- Arduino教程
- Arduino - 主页
- Arduino - 概述
- Arduino - 板描述
- Arduino - 安装
- Arduino - 程序结构
- Arduino - 数据类型
- Arduino - 变量和常量
- Arduino - 操作员
- Arduino - 控制语句
- Arduino - 循环
- Arduino - 功能
- Arduino - 字符串
- Arduino - 字符串对象
- Arduino - 时间
- Arduino - 数组
- Arduino 函数库
- Arduino - I/O 函数
- Arduino - 高级 I/O 功能
- Arduino - 字符函数
- Arduino - 数学库
- Arduino - 三角函数
- Arduino高级版
- Arduino - 到期与归零
- Arduino - 脉宽调制
- Arduino - 随机数
- Arduino - 中断
- Arduino - 通信
- Arduino - 内部集成电路
- Arduino - 串行外设接口
- Arduino 项目
- Arduino - LED 闪烁
- Arduino - LED 褪色
- Arduino - 读取模拟电压
- Arduino - LED 条形图
- Arduino - 键盘注销
- Arduino - 键盘消息
- Arduino - 鼠标按钮控制
- Arduino - 键盘串口
- Arduino 传感器
- Arduino - 湿度传感器
- Arduino - 温度传感器
- Arduino - 水检测器/传感器
- Arduino - PIR 传感器
- Arduino - 超声波传感器
- Arduino - 连接开关
- 电机控制
- Arduino - 直流电机
- Arduino - 伺服电机
- Arduino - 步进电机
- Arduino 和声音
- Arduino - 音调库
- Arduino - 无线通信
- Arduino - 网络通信
- Arduino 有用资源
- Arduino - 快速指南
- Arduino - 有用的资源
- Arduino - 讨论
Arduino - LED 褪色
此示例演示了如何使用 AnalogWrite() 函数使 LED 逐渐熄灭。AnalogWrite 使用脉冲宽度调制 (PWM),以不同的开和关比率快速打开和关闭数字引脚,以产生淡入淡出效果。
所需组件
您将需要以下组件 -
- 1 × 面包板
- 1 × Arduino Uno R3
- 1×LED
- 1×330Ω电阻
- 2 × 跳线
程序
按照电路图并将组件连接到面包板上,如下图所示。

注意- 要找出 LED 的极性,请仔细观察。两条腿中较短的一条,朝向灯泡的平坦边缘,表示负极端子。

电阻器等组件需要将其端子弯曲成 90° 角,以便正确安装面包板插座。您也可以将端子剪短。

草图
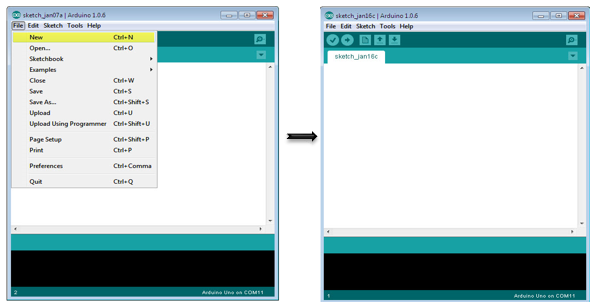
在计算机上打开 Arduino IDE 软件。使用 Arduino 语言进行编码将控制您的电路。单击“新建”打开新的草图文件。
Arduino代码
/*
   Fade
   This example shows how to fade an LED on pin 9 using the analogWrite() function.

   The analogWrite() function uses PWM, so if you want to change the pin you're using, be
   sure to use another PWM capable pin. On most Arduino, the PWM pins are identified with
   a "~" sign, like ~3, ~5, ~6, ~9, ~10 and ~11.
*/

int led = 9; // the PWM pin the LED is attached to
int brightness = 0; // how bright the LED is
int fadeAmount = 5; // how many points to fade the LED by
// the setup routine runs once when you press reset:

void setup() {
   // declare pin 9 to be an output:
   pinMode(led, OUTPUT);
}

// the loop routine runs over and over again forever:

void loop() {
   // set the brightness of pin 9:
   analogWrite(led, brightness);
   // change the brightness for next time through the loop:
   brightness = brightness + fadeAmount;
   // reverse the direction of the fading at the ends of the fade:
   if (brightness == 0 || brightness == 255) {
      fadeAmount = -fadeAmount ;
   }
   // wait for 30 milliseconds to see the dimming effect
   delay(300);
}
注意事项代码
将引脚 9 声明为 LED 引脚后,代码的 setup() 函数中无需执行任何操作。您将在代码主循环中使用的 AnalogWrite() 函数需要两个参数:一个告诉函数要写入哪个引脚,另一个指示要写入什么 PWM 值。
为了使 LED 逐渐关闭和打开,请逐渐将 PWM 值从 0(一直关闭)增加到 255(一直打开),然后再回到 0,以完成循环。在上面给出的草图中,PWM 值是使用称为亮度的变量来设置的。每次循环时,它都会增加变量fadeAmount的值。
如果亮度处于其值的任一极端(0 或 255),则 fadeAmount 将更改为其负值。换句话说,如果 fadeAmount 为 5,则将其设置为 -5。如果它是 -5,则将其设置为 5。下一次循环时,此更改也会导致亮度改变方向。
AnalogWrite()可以非常快地改变 PWM 值,因此草图末尾的延迟控制了淡入淡出的速度。尝试更改延迟值,看看它如何改变淡入淡出效果。
结果
您应该会看到 LED 亮度逐渐变化。