- 三.js教程
- Three.js - 主页
- Three.js - 简介
- Three.js - 安装
- Three.js - Hello Cube 应用程序
- Three.js - 渲染器和响应能力
- Three.js - 响应式设计
- Three.js - 调试和统计
- Three.js - 相机
- Three.js - 控件
- Three.js - 光与影
- Three.js - 几何
- Three.js - 材料
- Three.js - 纹理
- Three.js - 画线
- Three.js - 动画
- Three.js - 创建文本
- Three.js - 加载 3D 模型
- Three.js - 库和插件
- Three.js 有用资源
- Three.js - 快速指南
- Three.js - 有用的资源
- Three.js - 讨论
Three.js - 快速指南
Three.js - 简介
所有现代浏览器都变得更强大并且更容易直接使用 JavaScript 进行访问。他们采用了 WebGL(Web 图形库),这是一种 JavaScript API,允许您使用 GPU(图形处理单元)的功能在任何兼容的 Web 浏览器中渲染高性能交互式 3D 和 2D 图形。
但 WebGL 是一个非常低级的系统,只能绘制点、正方形和直线等基本对象。然而,直接从 JavaScript 进行 WebGL 编程是一个非常复杂且冗长的过程。您需要了解 WebGL 的内部细节并学习复杂的着色器语言才能充分利用 WebGL。Three.js来了,让您的生活变得轻松。
什么是 Three.js?
Three.js 是一个开源、轻量级、跨浏览器、通用 JavaScript 库。Three.js 在后台使用 WebGL,因此您可以使用它在浏览器中的 HTML <canvas> 元素上渲染图形。由于 Three.js 使用 JavaScript,因此您可以与其他网页元素进行交互,添加动画和交互,甚至创建具有某些逻辑的游戏。
为什么使用 Three.js?
以下功能使 Three.js 成为一个优秀的库。
您只需使用 JavaScript 即可创建复杂的 3D 图形。
您可以在浏览器内创建虚拟现实 (VR) 和增强现实 (AR) 场景。
由于它使用WebGL,因此它具有跨浏览器支持。许多浏览器都支持它。
您可以添加各种材质、纹理和动画 3D 对象。
您还可以从其他 3D 建模软件加载和处理对象。
只需几行 JavaScript 和简单的逻辑,您就可以创建任何内容,从高性能交互式 3D 模型到逼真的实时场景。
这些是使用 Three.js 创建的一些优秀网站−
你可以在Three.js的官方网站上找到很多其他的例子
浏览器支持
桌面和移动设备上的所有现代浏览器目前都支持 WebGL。您唯一需要注意的浏览器是移动 Opera Mini 浏览器。对于 IE 10 及更早版本,有 IEWebGL 插件,您可以从https://github.com/iewebgl/iewebgl./您可以在此处找到有关 WebGL 浏览器支持的详细信息。
一旦您了解了 Three.js 是什么,您就可以继续阅读下一章,了解如何设置项目以开始使用 Three.js。
Three.js - 安装
有多种方法可以将 Three.js 包含在您的项目中。您可以使用以下任意方法来开始使用 Three.js。然后打开您最喜欢的代码编辑器并开始。
下载完整的 Three.js 项目
将完整的 Three.js 项目下载到您的系统中。您可以在此处或从GitHub下载。解压 Three.js-master.zip 文件并查看 build 文件夹内部。你可以找到两个三.js,三.min.js,这只是一个缩小版本。将这两个文件中的任何一个添加到您的项目文件夹中,并将它们链接到您的 HTML 文件。现在您可以在项目中使用 Three.js 了。
注意- 我们建议使用缩小版本,因为它加载速度更快。
将以下 <script> 标记插入到 HTML 的 <head> 元素中,其中包含 Threejs.min.js 文件的路径。
<script src='/path/to/threejs.min.js'></script>
使用 CDN 链接
您可以从 CDN(内容交付网络)链接文件,CDN 是一个专门用于托管文件的远程站点,以便您可以在线使用它们。您可以使用这些网站中的任何一个 -
将以下任意 <script> 标记插入 HTML 的 <head> 元素中。
<script src="https://cdnjs.cloudflare.com/ajax/libs/three.js/r127/three.min.js"></script>
或者
<script src="https://cdn.jsdelivr.net/npm/three@0.127.0/build/three.min.js"></script>
安装Three.js包
Three.js 也可以作为NPM 上的包提供。如果您的计算机上安装了 Node.js,则可以使用 npm 或yarn 安装它。
npm install three
或者
yarn add three
然后,您可以将 Three.js 从 Three.module.js 文件导入到您的 JavaScript 文件中
import * as THREE from 'three'
您可以将 Three.js 与任何 JavaScript 框架(如 React、Angular、Vue)一起使用。
完成项目设置后,让我们开始创建。
Three.js - Hello Cube 应用程序
与任何其他编程语言一样,让我们通过创建“Hellocube!”来开始学习 Three.js。应用程序。
超文本标记语言
<!DOCTYPE html>
<html>
   <head>
      <meta name="viewport" content="width=device-width, initial-scale=1" />
      <meta charset="UTF-8" />
      <title>Three.js - Hello cube</title>
      <style>
         /* Our CSS goes here */
      </style>
      <script src="https://cdnjs.cloudflare.com/ajax/libs/three.js/r127/three.min.js"></script>
   </head>
   <body>
      <div id="threejs-container">
         <!-- Our output to be rendered here →
      </div>
      <script type="module">
         // our JavaScript code goes here
      </script>
   </body>
</html>
正如您所看到的,它只是一个带有 Three.js CDN 的简单 HTML 文件。
CSS
<style>
* {
   margin: 0;
   padding: 0;
   box-sizing: border-box;
   font-family: -apple-system, BlinkMacSystemFont, "Segoe UI", Roboto,
   Oxygen,
   Ubuntu, Cantarell, "Open Sans", "Helvetica Neue", sans-serif;
}
html,
body {
   height: 100vh;
   width: 100vw;
}
#threejs-container{
   position: block;
   width: 100%;
   height: 100%;
}
</style>
上面的CSS只是HTML页面的基本样式。Threejs-容器占据了整个屏幕。
JavaScript
这就是我们的 Three.js 应用程序发挥作用的地方。下面的代码在屏幕中间渲染一个立方体。所有这些代码都将进入 HTML 中的空 <script> 标记。
const width = window.innerWidth
const height = window.innerHeight
// Scene
const scene = new THREE.Scene()
scene.background = new THREE.Color('#00b140')
// Camera
const fov = 45 // AKA Field of View
const aspect = window.innerWidth / window.innerHeight
const near = 0.1 // the near clipping plane
const far = 100 // the far clipping plane
const camera = new PerspectiveCamera(fov, aspect, near, far)
camera.position.set(0, 0, 10)
// Renderer
const renderer = new THREE.WebGLRenderer()
renderer.setSize(window.innerWidth, window.innerHeight)
renderer.setPixelRatio(Math.min(window.devicePixelRatio, 2))
// Creating a cube
const geometry = new THREE.BoxGeometry(2, 2, 2)
const material = new THREE.MeshBasicMaterial({ wireframe: true })
const cube = new THREE.Mesh(geometry, material)
scene.add(cube)
// Rendering the scene
const container = document.querySelector('#threejs-container')
container.append(renderer.domElement)
renderer.render(scene, camera)
让我们一次一步地讨论代码,然后您可以在接下来的章节中获得有关每个元素的更多信息。我们需要做的第一件事是创建场景、相机和渲染器。这些是构成每个 Three.js 应用程序的基本组件。
现场
const scene = new THREE.Scene()
scene.background = new THREE.Color('#262626')
场景作为我们在屏幕上看到的所有内容的容器,如果没有 THREE.Scene 对象,Three.js 就无法渲染任何内容。背景颜色是深灰色,这样我们就可以看到立方体。
相机
const camera = new PerspectiveCamera(fov, aspect, near, far)
camera.position.set(0, 0, 10)
相机对象定义了渲染场景时我们将看到的内容。相机的类型不多,但类型不同,但在本例中,您将使用 PerspectiveCamera,它与我们的眼睛观察世界的方式相匹配。
渲染器
const renderer = new THREE.WebGLRenderer()
renderer.setSize(window.innerWidth, window.innerHeight)
渲染器对象负责根据相机计算场景在浏览器中的外观。渲染器有不同类型,但我们主要使用 WebGLRenderer,因为大多数浏览器都支持 WebGL。
除了创建渲染器实例之外,我们还需要设置渲染应用程序的大小。最好使用我们想要用我们的应用程序 The Cube 填充的区域的宽度和高度 - 在本例中是浏览器窗口的宽度和高度。
立方体
const geometry = new THREE.BoxGeometry(2, 2, 2)
const material = new THREE.MeshBasicMaterial({
   color: 0xffffff,
   wireframe: true,
})
const cube = new THREE.Mesh(geometry, material)
scene.add(cube)
上面的代码在屏幕中央创建了一个简单的立方体。我们可以使用 THREE.Mesh 制作任何物体。网格需要两个对象:几何体和材质。网格的几何形状定义了其形状,材料决定了对象的表面属性。
要创建立方体,我们需要 BoxGeometry 和颜色为 0xffffff 的主要材质 (MeshBasicMaterial)。如果将wireframe属性设置为true,它会告诉Three.js向我们显示一个线框而不是一个实体对象。
渲染场景
const container = document.querySelector('#threejs-container')
container.append(renderer.domElement)
renderer.render(scene, camera)
例子
最后但并非最不重要的一点是,我们将渲染器元素添加到 HTML 文档中。渲染器使用 <canvas> 元素向我们显示场景。在这种情况下,渲染器将 <canvas> 元素附加到 HTML 中的引用容器。
你好-cube-app.html
<!DOCTYPE html>
<html lang="en">
   <head>
      <meta charset="UTF-8" />
      <meta http-equiv="X-UA-Compatible" content="ie=edge" />
      <meta name="viewport" content="width=device-width, initial-scale=1.0" />
      <title>Three.js – Hello cube</title>
      <style>
         * {
            margin: 0;
            padding: 0;
            box-sizing: border-box;
            font-family: -applesystem, BlinkMacSystemFont, 'Segoe UI', Roboto, Oxygen, Ubuntu,
            Cantarell, 'Open Sans', 'Helvetica Neue', sans-serif;
         }
         html,
         body {
            height: 100vh;
            overflow: hidden;
            width: 100vw;
         }
         #threejs-container {
            position: block;
            width: 100%;
            height: 100%;
         }
      </style>
      <script src="https://cdnjs.cloudflare.com/ajax/libs/three.js/r128/three.min.js"></script>
   </head>
   <body>
      <div id="threejs-container"></div>
      <script type="module">
         // Hello Cube App
         // Your first Three.js application
         // sizes
         const width = window.innerWidth
         const height = window.innerHeight
         // scene
         const scene = new THREE.Scene()
         scene.background = new THREE.Color(0x262626)
         // camera
         const camera = new THREE.PerspectiveCamera(45, width / height, 0.1, 100)
         camera.position.set(0, 0, 10)
         // cube
         const geometry = new THREE.BoxGeometry(2, 2, 2)
         const material = new THREE.MeshBasicMaterial({
            color: 0xffffff,
            wireframe: true
         })
         const cube = new THREE.Mesh(geometry, material)
         scene.add(cube)
         // renderer
         const renderer = new THREE.WebGL1Renderer()
         renderer.setSize(width, height)
         renderer.setPixelRatio(Math.min(window.devicePixelRatio, 2))
         // rendering the scene
         const container = document.querySelector('#threejs-container')
         container.append(renderer.domElement)
         renderer.render(scene, camera)
      </script>
   </body>
</html>
输出
如果一切正常,输出看起来像这样。尝试一下代码以更好地理解它的工作原理。
您现在已经完成了第一个 Three.js 应用程序的创建。让我们继续为应用程序添加更多美感。
Three.js - 渲染器和响应能力
场景的基本功能
您知道场景是相机、灯光和我们要在屏幕上渲染的对象的容器。让我们看一下 Scene 对象的一些基本功能 -
添加对象
函数 add(object) 用于将对象添加到场景中。
const scene = THREE.Scene()
scene.add(cube) // adds the cube
scene.add(sphere) // adds a sphere
移除对象
函数remove(object)从场景中删除一个对象。
scene.remove(cube) // removes the last added cube
scene.remove(sphere) // removes a sphere
孩子们
在 scene.children 中返回场景中所有对象的数组,包括相机和灯光。
console.log(scene.children) // outputs all the objects in the scene
console.log(scene.children.length) // outputs number of elements on the
scene
注意- 我们可以使用名称属性为任何对象命名。名称对于调试目的很方便,但也可以直接访问场景中的对象。
查看以下示例。
场景.html
<!DOCTYPE html>
<html lang="en">
   <head>
      <meta charset="UTF-8" />
      <meta http-equiv="X-UA-Compatible" content="ie=edge" />
      <meta name="viewport" content="width=device-width, initial-scale=1.0" />
      <title>Three.js – The scene
      <style>
         * {
            margin: 0;
            padding: 0;
            box-sizing: border-box;
            font-family: -applesystem, BlinkMacSystemFont, 'Segoe UI', Roboto, Oxygen, Ubuntu,
               Cantarell, 'Open Sans', 'Helvetica Neue', sans-serif;
         }
         html,
         body {
            height: 100vh;
            width: 100vw;
            background-color: #262626;
            overflow: hidden;
         }
         #btn-conatiner {
            position: absolute;
            top: 0;
            left: 0;
            height: 10vh;
            width: 100%;
         }
         @media screen and (max-width:600px){
            #btn-container{
               display: flex;
               flex-direction: column;
            }
         }
         .btn {
            padding: 5px 15px;
            margin: 5px 15px;
            font-weight: bold;
            text-transform: uppercase;
         }
         .add {
            color: green;
         }
         .rem {
            color: red;
         }
         #threejs-container {
            position: block;
            width: 100%;
            height: 100%;
         }
      </style>
      <script src="https://cdnjs.cloudflare.com/ajax/libs/three.js/r128/three.min.js"></script>
      <script src="https://cdnjs.cloudflare.com/ajax/libs/dat-gui/0.7.7/dat.gui.js"></script>
   </head>
   <body>
      <div id="btn-conatiner">
         <button class="btn add">Add Cube</button>
         <button class="btn rem">Remove Cube</button>
      </div>
      <div id="threejs-container"></div>
      <script type="module">
         // Experimenting with different methods of scene
         // add, remove, children, getElementById
         // sizes
         let width = window.innerWidth
         let height = window.innerHeight
         const gui = new dat.GUI()
         // scene
         const scene = new THREE.Scene()
         scene.background = new THREE.Color(0x262626)
         // lights
         const ambientLight = new THREE.AmbientLight(0xffffff, 0.5)
         scene.add(ambientLight)
         const light = new THREE.PointLight(0xffffff, 0.5)
         light.position.set(-10, 10, -10)
         // for shadow
         light.castShadow = true
         light.shadow.mapSize.width = 1024
         light.shadow.mapSize.height = 1024
         light.shadow.camera.near = 0.1
         light.shadow.camera.far = 1000
         scene.add(light)
         // camera
         const camera = new THREE.PerspectiveCamera(45, width / height, 0.1, 1000)
         camera.position.set(0, 10, 40)
         camera.lookAt(0, 0, 0)
         gui.add(camera.position, 'z', 10, 200, 1).name('camera-z')
         // plane
         const planeGeometry = new THREE.PlaneGeometry(100, 100)
         const plane = new THREE.Mesh(
            planeGeometry,
            new THREE.MeshPhongMaterial({ color: 0xffffff, side: THREE.DoubleSide })
         )
         plane.rotateX(Math.PI / 2)
         plane.position.y = -1.75
         plane.receiveShadow = true
         scene.add(plane)
         // scene.add
         function addCube() {
            const cubeSize = Math.ceil(Math.random() * 3)
            const cubeGeometry = new THREE.BoxGeometry(cubeSize, cubeSize, cubeSize)const cubeMaterial = new THREE.MeshLambertMaterial({
               color: Math.random() * 0xffffff
            })
            const cube = new THREE.Mesh(cubeGeometry, cubeMaterial)
            cube.castShadow = true
            cube.name = 'cube-' + scene.children.length
            cube.position.x = -30 + Math.round(Math.random() * 50)
            cube.position.y = Math.round(Math.random() * 5)
            cube.position.z = -20 + Math.round(Math.random() * 50)
            scene.add(cube)
         }
         const add = document.querySelector('.add')
         add.addEventListener('click', () => {
            addCube()
            console.log('cube added')
         })
         // scene.remove
         function removeCube() {
            const allChildren = scene.children
            const lastObject = allChildren[allChildren.length - 1]
            if (lastObject.name) {
               scene.remove(lastObject)
            }
         }
         const remove = document.querySelector('.rem')
         remove.addEventListener('click', () => {
            removeCube()
            console.log('cube removed')
         })
         // scene.children
         console.log(scene.children)
         // responsivenesswindow.addEventListener('resize', () => {
            width = window.innerWidth
            height = window.innerHeight
            camera.aspect = width / height
            camera.updateProjectionMatrix()
            renderer.setSize(window.innerWidth, window.innerHeight)
            renderer.render(scene, camera)
         })
         // renderer
         const renderer = new THREE.WebGL1Renderer()
         renderer.setSize(width, height)
         renderer.setPixelRatio(Math.min(window.devicePixelRatio, 2))
         // animation
         function animate() {
            requestAnimationFrame(animate)
            renderer.render(scene, camera)
         }
         // rendering the scene
         const container = document.querySelector('#threejs-container')
         container.append(renderer.domElement)
         renderer.render(scene, camera)
         animate()
      </script>
   </body>
</html>
打开控制台查看场景中的元素。

使用名称属性
函数 scene.getObjectByName(name) 直接从场景中按特定名称返回对象。
您还可以添加另一个参数 - 递归。
scene.getObjectByName(name, recursive)
如果将递归参数设置为 true,Three.js 将搜索完整的对象树以查找具有指定名称的事物。
为场景添加雾
此属性允许您设置场景的雾。雾呈现出薄雾,遮盖了远处的物体。
scene.fog = new THREE.Fog(0xffffff, 0.015, 100)
这行代码定义了白雾(0xffffff)。您可以使用前面的两个属性来调整雾的显示方式。0.015 值设置近属性,100 值设置远属性。利用这些属性,您可以确定雾开始的位置以及雾变得更浓的速度。
对于 THREE.Fog 对象,雾会线性增加。还有一种不同的方式来设置场景的雾气;为此,请使用以下定义 -
scene.fog = new THREE.FogExp2(0xffffff, 0.01)
这次,我们不指定远近,只指定颜色(0xffffff)和雾的密度(0.01)。最好对这些属性进行一些试验以获得您想要的效果。
使用覆盖材质属性
overrideMaterial 属性强制场景中的所有对象使用相同的材质。
scene.overrideMaterial = new THREE.MeshLambertMaterial({ color: 0xffffff })
这里,场景中的所有物体采用相同的材质,即MeshLambertMaterial。
注意- THREE.Scene 是一种有时也称为Scenegraph 的结构。场景图是一种可以保存图形场景所有必要信息的结构。在 Three.js 中,这意味着 THREE.Scene 包含渲染所需的所有对象、灯光和其他对象。

渲染器
渲染器使用相机和场景中的信息在屏幕上绘制输出,即 <canvas> 元素。
在 Hello 立方体应用程序中,我们使用了 WebGLRenderer。还可以使用其他一些渲染器,但 WebGLRenderer 是迄今为止最强大的可用渲染器,并且通常是您唯一需要的渲染器。
注意- 有一个基于 canvas 的渲染器、一个基于 CSS 的渲染器和一个基于 SVG 的渲染器。尽管它们可以工作并且可以渲染简单的场景,但我不建议使用它们。它们的开发并不积极,非常消耗 CPU,并且缺乏良好的材质支持和阴影等功能。
Three.js - 响应式设计
在调整屏幕大小时,您可以观察到场景没有响应。使网页响应通常是指页面在不同尺寸的显示器(从台式机、平板电脑到手机)上显示良好。在本章中,您可以了解如何解决 Three.js 应用程序的一些基本问题。
当浏览器尺寸改变时自动调整输出大小
当您调整浏览器大小时,我们必须通知 Three.js 以了解 <canvas> 元素应该有多宽。对于相机,我们需要更新纵横比属性,该属性保存屏幕的纵横比,对于渲染器,我们需要更改其大小。
window.addEventListener('resize', () => {
   // update display width and height
   width = window.innerWidth
   height = window.innerHeight
   // update camera aspect
   camera.aspect = width / height
   camera.updateProjectionMatrix()
   // update renderer
   renderer.setSize(width, height)
   renderer.setPixelRatio(Math.min(window.devicePixelRatio, 2))
   renderer.render(scene, camera)
})
例子
上面的代码为您的 Three.js 项目提供了响应能力。
调整浏览器大小.html
<!DOCTYPE html>
<html lang="en">
   <head>
      <meta charset="UTF-8" />
      <meta http-equiv="X-UA-Compatible" content="ie=edge" />
      <meta name="viewport" content="width=device-width, initial-scale=1.0" />
      <title>Three.js – Resizing browser</title>
      <style>
         * {
            margin: 0;
            padding: 0;
            box-sizing: border-box;
            font-family: -applesystem, BlinkMacSystemFont, 'Segoe UI', Roboto, Oxygen, Ubuntu,
            Cantarell, 'Open Sans', 'Helvetica Neue', sans-serif;
         }
         html,
         body {
            height: 100vh;
            width: 100vw;
         }
         #threejs-container {
            position: block;
            width: 100%;
            height: 100%;
         }
      </style>
      <script src="https://cdnjs.cloudflare.com/ajax/libs/three.js/r128/three.min.js"></script>
      <script src="https://cdnjs.cloudflare.com/ajax/libs/dat-gui/0.7.7/dat.gui.js"></script>
   </head>
   <body>
      <div id="threejs-container"></div>
      <script type="module">
         // Adding responsiveness for Three.js
         // sizes
         let width = window.innerWidth
         let height = window.innerHeight
         const gui = new dat.GUI()
         // scene
         const scene = new THREE.Scene()
         scene.background = new THREE.Color(0x262626)
         // camera
         const camera = new THREE.PerspectiveCamera(45, width / height, 0.1, 100)
         camera.position.set(0, 0, 10)
         // cube
         const geometry = new THREE.BoxGeometry(2, 2, 2)
         const material = new THREE.MeshBasicMaterial({
            color: 0xffffff,
            wireframe: true
         })
         const cube = new THREE.Mesh(geometry, material)
         scene.add(cube)
         // responsiveness
         window.addEventListener('resize', () => {
            width = window.innerWidth
            height = window.innerHeight
            camera.aspect = width / height
            camera.updateProjectionMatrix()
            renderer.setSize(window.innerWidth, window.innerHeight)
            renderer.render(scene, camera)
         })
         // renderer
         const renderer = new THREE.WebGL1Renderer()
         renderer.setSize(width, height)
         renderer.setPixelRatio(Math.min(window.devicePixelRatio, 2))
         // animation
         function animate() {
            requestAnimationFrame(animate)
            cube.rotation.x += 0.005
            cube.rotation.y += 0.01
            renderer.render(scene, camera)
          }
         // rendering the scene
         const container = document.querySelector('#threejs-container')
         container.append(renderer.domElement)
         renderer.render(scene, camera)
         animate()
      </script>
   </body>
</html>
输出
当您执行代码时,它将产生以下输出 -
现在,调整浏览器的大小。由于响应式设计,该对象始终会重新定位在浏览器的中心。
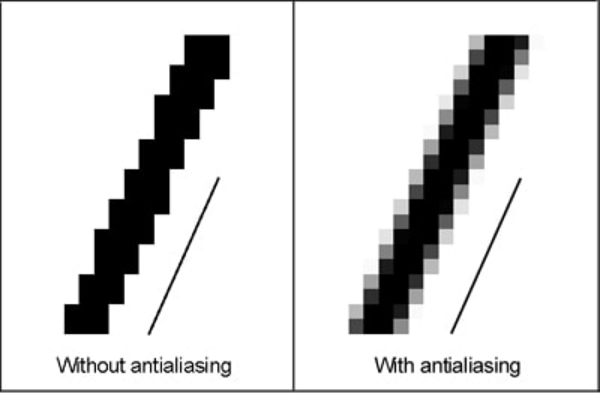
抗锯齿
锯齿效应是指边缘和对象(使用像素渲染)上出现锯齿状边缘或“锯齿”(也称为阶梯线)。
例子
抗锯齿.html
<!DOCTYPE html>
<html lang="en">
   <head>
      <meta charset="UTF-8" />
      <meta http-equiv="X-UA-Compatible" content="ie=edge" />
      <meta name="viewport" content="width=device-width, initial-scale=1.0" />
      <title>Three.js - Anti-aliasing</title>
      <style>
         * {
            margin: 0;
            padding: 0;
            box-sizing: border-box;
            font-family: -applesystem, BlinkMacSystemFont, 'Segoe UI', Roboto, Oxygen, Ubuntu,
            Cantarell, 'Open Sans', 'Helvetica Neue', sans-serif;
         }
         html,
         body {
            height: 100vh;
            width: 100vw;
         }
         #threejs-container {
            position: block;
            width: 100%;
            height: 100%;
         }
      </style>
      <script src="https://cdnjs.cloudflare.com/ajax/libs/three.js/r128/three.min.js"></script>
      <script src="https://cdnjs.cloudflare.com/ajax/libs/dat-gui/0.7.7/dat.gui.js"></script>
   </head>
   <body>
      <div id="threejs-container"></div>
      <script type="module">
         // Adding anti-aliasing to Three.js app for removing jaggies
         // sizes
         let width = window.innerWidth
         let height = window.innerHeight
         const gui = new dat.GUI()
         // scene
         const scene = new THREE.Scene()
         scene.background = new THREE.Color(0x262626)
         // camera
         const camera = new THREE.PerspectiveCamera(45, width / height, 0.1, 100)
         camera.position.set(0, 0, 10)
         // cube
         const geometry = new THREE.BoxGeometry(2, 2, 2)
         const material = new THREE.MeshBasicMaterial({
            color: 0xffffff,
            wireframe: true
         })
         const cube = new THREE.Mesh(geometry, material)
         scene.add(cube)
         // responsiveness
         window.addEventListener('resize', () => {
            width = window.innerWidth
            height = window.innerHeight
            camera.aspect = width / height
            camera.updateProjectionMatrix()
            renderer.setSize(window.innerWidth, window.innerHeight)
            renderer.render(scene, camera)
         })
         // renderer - anti-aliasing
         const renderer = new THREE.WebGLRenderer({ antialias: true })
         renderer.physicallyCorrectLights = true
         renderer.setSize(width, height)
         renderer.setPixelRatio(Math.min(window.devicePixelRatio, 2))
         // animation
         function animate() {
            requestAnimationFrame(animate)
            cube.rotation.x += 0.005
            cube.rotation.y += 0.01
            renderer.render(scene, camera)
         }
         // rendering the scene
         const container = document.querySelector('#threejs-container')
         container.append(renderer.domElement)
         renderer.render(scene, camera)
         animate()
      </script>
   </body>
</html>
输出
我们的 Hello 立方体应用程序中的别名如下所示。

我们可以通过将 WebGLRenderer 的 antialias 属性设置为 true 来打开抗锯齿功能。默认情况下,它是错误的。在这里,我们将抗锯齿参数设置为 true -
const renderer = new WebGLRenderer({ antialias: true })
renderer.physicallyCorrectLights = true
抗锯齿后,它看起来很平滑,没有锯齿,如下图所示。
physicalCorrectLights 属性告诉 Three.js 是否使用物理上正确的光照模式。默认为 false。将其设置为 true 有助于增加对象的细节。
Three.js - 调试和统计
使用Dat.GUI
不断尝试变量的值(例如立方体的位置)是很困难的。在这种情况下,假设直到你得到你喜欢的东西。这是一个缓慢而艰巨的过程。幸运的是,已经有一个很好的解决方案可以与 Three.js、dat.GUI 完美集成。它允许您创建一个可以更改代码中变量的基本用户界面组件。
安装
要在您的项目中使用 dat.GUI,请在此处下载并将 <script> 标记添加到 HTML 文件中。
<script type='text/javascript' src='path/to/dat.gui.min.js'></script>
或者您可以使用 CDN,在 HTML 中添加以下 <script> 标记。
<script src="https://cdnjs.cloudflare.com/ajax/libs/dat-gui/0.7.7/dat.gui.js"></script>
如果您在节点应用程序中使用 Three.js,请安装 npm 包 - dat.GUI 并将其导入您的 JavaScript 文件中。
npm install dat.gui
或者
yarn add dat.gui
import * as dat from 'dat.gui'
用法
首先,您应该初始化对象本身。它创建一个小部件并将其显示在屏幕右上角。
const gui = new dat.GUI()
然后,您可以添加要控制的参数和变量。例如,下面的代码是控制立方体的y位置。
gui.add(cube.position, 'y')
例子
尝试添加其他位置变量。请参阅此工作代码示例。
立方体.html
<!DOCTYPE html>
<html lang="en">
   <head>
      <meta charset="UTF-8" />
      <meta http-equiv="X-UA-Compatible" content="ie=edge" />
      <meta name="viewport" content="width=device-width, initial-scale=1.0" />
      <title>Three.js - Position GUI</title>
      <style>
         * {
            margin: 0;
            padding: 0;
            box-sizing: border-box;
            font-family: -applesystem, BlinkMacSystemFont, 'Segoe UI', Roboto, Oxygen, Ubuntu,
            Cantarell, 'Open Sans', 'Helvetica Neue', sans-serif;
         }
         html,
         body {
            height: 100vh;
            width: 100vw;
         }
         #threejs-container {
            position: block;
            width: 100%;
            height: 100%;
         }
      </style>
      <script src="https://cdnjs.cloudflare.com/ajax/libs/three.js/r128/three.min.js"></script>
      <script src="https://cdnjs.cloudflare.com/ajax/libs/dat-gui/0.7.7/dat.gui.js"></script>
   </head>
   <body>
      <div id="threejs-container"></div>
      <script type="module">
         // Adding UI to debug and experimenting different values
         // UI
         const gui = new dat.GUI()
         // sizes
         let width = window.innerWidth
         let height = window.innerHeight
         // scene
         const scene = new THREE.Scene()
         scene.background = new THREE.Color(0x262626)
         // camera
         const camera = new THREE.PerspectiveCamera(45, width / height, 0.1, 100)
         camera.position.set(0, 0, 10)
         // cube
         const geometry = new THREE.BoxGeometry(2, 2, 2)
         const material = new THREE.MeshBasicMaterial({
            color: 0xffffff,
            wireframe: true
         })
         gui.add(material, 'wireframe')
         const cube = new THREE.Mesh(geometry, material)
         scene.add(cube)
         gui.add(cube.position, 'x')
         gui.add(cube.position, 'y')
         gui.add(cube.position, 'z')
         // responsiveness
         window.addEventListener('resize', () => {
            width = window.innerWidth
            height = window.innerHeight
            camera.aspect = width / height
            camera.updateProjectionMatrix()
            renderer.setSize(window.innerWidth, window.innerHeight)
            renderer.render(scene, camera)
         })
         // renderer
         const renderer = new THREE.WebGL1Renderer()
         renderer.setSize(width, height)
         renderer.setPixelRatio(Math.min(window.devicePixelRatio, 2))
         // animation
         function animate() {
            requestAnimationFrame(animate)
            cube.rotation.x += 0.005
            cube.rotation.y += 0.01
            renderer.render(scene, camera)
         }
         // rendering the scene
         const container = document.querySelector('#threejs-container')
         container.append(renderer.domElement)
         renderer.render(scene, camera)
         animate()
      </script>
   </body>
</html>
输出
您可以使用 name 属性自定义显示的标签。要更改变量行上的标签,请使用 .name("your label")。
gui.add(cube.position, 'y').name('cube-y')
您可以设置最小/最大限制以及获取滑块的步骤。以下行允许值从 1 到 10,每次将值增加 1。
gui.add(cube.position, 'y').min(1).max(10).step(1)
// or
gui.add(cube.position, 'y', 1, 10, 1)
如果有许多同名的变量,您可能会发现很难区分它们。在这种情况下,您可以为每个对象添加文件夹。与对象相关的所有变量都位于一个文件夹中。
// creating a folder
const cube1 = gui.addFolder('Cube 1')
cube1.add(redCube.position, 'y').min(1).max(10).step(1)
cube1.add(redCube.position, 'x').min(1).max(10).step(1)
cube1.add(redCube.position, 'z').min(1).max(10).step(1)
// another folder
const cube2 = gui.addFolder('Cube 2')
cube2.add(greenCube.position, 'y').min(1).max(10).step(1)
cube2.add(greenCube.position, 'x').min(1).max(10).step(1)
cube2.add(greenCube.position, 'z').min(1).max(10).step(1)
例子
现在,检查以下示例。
gui-folders.html
<!DOCTYPE html>
<html lang="en">
   <head>
      <meta charset="UTF-8" />
      <meta http-equiv="X-UA-Compatible" content="ie=edge" />
      <meta name="viewport" content="width=device-width, initial-scale=1.0" />
      <title>Three.js - More variables</title>
      <style>
         * {
            margin: 0;
            padding: 0;
            box-sizing: border-box;
            font-family: -applesystem, BlinkMacSystemFont, 'Segoe UI', Roboto, Oxygen, Ubuntu,
               Cantarell, 'Open Sans', 'Helvetica Neue', sans-serif;
         }
         html,
         body {
            height: 100vh;
            width: 100vw;
         }
         #threejs-container {
            position: block;
            width: 100%;
            height: 100%;
         }
      </style>
      <script src="https://cdnjs.cloudflare.com/ajax/libs/three.js/r128/three.min.js"></script>
      <script src="https://cdnjs.cloudflare.com/ajax/libs/dat-gui/0.7.7/dat.gui.js"></script>
   </head>
   <body>
      <div id="threejs-container"></div>
      <script type="module">
         // Adding folders to distinguish between variables

         // controls
         const gui = new dat.GUI()
         // sizes
         let width = window.innerWidth
         let height = window.innerHeight
         // scene
         const scene = new THREE.Scene()
         scene.background = new THREE.Color(0x262626)
         // camera
         const camera = new THREE.PerspectiveCamera(45, width / height, 0.1, 100)
         camera.position.set(0, 0, 10)
         const camFolder = gui.addFolder('Camera')
         camFolder.add(camera.position, 'z').min(10).max(60).step(10)
         // cube
         const geometry = new THREE.BoxGeometry(2, 2, 2)
         const material = new THREE.MeshBasicMaterial({
            color: 0xffffff,
            wireframe: true
         })
         const cubeColor = {
            color: 0xffffff
         }
         const materialFolder = gui.addFolder('Material')
         materialFolder.add(material, 'wireframe')
         materialFolder.addColor(cubeColor, 'color').onChange(() => {
            // callback
            material.color.set(cubeColor.color)
         })
         materialFolder.open()
         const cube = new THREE.Mesh(geometry, material)
         scene.add(cube)
         const cubeFolder = gui.addFolder('Cube')
         // for position
         const posFolder = cubeFolder.addFolder('position')
         posFolder.add(cube.position, 'x', 0, 5, 0.1)
         posFolder.add(cube.position, 'y', 0, 5, 0.1)
         posFolder.add(cube.position, 'z', 0, 5, 0.1)
         posFolder.open()
         // for scale
         const scaleFolder = cubeFolder.addFolder('Scale')
         scaleFolder.add(cube.scale, 'x', 0, 5, 0.1).name('Width')
         scaleFolder.add(cube.scale, 'y', 0, 5, 0.1).name('Height')
         scaleFolder.add(cube.scale, 'z', 0, 5, 0.1).name('Depth')
         scaleFolder.open()
         cubeFolder.open()
         // responsiveness
         window.addEventListener('resize', () => {
            width = window.innerWidth
            height = window.innerHeight
            camera.aspect = width / height
            camera.updateProjectionMatrix()
            renderer.setSize(window.innerWidth, window.innerHeight)
            renderer.render(scene, camera)
         })
         // renderer
         const renderer = new THREE.WebGL1Renderer()
         renderer.setSize(width, height)
         renderer.setPixelRatio(Math.min(window.devicePixelRatio, 2))
         // animation
         function animate() {
         requestAnimationFrame(animate)
            cube.rotation.x += 0.005
            cube.rotation.y += 0.01
            renderer.render(scene, camera)
         }
         // rendering the scene
         const container = document.querySelector('#threejs-container')
         container.append(renderer.domElement)
         renderer.render(scene, camera)
         animate()
      </script>
   </body>
</html>
输出
您还可以添加一些回调函数。一旦值改变就会触发onChange。
gui.add(cube.position, 'y').onChange(function () {
   // refresh based on the new value of y
   console.log(cube.position.y)
})
让我们看一下使用 dat.gui 和回调更改颜色的另一个示例。
// parameter
const cubeColor = {
   color: 0xff0000,
}
gui.addColor(cubeColor, 'color').onChange(() => {
   // callback
   cube.color.set(cubeColor.color)
})
当cubeColor的颜色改变时,上面的回调onChange通知Three.js改变立方体的颜色。
从现在开始我们将经常使用这个 dat.gui。通过尝试“Hello Cube!”确保您习惯了它。应用程序。
统计- 统计在大规模应用中发挥着重要作用。
Three.js - 相机
相机类型
Three.js 中有两种类型的相机。
| 先生编号 | 相机及描述 |
|---|---|
| 1 | Three.js 中有不同的相机。最常见的相机也是我们一直使用的相机是 PerspectiveCamera。 |
| 2 | 第二个最常见的相机是正交相机。它指定一个具有左、右、上、下、近和远设置的框。它以二维方式表示三维物体。 |
让相机跟随物体
在动画函数中,我们使用camera.lookAt函数将相机指向对象的位置函数。我们在渲染的每一帧中都执行此操作。看起来相机完全跟随物体的位置。
function animate() {
   const object = scene.getObjectByName('sphere')
   renderer.render(scene, camera)
   camera.lookAt(object.position)
   requestAnimationFrame(render)
}
Three.js - 控件
您可以使用摄像机控制在场景中移动摄像机。Three.js 有许多摄像机控件,您可以使用它们来控制整个场景中的摄像机。您必须从GitHub单独获取控件。Three.js 库不包含这些。
| 先生编号 | 控制和说明 |
|---|---|
| 1 |
轨道控制允许摄像机围绕场景中心旋转。 |
| 2 |
TrackballControls 与 Orbit 控件类似。然而,它不保持恒定的相机向上矢量。 |
| 3 |
这些是类似飞行模拟器的控件。使用键盘和鼠标移动和驾驶。 |
| 4 |
PointerLockControls 实现内置浏览器 Pointer Lock API。 |
在本章中,我们看到了最有用的控件。一些开发人员正在为 Three.js 创建更有用的控件。您可以在这里看到一些其他控件,它们有详细的文档记录并且易于使用。
Three.js - 光与影
灯光使对象可见,类似地,在 Three.js 中,THREE.Light 照亮场景并使某些东西可见。并非所有材质都会受到光照的影响。MeshBasicMaterial 和 MeshNormalMaterial 是自发光的,因此它们不需要照明即可在场景中可见。但是,大多数其他材质(MeshLambertMaterial、MeshPhongMaterial、MeshStandardMaterial、MeshPhysicalMaterial 和 MeshToonMaterial)都可以。我们将在后续章节中讨论更多材料。在本章中,我们将重点介绍 Three.js 中不同类型的灯光。
每种光都具有颜色和强度属性。
color - (可选)灯光的十六进制颜色。默认值为 0xffffff(白色)。
强度- (可选)光强度/强度的数值。默认值为 1。
投射阴影
来自特定方向的光可以投射阴影。首先,我们应该让场景准备好投射阴影。
步骤 - 1
我们应该首先告诉渲染器我们要启用阴影。投射阴影是一项昂贵的操作。WebGLRenderer 仅支持此功能。它使用阴影映射,这是一种特定于 WebGL 的技术,直接在 GPU 上执行。
renderer.shadowMapEnabled = true
上面的代码行告诉渲染器在场景中投射阴影。
注意- Three.js 默认情况下使用阴影贴图。阴影贴图适用于投射阴影的光。场景渲染所有标记为从光的角度投射阴影的对象。
如果阴影的边缘看起来有点块状,则意味着阴影贴图太小。要增加阴影贴图大小,您可以为灯光定义shadowMapHeight 和shadowMapWidht 属性。或者,您也可以尝试更改WebGLRenderer的shadowMapType属性。您可以将其设置为 THREE.BasicShadowMap、THREE.PCFShadowMap 或 THREE.PCFSoftShadowMap。
// to antialias the shadow
renderer.shadowMapType = THREE.PCFSoftShadowMap
// or
directionalLight.shadowMapWidth = 2048
directionalLight.shadowMapHeight = 2048
步骤 - 2
您应该配置对象来投射阴影。您可以告知 Three.js 哪些对象可以投射阴影以及哪些对象可以接收阴影。
object.castShadow = true
object.recieveShadow = true
步骤 - 3
上述所有步骤对于每个灯都是相同的。下一步是设置与阴影相关的属性。
light.castShadow = true
light.shadow.camera.near = 10
light.shadow.camera.far = 100
light.shadow.camera.left = -50
light.shadow.camera.right = 50
light.shadow.camera.top = 50
light.shadow.camera.bottom = -50
第一个属性castShadow告诉Three.js这个光投射阴影。由于投射阴影是一项昂贵的操作,因此我们需要定义阴影可以出现的区域。您可以使用shadow.camera.near、shadow.camera.far 和shadow.camera.left 等属性来完成此操作。利用上述属性,我们创建了一个类似盒子的区域,Three.js 在此渲染阴影。
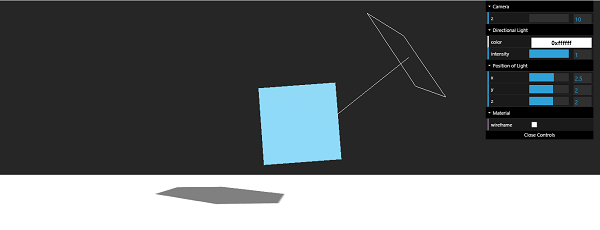
例子
在此示例中探索更多内容。
定向.html
<!DOCTYPE html>
<html lang="en">
   <head>
      <meta charset="UTF-8" />
      <meta http-equiv="X-UA-Compatible" content="ie=edge" />
      <meta name="viewport" content="width=device-width, initial-scale=1.0" />
      <title>Three.js - Directional Light</title>
      <style>
         * {
            margin: 0;
            padding: 0;
            box-sizing: border-box;
            font-family: -applesystem, BlinkMacSystemFont, 'Segoe UI', Roboto, Oxygen, Ubuntu,
            Cantarell, 'Open Sans', 'Helvetica Neue', sans-serif;
         }
         html,
         body {
            height: 100vh;
            width: 100vw;
         }
         #threejs-container {
            position: block;
            width: 100%;
            height: 100%;
         }
      </style>
      <script src="https://cdnjs.cloudflare.com/ajax/libs/three.js/r128/three.min.js"></script>
      <script src="https://cdnjs.cloudflare.com/ajax/libs/dat-gui/0.7.7/dat.gui.js"></script>
   </head>
   <body>
   <div id="container"></div>
      <script type="module">
         // Adding directional light to the scene
         // The lights falls from the light only in one direction.
         // You can see the position of light using helpers provided in Three.j
         s for debugging purposes

         // GUI
         const gui = new dat.GUI()
         // sizes
         let width = window.innerWidth
         let height = window.innerHeight
         // scene
         const scene = new THREE.Scene()
         scene.background = new THREE.Color(0x262626)
         // camera
         const camera = new THREE.PerspectiveCamera(45, width / height, 0.1, 1000)
         camera.position.set(0, 0, 10)
         const camFolder = gui.addFolder('Camera')
         camFolder.add(camera.position, 'z', 10, 80, 1)
         camFolder.open()
         // lights
         const ambientLight = new THREE.AmbientLight(0xffffff, 0.5)
         scene.add(ambientLight)
         const light = new THREE.DirectionalLight()
         light.position.set(2.5, 2, 2)
         light.castShadow = true
         light.shadow.mapSize.width = 512
         light.shadow.mapSize.height = 512
         light.shadow.camera.near = 0.5
         light.shadow.camera.far = 100
         scene.add(light)
         const helper = new THREE.DirectionalLightHelper(light)
         scene.add(helper)
         // light controls
         const lightColor = {
            color: light.color.getHex()
         }
         const lightFolder = gui.addFolder('Directional Light')
         lightFolder.addColor(lightColor, 'color').onChange(() => {
         light.color.set(lightColor.color)
         })
         lightFolder.add(light, 'intensity', 0, 1, 0.01)
         lightFolder.open()
         const directionalLightFolder = gui.addFolder('Position of Light')
         directionalLightFolder.add(light.position, 'x', -10, 10, 0.1)
         directionalLightFolder.add(light.position, 'y', -10, 10, 0.1)
         directionalLightFolder.add(light.position, 'z', -10, 10, 0.1)
         directionalLightFolder.open()
         // plane
         const planeGeometry = new THREE.PlaneGeometry(100, 20)
         const plane = new THREE.Mesh(planeGeometry, new THREE.MeshPhongMateria
         l({ color: 0xffffff }))
         plane.rotateX(-Math.PI / 2)
         plane.position.y = -1.75
         plane.receiveShadow = true
         scene.add(plane)
         // cube
         const geometry = new THREE.BoxGeometry(2, 2, 2)
         const material = new THREE.MeshStandardMaterial({
            color: 0x87ceeb
         })
         const materialFolder = gui.addFolder('Material')
         materialFolder.add(material, 'wireframe')
         materialFolder.open()
         const cube = new THREE.Mesh(geometry, material)
         cube.position.set(0, 0.5, 0)
         cube.castShadow = true
         cube.receiveShadow = true
         scene.add(cube)
         // responsiveness
         window.addEventListener('resize', () => {
            width = window.innerWidth
            height = window.innerHeight
            camera.aspect = width / height
            camera.updateProjectionMatrix()
            renderer.setSize(window.innerWidth, window.innerHeight)
            renderer.render(scene, camera)
         })
         // renderer
         const renderer = new THREE.WebGL1Renderer()
         renderer.setSize(window.innerWidth, window.innerHeight)
         renderer.shadowMap.enabled = true
         renderer.shadowMap.type = THREE.PCFSoftShadowMap
         renderer.setPixelRatio(Math.min(window.devicePixelRatio, 2))
         // animation
         function animate() {
            requestAnimationFrame(animate)
            cube.rotation.x += 0.005
            cube.rotation.y += 0.01
            renderer.render(scene, camera)
         }
         // rendering the scene
         const container = document.querySelector('#container')
         container.append(renderer.domElement)
         renderer.render(scene, camera)
         animate()
      </script>
   </body>
</html>
输出
| 先生编号 | 灯光及说明 |
|---|---|
| 1 |
它是最基本的光,均匀地照亮整个场景。 |
| 2 |
定向光来自特定点并从远处直接发射到目标。 |
| 3 |
它是另一种来自圆锥体特定方向的光。 |
| 4 |
点光源是从一个点向各个方向发射光的光源。 |
| 5 |
它是一种用于创造自然光的特殊灯。 |
Three.js - 几何
几何图形用于在 Three.js 中创建和定义形状。Three.js 有许多类型的内置几何图形,包括 2D 和 3D。
在本章中,我们将讨论基本的内置几何图形。我们将首先查看 2D 几何图形,然后,我们将探索所有可用的基本 3D 几何图形。
| 先生编号 | 几何形状和描述 |
|---|---|
| 1 |
THREE.PlaneGeometry 创建一个简单的 2D 矩形。 |
| 2 |
THREE.CircleGeometry 创建一个简单的 2D 圆。 |
| 3 |
THREE.RingGeometry 创建一个中心有孔的 D 盘。 |
| 4 |
THREE.BoxGeometry 创建一个具有指定尺寸的简单 3D 框。 |
| 5 |
THREE.SphereGeometry 创建 3D 球体几何形状。 |
| 6 |
要在 Three.js 中创建圆柱体,您可以使用 Three.CylinderGeometry。 |
| 7 |
您可以使用 THREE.ConeGeometry 创建圆锥体。它与 CylinderGeometry 非常相似,不同之处在于它只允许您设置半径而不是 radiusTop 和 radiusBottom。 |
| 8 |
环面是一种管状形状,看起来像甜甜圈。您可以使用 THREE.TorusGeometry 在 Three.js 中创建圆环。 |
| 9 |
环面结是一种特殊的结,看起来像一根绕自身缠绕几圈的管子。 |
| 10 |
多面体是仅具有平面和直边的几何形状。 |
在此处了解有关几何形状的更多信息
Three.js - 材料
材料就像物体的皮肤。它定义了几何体的外观。Three.js 提供了许多工作材料。我们应该根据自己的需要来选择材料的类型。在本章中,我们将讨论 Three.js 中最常用的材料。
| 先生编号 | 材料及描述 |
|---|---|
| 1 |
它是 Three.js 中非常基本的材料。 |
| 2 |
它使用距相机的距离来确定如何以灰度级为网格着色。 |
| 3 |
该材质使用面部法线向量的 x/y/z 值的大小来计算和设置面部显示颜色的红色/绿色/蓝色值。 |
| 4 |
您可以使用这种材料创建暗淡、无光泽的表面。 |
| 5 |
此材质类似于 MeshLambertMaterial,但可以创建更有光泽的表面。 |
| 6 |
|