WCF - 快速指南
WCF - 概述
WCF 代表 Windows 通信基础。WCF 的基本特征是互操作性。它是微软用于构建面向服务的应用程序的最新技术之一。基于基于消息的通信的概念(其中统一表示 HTTP 请求),WCF 使得无论传输机制如何不同都可以拥有统一的 API。
WCF 于 2006 年作为 .NET 框架的一部分随 Windows Vista 首次发布,随后进行了多次更新。WCF 4.5 是目前广泛使用的最新版本。
WCF 应用程序由三个组件组成 -
- WCF服务,
- WCF 服务主机,以及
- WCF 服务客户端。
WCF 平台也称为服务模型。
WCF 的基本概念
信息
这是一个通信单元,由除机身之外的多个部分组成。对于客户端和服务之间的所有类型的通信,都会发送和接收消息实例。
端点
它定义了要发送或接收消息的地址。它还指定了通信机制来描述如何发送消息以及定义消息集。端点的结构由以下部分组成 -
地址
地址指定接收消息的确切位置,并指定为统一资源标识符 (URI)。表示为scheme://domain[:port]/[path]。看看下面提到的地址 -
net.tcp://localhost:9000/ServiceA
这里,“net.tcp”是 TCP 协议的方案。域是“localhost”,可以是计算机名称或 Web 域,路径是“ServiceA”。
捆绑
它定义端点通信的方式。它由一些构成通信基础设施的绑定元素组成。例如,绑定规定了用于传输的协议(如 TCP、HTTP 等)、消息编码格式以及与安全性和可靠性相关的协议。
合约
它是指定端点向客户端公开哪些功能的操作集合。它通常由接口名称组成。
托管
从 WCF 的角度来看,托管是指 WCF 服务托管,可以通过许多可用选项来完成,例如自托管、IIS 托管和 WAS 托管。
元数据
这是 WCF 的一个重要概念,因为它促进了客户端应用程序和 WCF 服务之间的轻松交互。通常,WCF 服务的元数据在启用时会自动生成,这是通过检查服务及其端点来完成的。
WCF客户端
为了以方法的形式公开服务操作而创建的客户端应用程序称为 WCF 客户端。这可以由任何应用程序托管,甚至是进行服务托管的应用程序。
渠道
通道是客户端与服务进行通信的媒介。不同类型的通道堆叠在一起,称为通道堆栈。
肥皂
尽管 SOAP 被称为“简单对象访问协议”,但它并不是一种传输协议;而是一种传输协议。相反,它是一个由标头和正文部分组成的 XML 文档。
WCF的优点
它可以与其他服务互操作。这与 .NET Remoting 形成鲜明对比,在 .NET Remoting 中客户端和服务都必须具有 .Net。
与 ASMX(主动服务器方法)Web 服务相比,WCF 服务提供增强的可靠性和安全性。
在 WCF 中实现安全模型和绑定更改不需要对编码进行重大更改。只需要进行一些配置更改即可满足限制。
WCF 具有内置的日志记录机制,而在其他技术中,必须进行必要的编码。
WCF 集成了 AJAX 并支持 JSON(JavaScript 对象表示法)。
它提供可扩展性并支持即将推出的 Web 服务标准。
它有一个非常强大的默认安全机制。
WCF - 与 Web 服务
WCF 和 Web 服务之间存在一些主要差异,如下所列。
属性- WCF 服务由 ServiceContract 和 OperationContract 属性定义,而 Web 服务由 WebService 和 WebMethod 属性定义。
协议- WCF 支持一系列协议,即 HTTP、命名管道、TCP 和 MSMQ,而 Web 服务仅支持 HTTP 协议。
托管机制- WCF 托管有多种激活机制,即 IIS(Internet 信息服务)、WAS(Windows 激活服务)、自托管和 Windows 服务,但 Web 服务仅由 IIS 托管。
服务- WCF 支持强大的安全性、可信的消息传递、事务和互操作性,而 Web 服务仅支持安全服务。
序列化器- WCF 通过使用 System.Runtime.Serialization 支持 DataContract 序列化器,而 Web 服务通过使用 System.Xml.Serialization 支持 XML 序列化器。
工具- ServiceMetadata 工具 (svcutil.exe) 用于生成 WCF 服务的客户端,而 WSDL.EXE 工具用于为 Web 服务生成相同的客户端。
异常处理- 在WCF中,通过使用FaultContract可以更好地处理未处理的异常。它们不会像 Web 服务中那样作为 SOAP 错误返回给客户端。
哈希表- 可以在 WCF 中序列化哈希表,但在 Web 服务中并非如此。
绑定- WCF 支持多种类型的绑定,如 BasicHttpBinding、WSDualHttpBinding、WSHttpBinding 等,而 Web 服务仅支持 SOAP 或 XML。
多线程- WCF 通过使用 ServiceBehavior 类支持多线程,而 Web 服务不支持多线程。
双工服务操作- WCF 除了支持单向和请求响应服务操作之外,还支持双工服务操作,而 Web 服务不支持双工服务操作。
WCF - 开发人员工具
开发WCF服务应用程序主要有两种工具——Microsoft Visual Studio和CodePlex。Microsoft Visual Studio 是一个完整的开发工具包,是开发大量不同应用程序(如 ASP.NET Web 应用程序、桌面应用程序、移动应用程序等)所必需的。
Microsoft Visual Studio 使用.NET 框架功能。另一方面,CodePlex 是 Microsoft 的开源项目托管站点,为 WCF 服务应用程序开发提供多种免费工具。
微软视觉工作室
Microsoft Visual Studio 有许多版本,最初它(Visual Studio 2005)并不是 WCF 开发的热心支持者。目前,Visual Studio 2008 是唯一可用于开发WCF 服务应用程序的Microsoft IDE。
如今,最新版本的Microsoft Visual Studio 2010也是开发WCF服务应用程序的首选工具。Visual Studio 中还有一个现成的模板用于开发 WCF 服务应用程序。
选择这样的模板会导致添加用于以下目的的文件 -
- 服务合同
- 服务实施
- 服务配置
Microsoft Visual Studio 会自动添加必要的属性,并创建一个简单的“Hello World”服务,甚至无需编写任何代码。
代码库
CodePlex 由 Microsoft 于 2006 年 6 月推出,自那时以来,它已被世界各地的大量开发人员用来成功创建 .NET 项目。CodePlex 提供的一些用于开发 WCF 服务应用程序的工具如下:
wscf.blue - 这是一个 Microsoft Visual Studio 插件,也是“契约优先”开发工具集,有助于定义 WCF 服务操作,并相应地生成代码框架。相同的重要链接是 - https://wscfblue.codeplex.com
WCFProxyGenerator - 这也是一个 Microsoft Visual Studio 插件。该工具用于扩展客户端生成并提供额外的错误处理。有关此特定开发工具的更多信息,请访问https://wcfproxygenerator.codeplex.com
WCFMock - WCF 服务的测试可能是一项复杂的任务,该开发工具通过其有用的类为 WCF 服务的单元测试提供了便捷的解决方案。有关此工具的更多信息,请访问https://wcfmock.codeplex.com
另一个用于轻松开发 WCF 服务应用程序的免费工具是 WCFStorm。它的 LITE 版本提供了许多引人注目的功能,用于动态调用和测试 WCF 服务、编辑服务绑定、修改 WCF URL 端点等。
WCF-架构
WCF 具有分层架构,为开发各种分布式应用程序提供充足的支持。下面详细解释该架构。
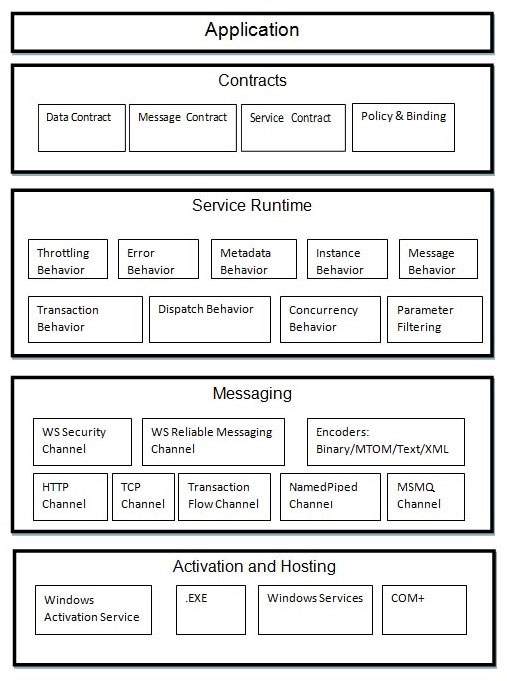
合约
合约层紧邻应用程序层,包含与现实世界合约类似的信息,该合约指定服务的操作以及它将生成的可访问信息的类型。合同基本上有四种类型,下面简要讨论 -
服务合同- 该合同向客户端以及外部世界提供有关端点产品以及通信过程中使用的协议的信息。
数据契约- 服务交换的数据由数据契约定义。客户端和服务都必须遵守数据合同。
消息契约- 数据契约由消息契约控制。它主要对 SOAP 消息参数的类型格式进行定制。这里需要提到的是,WCF 采用 SOAP 格式来进行通信。SOAP 代表简单对象访问协议。
策略和绑定- 与服务通信有某些先决条件,这些条件由策略和具有约束力的合同定义。客户需要遵守本合同。
服务运行时
服务运行时层位于合约层下方。它指定了运行时发生的各种服务Behave。有许多类型的Behave可以进行配置并属于服务运行时。
限制Behave- 管理处理的消息数量。
错误Behave- 定义任何内部服务错误发生的结果。
元数据Behave- 指定元数据对外界的可用性。
实例Behave- 定义需要创建的实例数量,以使它们可供客户端使用。
事务Behave- 在发生任何故障时启用事务状态的更改。
调度Behave- 控制 WCF 基础结构处理消息的方式。
并发Behave- 控制在客户端-服务器通信期间并行运行的功能。
参数过滤- 具有在调用方法之前验证方法参数的过程。
消息传递
该层由多个通道组成,主要处理两个端点之间要通信的消息内容。一组通道形成通道堆栈,构成通道堆栈的两种主要通道类型如下:
传输通道- 这些通道位于堆栈的底部,负责使用 HTTP、TCP、点对点、命名管道和 MSMQ 等传输协议发送和接收消息。
协议通道- 这些通道位于堆栈的顶部,也称为分层通道,通过修改消息来实现线路级协议。
激活和托管
WCF 体系结构的最后一层是实际托管服务或可以执行服务以便客户端轻松访问的地方。这是通过下面简要讨论的各种机制来完成的。
IIS - IIS 代表互联网信息服务。它通过服务使用 HTTP 协议提供了无数的优点。这里,不需要有主机码来激活服务码;相反,服务代码会自动激活。
Windows 激活服务- 这通常称为 WAS,随 IIS 7.0 一起提供。通过使用 TCP 或 Namedpipe 协议,HTTP 和基于非 HTTP 的通信都可以实现。
自托管- 这是一种 WCF 服务作为控制台应用程序进行自托管的机制。这种机制在选择所需协议和设置自己的寻址方案方面提供了惊人的灵活性。
Windows 服务- 使用此机制托管 WCF 服务是有利的,因为由于没有运行时激活,因此服务将保持激活状态并可供客户端访问。
WCF - 创建 WCF 服务
使用 Microsoft Visual Studio 2012 创建 WCF 服务是一项简单的任务。下面给出了创建 WCF 服务的分步方法以及所有必需的编码,以便更好地理解该概念。
- 启动 Visual Studio 2012。
- 单击“新项目”,然后在“Visual C#”选项卡中选择“WCF”选项。

创建的 WCF 服务执行基本算术运算,例如加法、减法、乘法和除法。主要代码位于两个不同的文件中——一个接口和一个类。
WCF 包含一个或多个接口及其实现的类。
using System;
using System.Collections.Generic;
using System.Linq;
using System.Runtime.Serialization;
using System.ServiceModel;
using System.Text;

namespace WcfServiceLibrary1 {
   // NOTE: You can use the "Rename" command on the "Refactor" menu to
   // change the interface name "IService1" in both code and config file
   // together.

   [ServiceContract]
   Public interface IService1 {
      [OperationContract]
      int sum(int num1, int num2);

      [OperationContract]
      int Subtract(int num1, int num2);

      [OperationContract]
      int Multiply(int num1, int num2);

      [OperationContract]
      int Divide(int num1, int num2);
   }

   // Use a data contract as illustrated in the sample below to add
   // composite types to service operations.

   [DataContract]
   Public class CompositeType {
      Bool boolValue = true;
      String stringValue = "Hello ";

      [DataMember]
      Public bool BoolValue {
         get { return boolValue; }
         set { boolValue = value; }
      }

      [DataMember]
      Public string StringValue {
         get { return stringValue; }
         set { stringValue = value; }
      }
   }
}
下面给出了其类背后的代码。
using System;
usingSystem.Collections.Generic;
usingSystem.Linq;
usingSystem.Runtime.Serialization;
usingSystem.ServiceModel;
usingSystem.Text;

namespace WcfServiceLibrary1 {
   // NOTE: You can use the "Rename" command on the "Refactor" menu to
   // change the class name "Service1" in both code and config file
   // together.

   publicclassService1 :IService1 {
      // This Function Returns summation of two integer numbers

      publicint sum(int num1, int num2) {
         return num1 + num2;
      }

      // This function returns subtraction of two numbers.
      // If num1 is smaller than number two then this function returns 0

      publicint Subtract(int num1, int num2) {
         if (num1 > num2) {
            return num1 - num2;
         }
         else {
            return 0;
         }
      }

      // This function returns multiplication of two integer numbers.
      publicint Multiply(int num1, int num2) {
         return num1 * num2;
      }

      // This function returns integer value of two integer number.
      // If num2 is 0 then this function returns 1.
      publicint Divide(int num1, int num2) {
         if (num2 != 0) {
            return (num1 / num2);
         } else {
            return 1;
         }
      }
   }
}
要运行此服务,请单击 Visual Studio 中的“开始”按钮。

当我们运行此服务时,会出现以下屏幕。
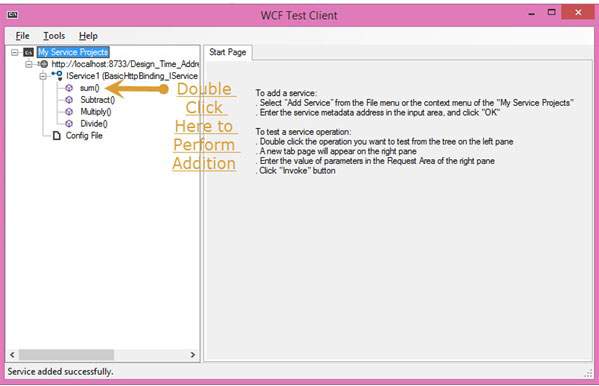
单击求和方法后,将打开以下页面。在这里,您可以输入任意两个整数,然后单击“调用”按钮。该服务将返回这两个数字的总和。
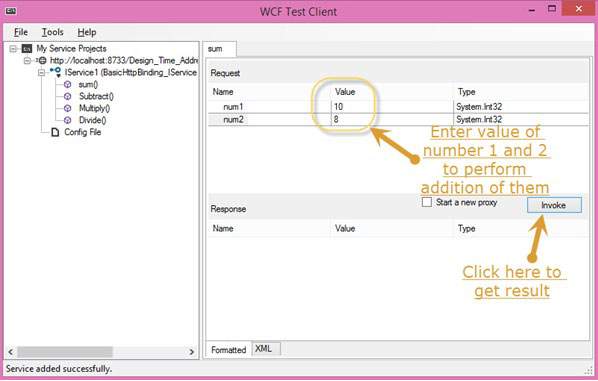

与求和一样,我们可以执行菜单中列出的所有其他算术运算。这是他们的快照。
单击“减去”方法后将出现以下页面。输入整数,单击“调用”按钮,并获得如下所示的输出 -

单击乘法方法后将出现以下页面。输入整数,单击“调用”按钮,并获得如下所示的输出 -

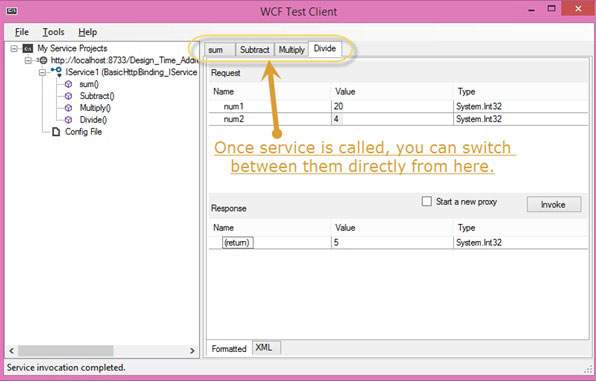
单击“除法”方法后将出现以下页面。输入整数,单击“调用”按钮,并获得如下所示的输出 -

调用服务后,您可以直接从此处在它们之间进行切换。
WCF - 托管 WCF 服务
创建 WCF 服务后,下一步是托管它,以便客户端应用程序可以使用它。这称为 WCF 服务托管。WCF 服务可以使用下面给出的四种方式中的任何一种来托管 -
IIS 托管- IIS 代表互联网信息服务。它的工作模型类似于托管 WCF 服务的 ASP.NET 的工作模型。IIS 托管的最佳功能是自动处理服务激活。IIS 托管还提供进程运行状况监控、空闲关闭、进程回收以及更多功能来促进 WCF 服务托管。
自托管- 当 WCF 服务托管在托管应用程序中时,称为自托管。它要求开发人员编写 ServiceHost 初始化所需的代码。在自托管中,WCF 服务可以托管在各种应用程序中,例如控制台应用程序、Windows 窗体等。
WAS 托管- 在 Windows 激活服务 (WAS) 中托管 WCF 服务是最有利的,因为它具有进程回收、空闲时间管理、通用配置系统以及对 HTTP、TCP 等的支持等功能。
Windows 服务托管- 对于本地系统客户端,最好将 WCF 服务托管为窗口服务,这称为 Window 服务托管。所有版本的 Windows 都支持这种类型的托管,在这里,服务控制管理器可以控制 WCF 服务的进程生命周期。
WCF - IIS 托管
在 IIS(Internet 信息服务)中托管 WCF 服务是一个逐步的过程。下面详细说明了 IIS 托管,其中包含所需的编码以及屏幕截图,以帮助您了解该过程。
步骤 1 - 启动 Visual Studio 2012 并单击文件 → 新建 → 网站。选择“WCF 服务”并将位置设置为 http。这将在 IIS 中托管该服务。单击“确定”。

步骤 2 - 下面给出了界面背后的代码。
using System;
using System.Collections.Generic;
using System.Linq;
using System.Runtime.Serialization;
using System.ServiceModel;
using System.ServiceModel.Web;
using System.Text;

// NOTE: You can use the "Rename" command on the "Refactor" menu to
// change the interface name "IService" in both code and config file
// together.

[ServiceContract]
Public interface IService {
   [OperationContract]
   String GetData(int value);

   [OperationContract]
   CompositeType GetDataUsingDataContract(CompositeType composite);

   // TODO: Add your service operations here
}

// Use a data contract as illustrated in the sample below to add
// composite types to service operations.

[DataContract]
Public class CompositeType {
   Bool boolValue = true;
   String stringValue = "Hello ";

   [DataMember]
   Public bool BoolValue {
      get { return boolValue; }
      set { boolValue = value; }
   }

   [DataMember]
   Public string StringValue {
      get { return stringValue; }
      set { stringValue = value; }
   }
}
步骤 3 - 下面给出了类文件背后的代码。
using System;
using System.Collections.Generic;
using System.Linq;
using System.Runtime.Serialization;
using System.ServiceModel;
using System.ServiceModel.Web;
using System.Text;

// NOTE: You can use the "Rename" command on the "Refactor" menu to
// change the class name "Service" in code, svc and config file
// together.

Public class Service : IService {
   Public string GetData(int value) {
      Return string.Format("You entered: {0}", value);
   }

   Public CompositeType GetDataUsingDataContract(CompositeType composite) {
      if(composite == null) {
         thrownewArgumentNullException("composite");
      }

      if(composite.BoolValue) {
         composite.StringValue += "Suffix";
      }
      return composite;
   }
}
步骤 4 - 服务文件 (.svc) 包含服务名称和文件名背后的代码。该文件用于了解服务。

<%@ ServiceHost Language = "C#" Debug = "true" Service = "Service"
   CodeBehind = "~/App_Code/Service.cs" %>
步骤 5 - 配置文件中提到服务器端配置。此处仅提到一个配置为“wsHttpBinding”的端点;我们还可以有多个具有不同绑定的端点。由于我们将在 IIS 中托管,因此我们必须仅使用 http 绑定。
<?xml version = "1.0"?>
<configuration>
   <!--
      Note: As an alternative to hand editing this file you can use the
         web admin tool to configure settings for your application. Use
         the Website->Asp.Net Configuration option in Visual Studio.
         A full list of settings and comments can be found in
         machine.config.comments usually located in
         \Windows\Microsoft.Net\Framework\vx.x\Config
   -->
   <configSections>
      <sectionGroup name = "system.web.extensions"
         ype = "System.Web.Configuration.SystemWebExtensionsSectionGroup,
         System.Web.Extensions, Version = 3.5.0.0, Culture = neutral,
         PublicKeyToken = 31BF3856AD364E35">

         <sectionGroup name = "scripting"
            type = "System.Web.Configuration.ScriptingSectionGroup,
            System.Web.Extensions, Version = 3.5.0.0, Culture = neutral,
            PublicKeyToken = 31BF3856AD364E35">

            <section name = "scriptResourceHandler"
               type = "System.Web.Configuration.ScriptingScriptResourceHandlerSection,
               System.Web.Extensions, Version = 3.5.0.0,
               Culture = neutral, PublicKeyToken = 31BF3856AD364E35"
               requirePermission = "false"
               allowDefinition = "MachineToApplication"/>

            <sectionGroup name = "webServices"
               type = "System.Web.Configuration.ScriptingWebServicesSectionGroup,
               System.Web.Extensions, Version = 3.5.0.0,
               Culture = neutral, PublicKeyToken = 31BF3856AD364E35">

               <section name = "jsonSerialization"
                  type = "System.Web.Configuration.ScriptingJsonSerializationSection,
                  System.Web.Extensions, Version = 3.5.0.0,
                  Culture = neutral, PublicKeyToken = 31BF3856AD364E35"
                  requirePermission = "false" allowDefinition = "Everywhere"/>

               <section name = "profileService"
                  type = "System.Web.Configuration.ScriptingProfileServiceSection,
                  System.Web.Extensions, Version = 3.5.0.0,
                  Culture = neutral, PublicKeyToken = 31BF3856AD364E35"
                  requirePermission = "false"
                  allowDefinition = "MachineToApplication"/>

               <section name = "authenticationService"
                  type = "System.Web.Configuration.ScriptingAuthenticationServiceSection,
                  System.Web.Extensions, Version = 3.5.0.0,
                  Culture = neutral, PublicKeyToken = 31BF3856AD364E35"
                  requirePermission = "false"
                  allowDefinition = "MachineToApplication"/>

               <section name = "roleService"
                  type = "System.Web.Configuration.ScriptingRoleServiceSection,
                  System.Web.Extensions, Version = 3.5.0.0,
                  Culture = neutral, PublicKeyToken = 31BF3856AD364E35"
                  requirePermission = "false"
                  allowDefinition = "MachineToApplication"/>

            </sectionGroup>
         </sectionGroup>
      </sectionGroup>
   </configSections>

<appSettings/>
   <connectionStrings/>
   <system.web>
      <!--
         Set compilation debug="true" to insert debugging
         symbols into the compiled page. Because this
         affects performance, set this value to true only
         during development.
      -->

      <compilation debug = "true">
         <assemblies>

            <add assembly = "System.Core, Version = 3.5.0.0, Culture = neutral,
               PublicKeyToken = B77A5C561934E089"/>

            <add assembly = "System.Web.Extensions, Version = 3.5.0.0,
               Culture = neutral, PublicKeyToken = 31BF3856AD364E35"/>

            <add assembly = "System.Data.DataSetExtensions, Version = 3.5.0.0,
               Culture = neutral, PublicKeyToken = B77A5C561934E089"/>

            <add assembly = "System.Web.Extensions, Version = 3.5.0.0,
               Culture = neutral, PublicKeyToken = 31BF3856AD364E35"/>

            <add assembly = "System.Xml.Linq, Version = 3.5.0.0, Culture = neutral,
               PublicKeyToken = B77A5C561934E089"/>

         </assemblies>
      </compilation>

         <!--
            The <authentication> section enables configuration
            of the security authentication mode used by
            ASP.NET to identify an incoming user.
         -->

      <authentication mode="Windows"/>
         <!--
            The <customErrors> section enables configuration
            of what to do if/when an unhandled error occurs
            during the execution of a request. Specifically,
            it enables developers to configure html error pages
            to be displayed in place of a error stack trace.

            <customErrors mode = "RemoteOnly" defaultRedirect = "GenericErrorPage.htm">
               <error statusCode = "403" redirect = "NoAccess.htm" />
               <error statusCode = "404" redirect = "FileNotFound.htm" />
            </customErrors>
         -->

         <pages>
            <controls>
               <add tagPrefix = "asp" namespace = "System.Web.UI"
                  assembly = "System.Web.Extensions, Version = 3.5.0.0,
                  Culture = neutral, PublicKeyToken = 31BF3856AD364E35"/>

               <add tagPrefix = "asp" namespace = "System.Web.UI.WebControls"
                  assembly = "System.Web.Extensions, Version = 3.5.0.0,
                  Culture = neutral, PublicKeyToken = 31BF3856AD364E35"/>

            </controls>
         </pages>

         <httpHandlers>
            <remove verb = "*" path = "*.asmx"/>

            <add verb = "*" path = "*.asmx" validate = "false"
               type = "System.Web.Script.Services.ScriptHandlerFactory,
               System.Web.Extensions, Version = 3.5.0.0, Culture = neutral,
               PublicKeyToken = 31BF3856AD364E35"/>

            <add verb = "*" path = "*_AppService.axd" validate = "false"
               type = "System.Web.Script.Services.ScriptHandlerFactory,
               System.Web.Extensions, Version = 3.5.0.0, Culture = neutral,
               PublicKeyToken = 31BF3856AD364E35"/>

            <add verb = "GET,HEAD" path = "ScriptResource.axd"
               type = "System.Web.Handlers.ScriptResourceHandler,
               System.Web.Extensions, Version = 3.5.0.0, Culture = neutral,
               PublicKeyToken = 31BF3856AD364E35" validate = "false"/>
         </httpHandlers>

         <httpModules>
            <add name = "ScriptModule"
               type = "System.Web.Handlers.ScriptModule,
               System.Web.Extensions, Version = 3.5.0.0, Culture = neutral,
               PublicKeyToken = 31BF3856AD364E35"/>
         </httpModules>
   </system.web>

   <system.codedom>
      <compilers>

         <compiler language = "c#;cs;csharp" extension = ".cs"
            warningLevel = "4" type = "Microsoft.CSharp.CSharpCodeProvider,
            System, Version = 2.0.0.0, Culture = neutral,
            PublicKeyToken = b77a5c561934e089">

            <providerOption name = "CompilerVersion" value = "v3.5"/>
            <providerOption name = "WarnAsError" value = "false"/>

         </compiler>

         <compiler language = "vb;vbs;visualbasic;vbscript" extension = ".vb"
            warningLevel = "4" type = "Microsoft.VisualBasic.VBCodeProvider,
            System, Version = 2.0.0.0, Culture = neutral,
            PublicKeyToken = b77a5c561934e089">

            <providerOption name = "CompilerVersion" value = "v3.5"/>
            <providerOption name = "OptionInfer" value = "true"/>
            <providerOption name = "WarnAsError" value = "false"/>

         </compiler>
      </compilers>

   </system.codedom>
   <!--
      The system.webServer section is required for running ASP.NET AJAX
      under Internet Information Services 7.0.
      It is not necessary for previous version of IIS.
   -->
   <system.webServer>
      <validation validateIntegratedModeConfiguration="false"/>

      <modules>
         <remove name = "ScriptModule"/>
         <add name = "ScriptModule" preCondition = "managedHandler"
            type = "System.Web.Handlers.ScriptModule,
            System.Web.Extensions, Version = 3.5.0.0, Culture = neutral,
            PublicKeyToken = 31BF3856AD364E35"/>
      </modules>

      <handlers>
         <remove name = "WebServiceHandlerFactory-Integrated"/>
         <remove name = "ScriptHandlerFactory"/>
         <remove name = "ScriptHandlerFactoryAppServices"/>
         <remove name = "ScriptResource"/>

         <add name = "ScriptHandlerFactory" verb = "*" path = "*.asmx"
            preCondition = "integratedMode"
            type = "System.Web.Script.Services.ScriptHandlerFactory,
            System.Web.Extensions, Version = 3.5.0.0, Culture = neutral,
            PublicKeyToken = 31BF3856AD364E35"/>

         <add name = "ScriptHandlerFactoryAppServices"
            verb = "*" path = "*_AppService.axd" preCondition = "integratedMode"
            type = "System.Web.Script.Services.ScriptHandlerFactory,
            System.Web.Extensions, Version = 3.5.0.0, Culture = neutral,
            PublicKeyToken = 31BF3856AD364E35"/>

         <add name = "ScriptResource" preCondition = "integratedMode"
            verb = "GET,HEAD" path = "ScriptResource.axd"
            type = "System.Web.Handlers.ScriptResourceHandler,
            System.Web.Extensions, Version = 3.5.0.0, Culture = neutral,
            PublicKeyToken = 31BF3856AD364E35"/>
      </handlers>

      <!--To browse web app root directory during debugging,
         set the value below to true. Set to false before deployment to
         avoid disclosing web app folder information.-->

      <directoryBrowse enabled = "true"/>
   </system.webServer>

   <runtime>
      <assemblyBinding appliesTo = "v2.0.05727" xmlns =" urn:schemas-microsoft-com:asm.v1">

         <dependentAssembly>
            <assemblyIdentity name = "System.Web.Extensions" publicKeyToken = "31bf3856ad364e35"/>
            <bindingRedirect oldVersion = "1.0.0.0-1.1.0.0" newVersion = "3.5.0.0"/>
         </dependentAssembly>

         <dependentAssembly>
            <assemblyIdentity name = "System.Web.Extensions.Design" publicKeyToken =" 31bf3856ad364e35"/>
            <bindingRedirect oldVersion = "1.0.0.0-1.1.0.0" newVersion = "3.5.0.0"/>
         </dependentAssembly>

      </assemblyBinding>
   </runtime>

   <system.serviceModel>
      <services>
         <service name = "Service" behaviorConfiguration = "ServiceBehavior">
         <!-- Service Endpoints -->
            <endpoint address = "" binding = "basicHttpBinding" contract = "IService">
               <!--
                  Upon deployment, the following identity element should be removed or replaced
                  to reflect the identity under which the deployed service runs. If removed,
                  WCF will infer an appropriate identity automatically.
               -->

               <identity>
                  <dns value="localhost"/>
               </identity>

            </endpoint>
            <endpoint address = "mex" binding = "mexHttpBinding" contract = "IMetadataExchange"/>

         </service>
      </services>

      <behaviors>
         <serviceBehaviors>
            <behavior name = "ServiceBehavior">
               <!-- To avoid disclosing metadata information, set the value below
                  to false before deployment -->

               <serviceMetadata httpGetEnabled = "true"/>

               <!-- To receive exception details in faults for debugging purposes,
                  set the value below to true.
                  Set to false before deployment to false avoid
                  disclosing exception information -->

               <serviceDebug includeExceptionDetailInFaults = "false"/>
            </behavior>
         </serviceBehaviors>
      </behaviors>

   </system.serviceModel>
</configuration>
步骤 6 - 您需要提及服务文件名以及配置文件中提到的地址。这里给出了 IIS 的屏幕截图。
单击开始 → 运行 → inetmgr 将打开以下窗口。
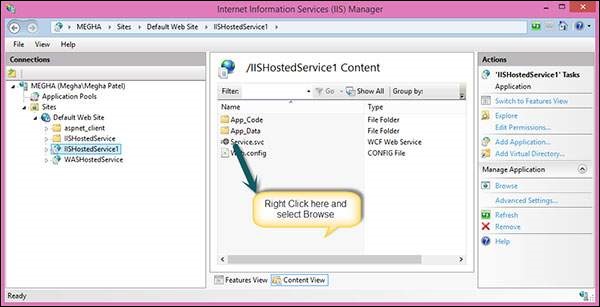
步骤 7 - 运行应用程序,将生成以下屏幕。

WCF-自托管
此处,WCF 服务托管在控制台应用程序中。下面给出的是按顺序排列的适当步骤的过程,解释了整个过程。
步骤 1 - 首先,让我们创建服务合约及其实现。创建一个控制台应用程序并将其命名为 MyCalculatorService。这是一个返回两个数字相加的简单服务。
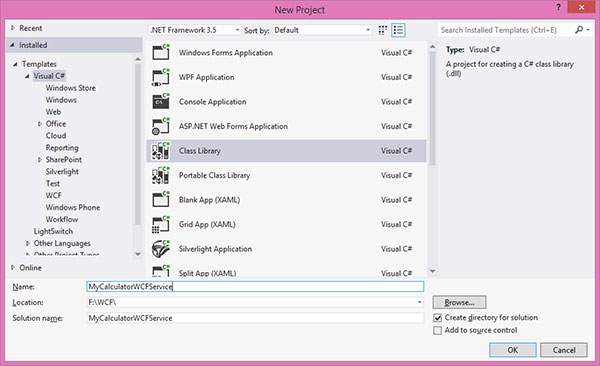
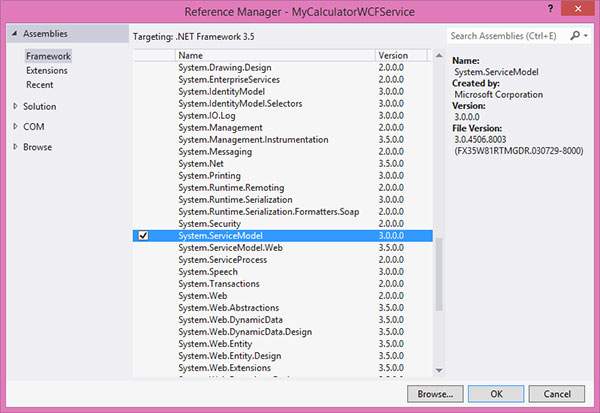
步骤 2 - 现在,右键单击解决方案资源管理器中的引用,然后单击添加引用。将打开以下窗口;将 System.ServiceModel 引用添加到项目中。
步骤 3 - 创建 ISimpleCalculator 接口,将 ServiceContract 和 OperationContract 属性添加到类和函数中,如下所示。您将在后面的课程中了解更多有关这些合同的信息。这些合约将向外界公开使用该服务的方法。
步骤 4 - 该文件背后的代码如下 -
using System;
using System.Collections.Generic;
using System.Linq;
using System.Text;
using System.ServiceModel;

namespace MyCalculatorWCFService {
   [ServiceContract()]
   Public interface ISimpleCalculator {
      [OperationContract()]
      int Add(int num1, int num2);
   }
}
步骤 5 - MyCalculatorService 是 IMyCalculatorService 接口的实现类,如下所示。
using System;
using System.Collections.Generic;
using System.Linq;
using System.Text;

namespace MyCalculatorWCFService {
   Class SimpleCalculator : ISimpleCalculator {
      Public int Add(int num1, int num2) {
         return num1 + num2;
      }
   }
}
第 6 步- 现在,我们已准备好服务。让我们开始实施托管流程。创建一个新的控制台应用程序并将其命名为“MyCalculatorWCFServiceHost”。

步骤 7 - 添加 system.servicemodel 和项目 MyCalculatorWCFService 的引用。

其背后的代码如下 -
using System;
using System.Collections.Generic;
using System.Linq;
using System.Text;
using MyCalculatorWCFService;
using System.ServiceModel;
using System.ServiceModel.Description;

namespace MyCalculatorWCFServiceHost {
   class Program {
      static void Main(string[] args) {
         //Create a URI to serve as the base address
         UrihttpUrl = newUri("http://localhost:8090/MyCalculatorWCFService/SimpleCalculator");

         //Create ServiceHost
         ServiceHost host = newServiceHost(typeof(MyCalculatorWCFService.ISimpleCalculator), httpUrl);

         //Add a service endpoint
         host.AddServiceEndpoint(typeof(MyCalculatorWCFService.ISimpleCal culator), newWSHttpBinding(), "");

         //Enable metadata exchange
         ServiceMetadataBehaviorsmb = newServiceMetadataBehavior();
         smb.HttpGetEnabled = true;
         host.Description.Behaviors.Add(smb);

         //Start the Service
         host.Open();
         Console.WriteLine("Service is host at " + DateTime.Now.ToString());
         Console.WriteLine("Host is running... Press  key to stop");
         Console.ReadLine();
      }
   }
}

WCF-WAS 托管
要理解 WAS 托管的概念,我们需要了解如何配置系统以及如何创建服务契约,从而实现与托管服务的不同绑定。
首先,为非协议启用WCF。在开始创建服务之前,我们需要配置系统以支持 WAS。以下是配置 WAS 的步骤 -
单击“开始”菜单→“控制面板”→“程序和功能”,然后单击左侧窗格中的“打开或关闭 Windows 组件”。
展开“Microsoft .Net Framework 3.0”并启用“Windows Communication Foundation HTTP 激活”和“Windows Communication Foundation 非 HTTP 激活”。
接下来,我们需要将 Binding 添加到默认网站。例如,我们将默认网站绑定到 TCP 协议。转到开始菜单→程序→附件。右键单击“命令提示符”,然后从上下文菜单中选择“以管理员身份运行”。
执行以下命令 -
C:\Windows\system32\inetsrv> appcmd.exe set site "Default Web Site" -+bindings.[protocol='net.tcp',bindingInformation='808:*']
此命令通过修改位于“C:\Windows\system32\inetsrv\config”目录中的 applicationHost.config 文件将 net.tcp 站点绑定添加到默认网站。同样,我们可以在默认网站中添加不同的协议。
创建WAS托管服务
步骤 1 - 打开 Visual Studio 2008 并单击新建 → 网站,然后从模板中选择 WCF 服务,并将位置选择为 HTTP,如下所示 -

步骤 2 - 通过创建接口 IMathService 来创建合约。将 ServiceContract 属性添加到接口,并将 OperationContract 属性添加到方法声明。
using System;
using System.Collections.Generic;
using System.Linq;
using System.Runtime.Serialization;
using System.ServiceModel;
using System.Text;

// NOTE: You can use the "Rename" command on the "Refactor" menu to
// change the interface name "IService" in both code and config file
// together.

[ServiceContract]

Public interface IMathService {
   [OperationContract]
   int Add(int num1, int num2);

   [OperationContract]
   int Subtract(int num1, int num2);
}
步骤 3 - IMathService 接口的实现如下所示 -
using System;
using System.Collections.Generic;
using System.Linq;
using System.Runtime.Serialization;
using System.ServiceModel;
using System.ServiceModel.Web;
using System.Text;

// NOTE: You can use the "Rename" command on the "Refactor" menu to
// change the class name "Service" in code, svc and config file
// together.

Public class MathService : IMathService {
   Public int Add(int num1, int num2) {
      return num1 + num2;
   }
   Public int Subtract(int num1, int num2) {
      return num1 - num2;
   }
}
步骤 4 - 服务文件如下所示。

<%@ServiceHostLanguage="C#"Debug="true"Service="MathService"CodeBehind="~/App_Code/MathService.cs"%>
步骤 5 - 在 web.Config 文件中,创建具有“netTcpBinding”绑定的端点,并且服务元数据将使用元数据交换点发布。因此,创建元数据交换端点,地址为“mex”,绑定为“mexTcpBinding”。如果不发布服务元数据,我们就无法使用 net.tcp 地址创建代理,例如 -
svcutil.exe net.tcp://localhost/WASHostedService/MathService.svc).
<?xml version = "1.0" ?>
<configuration>
   <!--
      Note: As an alternative to hand editing this file you can use the
         web admin tool to configure settings for your application. Use
         the Website->Asp.Net Configuration option in Visual Studio.
         A full list of settings and comments can be found in
         machine.config.comments usually located in
         \Windows\Microsoft.Net\Framework\vx.x\Config
   -->
   <configSections>
      <sectionGroup name = "system.web.extensions"
         type = "System.Web.Configuration.SystemWebExtensionsSectionGroup,
         System.Web.Extensions, Version = 3.5.0.0, Culture = neutral,
         PublicKeyToken = 31BF3856AD364E35">

         <sectionGroup name = "scripting"
            type = "System.Web.Configuration.ScriptingSectionGroup,
            System.Web.Extensions, Version = 3.5.0.0, Culture = neutral,
            PublicKeyToken =3 1BF3856AD364E35">

            <section name = "scriptResourceHandler"
               type = "System.Web.Configuration.ScriptingScriptResourceHandlerSection,
               System.Web.Extensions, Version = 3.5.0.0, Culture = neutral,
               PublicKeyToken = 31BF3856AD364E35"
               requirePermission = "false"
               allowDefinition = "MachineToApplication"/>

            <sectionGroup name = "webServices"
               type = "System.Web.Configuration.ScriptingWebServicesSectionGroup,
               System.Web.Extensions, Version = 3.5.0.0, Culture = neutral,
               PublicKeyToken = 31BF3856AD364E35">

               <section name = "jsonSerialization"
                  type = "System.Web.Configuration.ScriptingJsonSerializationSection,
                  System.Web.Extensions, Version = 3.5.0.0, Culture = neutral,
                  PublicKeyToken = 31BF3856AD364E35" requirePermission = "false"
                  allowDefinition = "Everywhere"/>

               <section name = "profileService"
                  type = "System.Web.Configuration.ScriptingProfileServiceSection,
                  System.Web.Extensions, Version = 3.5.0.0, Culture = neutral,
                  PublicKeyToken = 31BF3856AD364E35" requirePermission = "false"
                  allowDefinition = "MachineToApplication"/>

               <section name = "authenticationService"
                  type = "System.Web.Configuration.ScriptingAuthenticationServiceSection,
                  System.Web.Extensions, Version = 3.5.0.0, Culture = neutral,
                  PublicKeyToken = 31BF3856AD364E35" requirePermission = "false"
                  allowDefinition = "MachineToApplication"/>

               <section name = "roleService"
                  type = "System.Web.Configuration.ScriptingRoleServiceSection,
                  System.Web.Extensions, Version = 3.5.0.0, Culture = neutral,
                  PublicKeyToken = 31BF3856AD364E35" requirePermission = "false"
                  allowDefinition = "MachineToApplication"/>

            </sectionGroup>
         </sectionGroup>
      </sectionGroup>
   </configSections>

   <appSettings/>
   <connectionStrings/>

   <system.web>
      <!--
         Set compilation debug="true" to insert debugging
         symbols into the compiled page. Because this
         affects performance, set this value to true only
         during development.
      -->
      <compilation debug = "true">
         <assemblies>
            <add assembly = "System.Core, Version = 3.5.0.0,
               Culture = neutral, PublicKeyToken = B77A5C561934E089"/>

            <add assembly = "System.Web.Extensions, Version = 3.5.0.0,
               Culture = neutral, PublicKeyToken = 31BF3856AD364E35"/>

            <add assembly = "System.Data.DataSetExtensions,
               Version = 3.5.0.0, Culture = neutral,
               PublicKeyToken = B77A5C561934E089"/>

            <add assembly = "System.Web.Extensions, Version = 3.5.0.0,
               Culture = neutral, PublicKeyToken = 31BF3856AD364E35"/>

            <add assembly = "System.Xml.Linq,
               Version = 3.5.0.0, Culture = neutral,
               PublicKeyToken = B77A5C561934E089"/>
         </assemblies>
      </compilation>

      <!--
         The <authentication> section enables configuration
         of the security authentication mode used by
         ASP.NET to identify an incoming user.
      -->

      <authentication mode="Windows"/>

      <!--
         The <customErrors> section enables configuration
         of what to do if/when an unhandled error occurs
         during the execution of a request. Specifically,
         it enables developers to configure html error pages
         to be displayed in place of a error stack trace.
         <customErrors mode = "RemoteOnly" defaultRedirect = "GenericErrorPage.htm">
         <error statusCode = "403" redirect = "NoAccess.htm" />
         <error statusCode = "404" redirect = "FileNotFound.htm" />
         </customErrors>
      -->

      <pages>
         <controls>
            <add tagPrefix = "asp" namespace = "System.Web.UI"
               assembly = "System.Web.Extensions, Version = 3.5.0.0, Culture = neutral,
               PublicKeyToken = 31BF3856AD364E35"/>

            <add tagPrefix = "asp" namespace = "System.Web.UI.WebControls"
               assembly = "System.Web.Extensions, Version = 3.5.0.0, Culture = neutral,
               PublicKeyToken = 31BF3856AD364E35"/>
         </controls>
      </pages>

      <httpHandlers>
         <remove verb = "*" path = "*.asmx"/>

         <add verb =" *" path =" *.asmx" validate="false"
            type = "System.Web.Script.Services.ScriptHandlerFactory,
            System.Web.Extensions, Version = 3.5.0.0, Culture = neutral,
            PublicKeyToken = 31BF3856AD364E35"/>

         <add verb = "*" path = "*_AppService.axd" validate = "false"
            type = "System.Web.Script.Services.ScriptHandlerFactory,System.Web.Extensions,
            Version = 3.5.0.0, Culture = neutral,
            PublicKeyToken = 31BF3856AD364E35"/>

         <add verb = "GET,HEAD" path = "ScriptResource.axd"
            type = "System.Web.Handlers.ScriptResourceHandler, System.Web.Extensions,
            Version = 3.5.0.0, Culture = neutral,
            PublicKeyToken = 31BF3856AD364E35" validate = "false"/>
      </httpHandlers>

      <httpModules>
         <add name = "ScriptModule"
            type = "System.Web.Handlers.ScriptModule,
            System.Web.Extensions, Version = 3.5.0.0, Culture = neutral,
            PublicKeyToken = 31BF3856AD364E35"/>
      </httpModules>

   </system.web>

   <system.codedom>
      <compilers>

         <compiler language = "c#;cs;csharp" extension = ".cs" warningLevel = "4"
            type = "Microsoft.CSharp.CSharpCodeProvider, System,
            Version = 2.0.0.0, Culture = neutral,
            PublicKeyToken = b77a5c561934e089">

            <providerOption name = "CompilerVersion" value = "v3.5"/>
            <providerOption name = "WarnAsError" value = "false"/>
         </compiler>

         <compiler language = "vb;vbs;visualbasic;vbscript"
            extension = ".vb" warningLevel = "4"
            type = "Microsoft.VisualBasic.VBCodeProvider, System,
            Version = 2.0.0.0, Culture = neutral,
            PublicKeyToken = b77a5c561934e089">

            <providerOption name = "CompilerVersion" value = "v3.5"/>
            <providerOption name = "OptionInfer" value = "true"/>
            <providerOption name = "WarnAsError" value = "false"/>
         </compiler>

      </compilers>
   </system.codedom>

   <!--
      The system.webServer section is required for running ASP.NET AJAX under
      Internet Information Services 7.0. It is not necessary for previous version of IIS.
   -->

   <system.webServer>
      <validation validateIntegratedModeConfiguration = "false"/>

      <modules>
         <remove name = "ScriptModule"/>
         <add name = "ScriptModule" preCondition = "managedHandler"
            type = "System.Web.Handlers.ScriptModule, System.Web.Extensions,
            Version = 3.5.0.0, Culture = neutral,
            PublicKeyToken = 31BF3856AD364E35"/>
      </modules>

      <handlers>
         <remove name = "WebServiceHandlerFactory-Integrated"/>
         <remove name = "ScriptHandlerFactory"/>
         <remove name = "ScriptHandlerFactoryAppServices"/>
         <remove name = "ScriptResource"/>

         <add name = "ScriptHandlerFactory"
            verb = "*" path = "*.asmx" preCondition = "integratedMode"
            type = "System.Web.Script.Services.ScriptHandlerFactory,
            System.Web.Extensions, Version = 3.5.0.0, Culture = neutral,
            PublicKeyToken = 31BF3856AD364E35"/>

         <add name = "ScriptHandlerFactoryAppServices"
            verb = "*" path = "*_AppService.axd" preCondition = "integratedMode"
            type = "System.Web.Script.Services.ScriptHandlerFactory,
            System.Web.Extensions, Version = 3.5.0.0, Culture = neutral,
            PublicKeyToken = 31BF3856AD364E35"/>

         <add name = "ScriptResource" preCondition = "integratedMode"
            verb = "GET,HEAD" path = "ScriptResource.axd"
            type = "System.Web.Handlers.ScriptResourceHandler,
            System.Web.Extensions, Version = 3.5.0.0, Culture = neutral,
            PublicKeyToken = 31BF3856AD364E35"/>

      </handlers>
      <!--
         To browse web app root directory during debugging, set the value below to true.
         Set to false before deployment to avoid disclosing web app folder information.
      -->
      <directoryBrowse enabled="true"/>
   </system.webServer>

   <runtime>
      <assemblyBinding appliesTo = "v2.0.05727" xmlns = "urn:schemas-microsoft-com:asm.v1">

         <dependentAssembly>
            <assemblyIdentity name = "System.Web.Extensions" publicKeyToken = "31bf3856ad364e35"/>
            <bindingRedirect oldVersion = "1.0.0.0-1.1.0.0" newVersion = "3.5.0.0"/>
         </dependentAssembly>

         <dependentAssembly>
            <assemblyIdentity name = "System.Web.Extensions.Design" publicKeyToken = "31bf3856ad364e35"/>
            <bindingRedirect oldVersion = "1.0.0.0-1.1.0.0" newVersion = "3.5.0.0"/>
         </dependentAssembly>

      </assemblyBinding>
   </runtime>

   <system.serviceModel>
      <services>
         <service behaviorConfiguration = "ServiceBehavior" name = "Service">
            <endpoint address = "" binding = "basicHttpBinding" contract = "IMathService">

            <identity>
               <dns value = "localhost" />
            </identity>

            </endpoint>
            <endpoint address = "mex" binding = "mexHttpBinding" contract = "IMetadataExchange"/>
         </service>
      </services>

      <behaviors>
         <serviceBehaviors>
            <behavior name = "ServiceBehavior">
               <!--
                  To avoid disclosing metadata information, set the value below
                  to false before deployment.
               -->
               <serviceMetadata httpGetEnabled="true"/>

               <!--
                  To receive exception details in faults for debugging purposes,
                  set the value below to true. Set to false before deployment to avoid
                  disclosing exception information
               -->
               <serviceDebug includeExceptionDetailInFaults="false"/>
            </behavior>
         </serviceBehaviors>
      </behaviors>

   </system.serviceModel>
</configuration>
启用对托管服务的不同绑定
转到“开始”菜单→“程序”→“附件”。右键单击“命令提示符”,然后从上下文菜单中选择“以管理员身份运行”。
执行以下命令 -
C:\Windows\system32\inetsrv>appcmd set app "Default Web Site/WASHostedService" /enabledProtocols:http,net.tcp
它将产生以下输出 -

WCF-Windows 服务托管
Windows服务托管的操作很简单。下面给出了带有必要编码和屏幕截图的步骤,以简单的方式解释了该过程。
步骤 1 - 现在让我们创建一个 WCF 服务。打开 Visual Studio 2008,单击“新建”→“项目”,然后从模板中选择“类库”。

步骤 2 - 将引用 System.ServiceModel 添加到项目中。这是用于创建 WCF 服务的核心程序集。
步骤 3 - 接下来,我们可以创建 ISimpleCalulator 接口。添加服务和操作合同属性,如下所示 -
using System;
using System.Collections.Generic;
using System.Linq;
using System.Text;
using System.ServiceModel;

namespace WindowsServiceHostedService{
   [ServiceContract]
   public interfaceISimpleCalculator {
      [OperationContract]
      int Add(int num1, int num2);

      [OperationContract]
      int Subtract(int num1, int num2);

      [OperationContract]
      int Multiply(int num1, int num2);

      [OperationContract]
      double Divide(int num1, int num2);
   }
}
步骤 4 - 实现 ISimpleCalculator 接口,如下所示 -
using System;
using System.Collections.Generic;
using System.Linq;
using System.Text;

namespace WindowsServiceHostedService {
   Class SimpleCalulator : ISimpleCalculator {
      Public int Add(int num1, int num2) {
         return num1 + num2;
      }
      Public int Subtract(int num1, int num2) {
         return num1 - num2;
      }
      Public int Multiply(int num1, int num2) {
         return num1 * num2;
      }
      Public double Divide(int num1, int num2) {
         if (num2 != 0)
            return num1 / num2;
         else
            return 0;
      }
   }
}
步骤 5 - 构建项目并获取 dll。现在,我们已准备好使用 WCF 服务。我们将了解如何在 Windows 服务中托管 WCF 服务。
注意- 在这个项目中,提到我们在同一个项目中创建合同和服务(实现)。但是,如果您在不同的项目中同时使用这两种方法,那么这始终是一个很好的做法。
步骤 6 - 打开 Visual Studio 2008 并单击新建 → 项目并选择 Windows 服务。

步骤 7 - 添加“WindowsServiceHostedService.dll”作为对项目的引用。该程序集将充当服务。
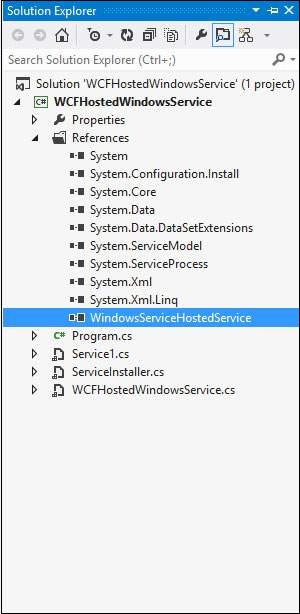
步骤 8 - 服务的 OnStart 方法可用于编写 WCF 的托管代码。我们必须确保只使用一个服务主机对象。OnStop方法用于关闭Service Host。下面的代码展示了如何在Windows服务中托管WCF服务。
using System;
using System.Collections.Generic;
using System.ComponentModel;
using System.Data;
using System.Diagnostics;
using System.Linq;
using System.ServiceProcess;
using System.Text;
using System.ServiceModel;
using System.ServiceModel.Description;

namespace WCFHostedWindowsService {
   Partial class WCFHostedWindowsService : ServiceBase {
      ServiceHostm_Host;

      Public WCFHostedWindowsService() {
         InitializeComponent();
      }
      Private void InitializeComponent() {
         thrownewNotImplementedException();
      }
      protectedoverridevoidOnStart(string[] args) {
         if (m_Host != null) {
            m_Host.Close();
         }

         //Create a URI to serve as the base address
         UrihttpUrl = newUri("http://localhost:8090/WindowsServiceHostedService/SimpleCalculator");

         //Create ServiceHost
         m_Host = newServiceHost typeof(WindowsServiceHostedService.SimpleCalulator), httpUrl);

         //Add a service endpoint
         m_Host.AddServiceEndpoint (typeof(WindowsServiceHostedService.ISimpleCalculator), newWSHttpBinding(), "");

         //Enable metadata exchange
         ServiceMetadataBehaviorsmb = newServiceMetadataBehavior();
         smb.HttpGetEnabled = true;
         m_Host.Description.Behaviors.Add(smb);

         //Start the Service
         m_Host.Open();
      }
      protectedoverridevoidOnStop() {
         if (m_Host != null) {
            m_Host.Close();
            m_Host = null;
         }
      }
      staticvoid Main() {
         ServiceBase[] ServicesToRun;
         ServicesToRun = newServiceBase[] {
            newWCFHostedWindowsService();
         }
         ServiceBase.Run(ServicesToRun);
      }
   }
}
步骤 9 - 为了安装服务,我们需要 Windows 服务的 Installer 类。所以在项目中添加一个新的Installer类,该类继承自Installer c
