- Zend 框架教程
- Zend 框架 - 主页
- Zend 框架 - 简介
- Zend 框架 - 安装
- 骨架应用
- Zend 框架 - MVC 架构
- Zend 框架 - 概念
- Zend 框架 - 服务管理器
- Zend 框架 - 事件管理器
- Zend 框架 - 模块系统
- 应用结构
- Zend 框架 - 创建模块
- Zend 框架 - 控制器
- Zend 框架 - 路由
- Zend 框架 - 视图层
- Zend 框架 - 布局
- 模型和数据库
- 不同的数据库
- 表格和验证
- Zend 框架 - 文件上传
- Zend 框架 - Ajax
- Cookie 管理
- 会话管理
- Zend 框架 - 身份验证
- 电子邮件管理
- Zend 框架 - 单元测试
- Zend 框架 - 错误处理
- Zend 框架 - 工作示例
- Zend 框架有用的资源
- Zend 框架 - 快速指南
- Zend 框架 - 有用的资源
- Zend 框架 - 讨论
Zend 框架 - 工作示例
在本章中,我们将学习如何在 Zend Framework 中创建一个完整的基于 MVC 的员工应用程序。请按照下面给出的步骤操作。
第1步:模块.php
首先,我们应该在 – myapp/module/Employee/src/ 目录中创建一个 Employee 模块,然后实现 ConfigProviderInterface 接口。
Module 类的完整代码如下 -
<?php
namespace Employee;
use Zend\ModuleManager\Feature\ConfigProviderInterface;
class Module implements ConfigProviderInterface {
   public function getConfig() {
      return include __DIR__ . '/../config/module.config.php';
   }
}
第2步:composer.json
使用以下代码在自动加载部分下的composer.json中配置Tutorial模块。
"autoload": {
   "psr-4": {
      "Application\\": "module/Application/src/",
      "Tutorial\\": "module/Tutorial/src/",
      "Employee\\": "module/Employee/src/"
   }
}
现在,使用 Composer update 命令更新应用程序。
composer update
Composer 命令将对应用程序进行必要的更改并显示日志,如下面的命令提示符所示。
Loading composer repositories with package information
Updating dependencies (including require-dev)
   - Removing zendframework/zend-component-installer (0.3.0)
   - Installing zendframework/zend-component-installer (0.3.1)
   Downloading: 100%

   - Removing zendframework/zend-stdlib (3.0.1)
   - Installing zendframework/zend-stdlib (3.1.0)
   Loading from cache

   - Removing zendframework/zend-eventmanager (3.0.1)
   - Installing zendframework/zend-eventmanager (3.1.0)
   Downloading: 100%

   - Removing zendframework/zend-view (2.8.0)
   - Installing zendframework/zend-view (2.8.1)
   Loading from cache

   - Removing zendframework/zend-servicemanager (3.1.0)
   - Installing zendframework/zend-servicemanager (3.2.0)
   Downloading: 100%

   - Removing zendframework/zend-escaper (2.5.1)
   - Installing zendframework/zend-escaper (2.5.2)
   Loading from cache

   - Removing zendframework/zend-http (2.5.4)
   - Installing zendframework/zend-http (2.5.5)
   Loading from cache

   - Removing zendframework/zend-mvc (3.0.1)
   - Installing zendframework/zend-mvc (3.0.4)
   Downloading: 100%

   - Removing phpunit/phpunit (5.7.4)
   - Installing phpunit/phpunit (5.7.5)
   Downloading: 100%

Writing lock file
Generating autoload files
步骤 3:员工模块的 module.config.php
使用以下代码在 myapp/module/Employee/config 下创建模块配置文件“module.config.php”。
<?php
namespace Employee;
use Zend\ServiceManager\Factory\InvokableFactory;
use Zend\Router\Http\Segment;
return [
   'controllers' => [
      'factories' => [
         Controller\EmployeeController::class => InvokableFactory::class,
      ],
   ],
   'view_manager' => [
      'template_path_stack' => ['employee' => __DIR__ . '/../view',],
   ],
];
现在,在应用程序级配置文件 myapp/config/modules.config.php 中配置 Employee 模块。
return ['Zend\Router', 'Zend\Validator', 'Application', 'Tutorial', 'Employee'];
第四步:EmployeeController
通过扩展 AbstractActionController 创建一个新的 PHP 类 EmployeeController 并将其放置在 myapp/module/Employee/src/Controller 目录中。
完整的代码清单如下 -
<?php
namespace Employee\Controller;
use Zend\Mvc\Controller\AbstractActionController;
use Zend\View\Model\ViewModel;
class EmployeeController extends AbstractActionController {
   public function indexAction() {
      return new ViewModel();
   }
}
第5步:路由器配置
让我们在 Employee 模块中添加一条分段路由。更新员工模块配置文件 module.config.php,位于 myapp/module/Employee/config。
<?php
namespace Employee;
use Zend\ServiceManager\Factory\InvokableFactory;
use Zend\Router\Http\Segment;
return [
   'controllers' => [
      'factories' => [
         Controller\EmployeeController::class => InvokableFactory::class,
      ],
   ],
   'router' => [
      'routes' => [
         'employee' => [
            'type' => Segment::class,
            'options' => [
               'route' => '/employee[/:action[/:id]]',
               'constraints' => [
                  'action' => '[a-zA-Z][a-zA-Z0-9_-]*',
                  'id' => '[0-9]+',
               ],
               'defaults' => [
                  'controller' => Controller\EmployeeController::class,
                  'action' => 'index',
               ],
            ],
         ],
      ],
   ],
   'view_manager' => [
      'template_path_stack' => [
         'employee' => __DIR__ . '/../view',
      ],
   ],
];
我们已成功添加员工模块的路由。下一步是为 Employee 应用程序创建一个视图脚本。
第 6 步:创建视图模型
在 myapp/module/Employee/view/employee/employee 目录下创建一个名为“index.phtml”的文件。
在文件中添加以下更改 -
<div class = "row content">
   <h3>This is my first Zend application</h3>
</div>
Move to “EmployeeController.php” file and edit the following changes,

<?php
namespace Employee\Controller;
use Zend\Mvc\Controller\AbstractActionController;
use Zend\View\Model\ViewModel;
class EmployeeController extends AbstractActionController {
   public function indexAction() {
      return new ViewModel();
   }
}
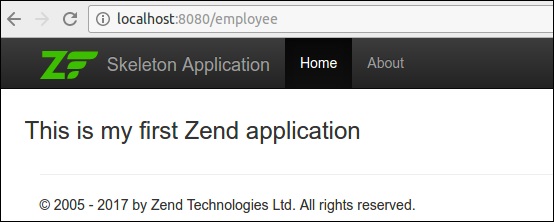
最后,我们成功完成了 Employee 模块。我们可以使用以下网址访问它 - http://localhost:8080/employee。
结果
下一步,我们将在员工应用程序中执行添加、编辑和删除数据操作。为了执行这些操作,我们应该首先创建一个数据库模型。将在下一步中进行描述。
第7步:创建模型
让我们在模块src 目录中创建一个模型 Employee 。通常,模型分组在模型文件夹下(myapp/module/Employee/src/Model/Employee.php)
<?php
namespace Employee\Model;
class Employee {
   public $id;
   public $emp_name;
   public $emp_job;
}
第8步:MySQL表
使用以下命令在本地 MYSQL 服务器中创建名为tutorials的数据库-
create database tutorials;
让我们使用以下 SQL 命令在数据库中创建一个名为employee的表 -
use tutorials;
CREATE TABLE employee (
   id int(11) NOT NULL auto_increment,
   emp_name varchar(100) NOT NULL,
   emp_job varchar(100) NOT NULL,
   PRIMARY KEY (id)
);
使用以下查询将数据插入员工表 -
INSERT INTO employee (emp_name, emp_job) VALUES ('Adam',  'Tutor');
INSERT INTO employee (emp_name, emp_job) VALUES ('Bruce',  'Programmer');
INSERT INTO employee (emp_name, emp_job) VALUES ('David',  'Designer');
步骤 9:更新数据库配置
使用必要的数据库驱动器信息更新全局配置文件 myapp/config/autoload/global.php。
return [
   'db' => [
      'driver' => 'Pdo',
      'dsn' => 'mysql:dbname = tutorials;host=localhost',
      'driver_options' => [PDO::MYSQL_ATTR_INIT_COMMAND => 'SET NAMES \'UTF8\''],
   ],
];
现在,更新本地配置文件 myapp/config/autoload/local.php 中的数据库凭据。通过这种方式,我们可以分离本地和实时数据库连接凭据。
<?php
return array(
   'db' => array('username' => '<user_name>', 'password' => '<password>',),
);
第10步:实现exchangeArray
在Employee模型中实现exchangeArray函数。
<?php
namespace Employee\Model;
class Employee {
   public $id;
   public $emp_name;
   public $emp_job;
   public function exchangeArray($data) {
      $this->id = (!empty($data['id'])) ? $data['id'] : null;
      $this->emp_name = (!empty($data['emp_name'])) ? $data['emp_name'] : null;
      $this->emp_job = (!empty($data['emp_job'])) ? $data['emp_job'] : null;
   }
}
步骤11:使用TableGateway获取员工数据
在模型文件夹本身中创建类 EmployeeTable。它在以下代码块中定义。
<?php
namespace Employee\Model;
use Zend\Db\TableGateway\TableGatewayInterface;
class EmployeeTable {
   protected $tableGateway;
   public function __construct(TableGatewayInterface $tableGateway) {
      $this->tableGateway = $tableGateway;
   }
   public function fetchAll() {
      $resultSet = $this->tableGateway->select();
      return $resultSet;
   }
}
第12步:配置EmployeeTable类
使用getServiceConfig()方法更新Module.php中的员工服务
<?php
namespace Employee;
use Zend\Db\Adapter\AdapterInterface;
use Zend\Db\ResultSet\ResultSet;
use Zend\Db\TableGateway\TableGateway;
use Zend\ModuleManager\Feature\ConfigProviderInterface;

class Module implements ConfigProviderInterface {
   public function getConfig() {
      return include __DIR__ . '/../config/module.config.php';
   }
   public function getServiceConfig() {
      return [
         'factories' => [
            Model\EmployeeTable::class => function (    $container) {
               $tableGateway = $container>get( Model\EmployeeTableGateway::class);
               $table = new Model\EmployeeTable($tableGateway);
               return $table;
            },
            Model\EmployeeTableGateway::class => function ($container) {
               $dbAdapter = $container->get(AdapterInterface::class);
               $resultSetPrototype = new ResultSet();
               $resultSetPrototype->setArrayObjectPrototype(new Model\Employee());
               return new TableGateway('employee', $dbAdapter, null, $resultSetPrototype);
            },
         ],
      ];
   }
}
第13步:在控制器中添加员工服务
更新 myapp/module/config/module.config.php 中员工模块配置的控制器部分,如下所示。
'controllers' => [
   'factories' => [
      Controller\EmployeeController::class => function($container) {
         return new Controller\EmployeeController(
            $container->get(Model\EmployeeTable::class)
         );
      },
   ],
]
第 14 步:添加 EmployeeController 的构造函数
添加以EmployeeTable作为参数的构造函数并编辑以下更改。
<?php
namespace Employee\Controller;
use Zend\Mvc\Controller\AbstractActionController;
use Zend\View\Model\ViewModel;
use Employee\Model\Employee;
use Employee\Model\EmployeeTable;

class EmployeeController extends AbstractActionController {
   private $table;
   public function __construct(EmployeeTable $table) {
      $this->table = $table;
   }
   public function indexAction() {
      $view = new ViewModel([
         'data' => $this->table->fetchAll(),
      ]);
      return $view;
   }
}
步骤15:在视图脚本“index.phtml”中显示员工信息
移至文件 -index.phtml并进行以下更改 -
<?php
$title = 'Employee application';
$this->headTitle($title);
?>

<table class="table">
   <tr>
      <th>Employee Name</th>
      <th>Employee Job</th>
      <th>Edit/Delete operations</th>
   </tr>
   <?php foreach ($data as $empdata) : ?>
   <tr>
      <td><?php echo $this->escapeHtml($empdata->emp_name);?></td>
      <td><?php echo $this->escapeHtml($empdata->emp_job);?></td>
      <td>
         <a href="<?php echo $this->url('employee',
            array('action'=>'edit', 'id' =>$empdata->id));?>">Edit</a>
         <a href="<?php echo $this->url('employee',
            array('action'=>'delete', 'id' => $empdata->id));?>">Delete</a>
      </td>
   </tr>
   <?php endforeach; ?>
</table>
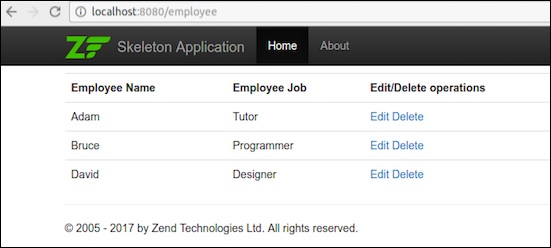
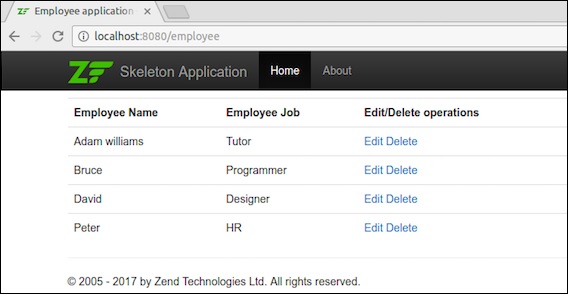
现在我们已经成功创建了一个数据库模型并且可以在应用程序中获取记录。
使用 URL 请求应用程序 - http://localhost:8080/employee。
结果
下一步将介绍员工模块中的插入、编辑和删除数据操作。
第 16 步:创建员工表单
在 myapp/module/Employee/src/Form 目录中创建一个名为EmployeeForm.php的文件。它在下面的代码块中进行了描述。
<?php
namespace Employee\Form;
use Zend\Form\Form;

class EmployeeForm extends Form {
   public function __construct($name = null) {
      /
      / we want to ignore the name passed
      parent::__construct('employee');
      $this->add(array(
         'name' => 'id',
         'type' => 'Hidden',
      ));
      $this->add(array(
         'name' => 'emp_name',
         'type' => 'Text',
         'options' => array(
            'label' => 'Name',
         ),
      ));
      $this->add(array(
         'name' => 'emp_job',
         'type' => 'Text',
         'options' => array(
            'label' => 'Job',
         ),
      ));
      $this->add(array(
         'name' => 'submit',
         'type' => 'Submit',
         'attributes' => array(
            'value' => 'Go',
            'id' => 'submitbutton',
         ),
      ));
   }
}
第 17 步:更新员工模型
更新员工模型并实现InputFilterAwareInterface。移动到目录 myapp/module/Employee/src/Employee/Model 并在Employee.phpfile中添加以下更改。
<?php
namespace Employee\Model;

// Add these import statements
use Zend\InputFilter\InputFilter;
use Zend\InputFilter\InputFilterAwareInterface;
use Zend\InputFilter\InputFilterInterface;

class Employee implements InputFilterAwareInterface {
   public $id;
   public $emp_name;
   public $emp_job;
   protected $inputFilter;
   public function exchangeArray($data) {
      $this->id = (isset($data['id'])) ? $data['id'] : null;
      $this->emp_name = (isset($data['emp_name'])) ? $data['emp_name'] : null;
      $this->emp_job = (isset($data['emp_job']))  ? $data['emp_job'] : null;
   }

   // Add content to these methods:
   public function setInputFilter(InputFilterInterface $inputFilter) {
      throw new \Exception("Not used");
   }
   public function getInputFilter() {
      if (!$this->inputFilter) {
         $inputFilter = new InputFilter();
         $inputFilter->add(array(
            'name' => 'id',
            'required' => true,
            'filters' => array(
               array('name' => 'Int'),
            ),
         ));
         $inputFilter->add(array(
            'name' => 'emp_name',
            'required' => true,
            'filters' => array(
               array('name' => 'StripTags'),
               array('name' => 'StringTrim'),
            ),
            'validators' => array(
               array('name' => 'StringLength',
                        'options' => array(
                           'encoding' => 'UTF-8',
                           'min' => 1,
                           'max' => 50,
                        ),
                    ),
                ),
            ));
         $inputFilter->add(array(
            'name' => 'emp_job',
            'required' => true,
            'filters' => array(
               array('name' => 'StripTags'),
               array('name' => 'StringTrim'),
            ),
            'validators' => array(
               array('name' => 'StringLength',
                  'options' => array(
                     'encoding' => 'UTF-8',
                     'min' => 1,
                     'max' => 50,
                  ),
                  ),
               ),
         ));
         $this->inputFilter = $inputFilter;
      }
      return $this->inputFilter;
   }
}
第18步:在Employee Controller中添加addAction
在EmployeeController类中添加以下更改。
<?php
使用 Zend\Mvc\Controller\AbstractActionController;
使用 Zend\View\Model\ViewModel;
使用员工\模型\员工;
使用 Employee\Model\EmployeeTable;
使用 Employee\Form\EmployeeForm;

公共函数 addAction() {
   $form = new EmployeeForm();
   $form->get('提交')->setValue('添加');
   $request = $this->getRequest();

   if ($request->isPost()) {
      $员工=新员工();
      $form->setInputFilter($employee->getInputFilter());
      $form->setData($request->getPost());

      if ($form->isValid()) {
         $employee->exchangeArray($form->getData());
         $this->table->saveEmployee($employee);

         // 重定向到员工列表
         返回 $this->redirect()->toRoute('employee');
      }
   }
   返回数组('form' => $form);
}
步骤 19:在 EmployeeTable 类中添加保存功能
在 EmployeeTable 类中添加以下两个函数 - myapp/module/Employee/src/Model/EmployeeTable.php
public function getEmployee($id) {
   $id  = (int) $id;
   $rowset = $this->tableGateway->select(array('id' => $id));
   $row = $rowset->current();
   if (!$row) {
      throw new \Exception("Could not find row $id");
   }
   return $row;
}
public function saveEmployee(Employee $employee) {
   $data = array (
      'emp_name' => $employee->emp_name,
      'emp_job'  => $employee->emp_job,
   );
   $id = (int) $employee->id;
   if ($id == 0) {
      $this->tableGateway->insert($data);
   } else {
      if ($this->getEmployee($id)) {
         $this->tableGateway->update($data, array('id' => $id));
      } else {
         throw new \Exception('Employee id does not exist');
      }
   }
}
第20步:为AddAction方法创建视图脚本,Add.phtml
在 myapp/module/view/employee/employee 中的“Add.phtml”文件中添加以下更改。
<?php
   $title = 'Add new employee';
   $this->headTitle($title);
?>
<h1><?php echo $this->escapeHtml($title); ?></h1>

<?php
   $form->setAttribute('action', $this->url('employee', array('action' => 'add')));
   $form->prepare();
   echo $this->form()->openTag($form);
   echo $this->formHidden($form->get('id'));
   echo $this->formRow($form->get('emp_name'))."<br>";
   echo $this->formRow($form->get('emp_job'))."<br>";
   echo $this->formSubmit($form->get('submit'));
   echo $this->form()->closeTag();
Request the application using the url, http://localhost:8080/employee/add
结果
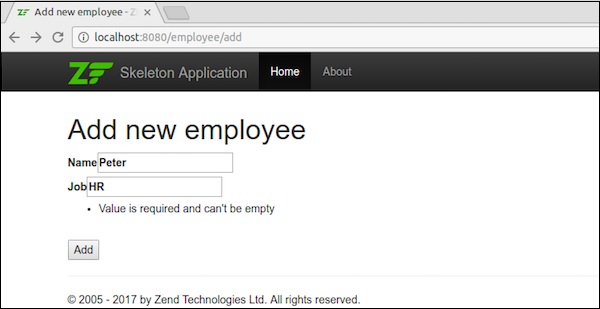
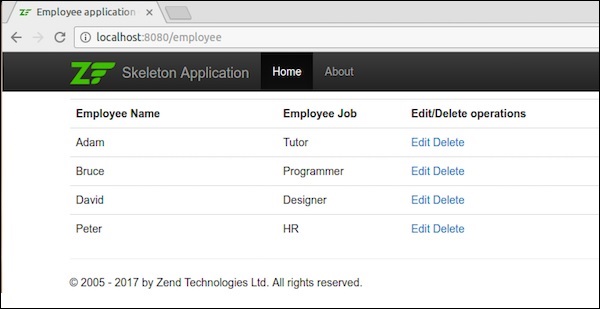
添加数据后,它将重定向到主页。
步骤 21:编辑员工记录
让我们在Employee模块中执行编辑数据操作。在Employeecontroller.php中更新以下更改。
public function editAction() {
   $id = (int) $this->params()->fromRoute('id', 0);
   if (!$id) {
      return $this->redirect()->toRoute('employee', array(
         'action' => 'add'
      ));
   }
   try {
      $employee = $this->table->getEmployee($id);
   } catch (\Exception $ex) {
      return $this->redirect()->toRoute('employee', array(
         'action' => 'index'
      ));
   }
   $form = new EmployeeForm();
   $form->bind($employee);
   $form->get('submit')->setAttribute('value', 'Edit');
   $request = $this->getRequest();

   if ($request->isPost()) {
      $form->setInputFilter($employee->getInputFilter());
      $form->setData($request->getPost());
      if ($form->isValid()) {
         $this->table->saveEmployee($employee);

         // Redirect to list of employees
         return $this->redirect()->toRoute('employee');
      }
   }
   return array('id' => $id, 'form' => $form,);
}
在这里,我们查找匹配路由中的id,然后加载员工详细信息以进行编辑操作。
第22步:Employee.php
现在,在“Employee.php”文件中添加以下更改,该文件位于 - myapp/module/Employee/src/Employee/Model/ 目录中。
public function getArrayCopy() {
   return get_object_vars($this);
}
在这里,Zend\Stdlib\Hydrator\ArraySerialized 期望在模型中找到两个方法:getArrayCopy()和ExchangeArray()。
其中,使用exchangeArray()进行迭代。该函数用于绑定员工表中的数据。
现在,我们需要为editAction()创建一个视图脚本。
第23步:创建Edit.phtml
在模块/Employee/view/employee/employee/edit.phtml中创建视图脚本文件
<?php
   $title = 'Edit employee records';
   $this->headTitle($title);
?>
<h1><?php echo $this->escapeHtml($title); ?></h1>

<?php
$form = $this->form;
$form->setAttribute('action', $this->url(
   'employee',
   array('action' => 'edit', 'id' => $this->id,)
));
$form->prepare();
echo $this->form()->openTag($form);
echo $this->formHidden($form->get('id'));
echo $this->formRow($form->get('emp_name'))."<br>";
echo $this->formRow($form->get('emp_job'))."<br>";
echo $this->formSubmit($form->get('submit'));
echo $this->form()->closeTag();
编辑员工详细信息如以下屏幕截图所示。
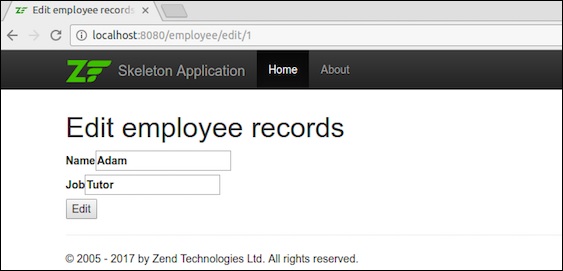
数据编辑完成后,将重定向到主页。
步骤24:添加deleteEmployee方法
在EmployeeTable类中添加deleteEmployee方法 - myapp/module/Employee/src/Model/EmployeeTable.php
public function deleteEmployee($id) {
   $this->tableGateway->delete(['id' => (int) $id]);
}
步骤25:删除员工记录
现在让我们在Employee模块中执行删除数据操作。在 EmployeeController 类中添加以下方法,deleteAction 。
public function deleteAction() {
   $id = (int) $this->params()->fromRoute('id', 0);
   if (!$id) {
      return $this->redirect()->toRoute('employee');
   }
   $request = $this->getRequest();
   if ($request->isPost()) {
      $del = $request->getPost('del', 'No');
      if ($del == 'Yes') {
         $id = (int) $request->getPost('id');
         $this->table->deleteEmployee($id);
      }
      return $this->redirect()->toRoute('employee');
   }
   return array(
      'id' => $id,
      'employee' => $this->table->getEmployee($id)
   );
}
这里,deleteEmployee()方法通过员工的id删除员工并重定向到员工列表页面(主页)。
现在让我们为deleteAction() 方法创建相应的视图脚本。
步骤 26:创建视图脚本
在myapp/module/Employee/view/employee/employee/delete.phtml中创建一个名为 delete.phtml 的文件,并在其中添加以下代码。
<?php
   $title = 'Delete an employee record';
   $this->headTitle($title);
?>
<h1><?php echo $this->escapeHtml($title); ?></h1>

'<?php echo $this->escapeHtml($employee->emp_name); ?>' by
'<?php echo $this->escapeHtml($employee->emp_job); ?&'?
<?php
   $url = $this->url('employee', array('action' => 'delete', 'id' => $this->id,));
?>

<form action ="<?php echo $url; ?>" method = "post">
   <div>
      <input type = "hidden" name = "id" value = "<?php echo (int) $employee->id; ?>" />
      <input type = "submit" name = "del" value = "Yes" />
      <input type = "submit" name = "del" value = "No" />
   </div>
</form>
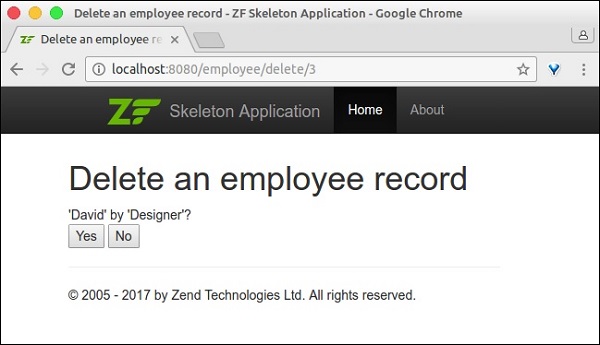
现在,使用主页中的编辑链接删除任何员工,结果将如以下屏幕截图所示。
结果
我们已经通过实现所有必要的功能成功完成了员工模块。
结论
在当前的竞争环境中,Zend框架被开发者放在了首位。它为 PHP 语言中的任何程序或任何类型的应用程序提供抽象。它是一个成熟的框架,支持现代 PHP 语言功能。它有趣、专业、不断发展并与当前技术保持同步。