- 角度材质 7 教程
- Angular Material 7 - 主页
- Angular 材料 7 - 概述
- 环境设置
- 表单控件
- Angular Material 7 - 自动完成
- Angular 材质 7 - 复选框
- Angular Material 7 - 日期选择器
- Angular Material 7 - 表单字段
- 角度材质 7 - 输入
- Angular Material 7 - 单选按钮
- 角度材质 7 - 选择
- 角度材料 7 - 滑块
- Angular Material 7 - 切换滑块
- 导航
- Angular 材质 7 - 菜单
- Angular Material 7 - 侧面导航
- Angular Material 7 - 工具栏
- 布局
- 角度材料 7 - 卡片
- 角度材料 7 - 分隔线
- Angular Material 7 - 扩展面板
- Angular Material 7 - 网格列表
- Angular 材质 7 - 列表
- 角度材料 7 - 步进器
- Angular Material 7 - 选项卡
- 角度材质 7 - 树
- 按钮和指示灯
- 角度材质 7 - 按钮
- Angular Material 7 - 按钮切换
- Angular Material 7 - 徽章
- 角材料 7 - 芯片
- Angular Material 7 - 图标
- Angular Material 7 - 进度旋转器
- Angular Material 7 - 进度条
- 角度材质 7 - 波纹
- 弹出窗口和模态窗口
- Angular Material 7 - SnackBar
- Angular Material 7 - 工具提示
- 数据表
- Angular Material 7 - 分页器
- Angular Material 7 - 排序标题
- 角材料 7 - 表格
- Angular Material 7 资源
- Angular Material 7 - 快速指南
- Angular Material 7 - 资源
- Angular Material 7 - 讨论
角度材质 7 - 树
<mat-tree>是一个 Angular 指令,用于创建具有材质样式的树以显示分层数据。
在本章中,我们将展示使用 Angular Material 绘制树所需的配置。
以下是修改后的模块描述符app.module.ts的内容。
import { BrowserModule } from '@angular/platform-browser';
import { NgModule } from '@angular/core';
import { AppComponent } from './app.component';
import {BrowserAnimationsModule} from '@angular/platform-browser/animations';
import {MatTreeModule, MatIconModule, MatButtonModule} from '@angular/material'
import {FormsModule, ReactiveFormsModule} from '@angular/forms';
@NgModule({
   declarations: [
      AppComponent
   ],
   imports: [
      BrowserModule,
      BrowserAnimationsModule,
      MatTreeModule, MatIconModule, MatButtonModule,
      FormsModule,
      ReactiveFormsModule
   ],
   providers: [],
   bootstrap: [AppComponent]
})
export class AppModule { }
以下是修改后的 HTML 主机文件app.component.html的内容。
<mat-tree [dataSource] = "dataSource" [treeControl] = "treeControl">
   <mat-tree-node *matTreeNodeDef = "let node" matTreeNodeToggle matTreeNodePadding>
      <button mat-icon-button disabled></button>
      {{node.filename}} : {{node.type}}
   </mat-tree-node>
   <mat-tree-node *matTreeNodeDef = "let node;when: hasChild" matTreeNodePadding>
      <button mat-icon-button matTreeNodeToggle [attr.aria-label] = "'toggle ' + node.filename">
         <mat-icon class = "mat-icon-rtl-mirror">
            {{treeControl.isExpanded(node) ? 'expand_more' : 'chevron_right'}}
         </mat-icon>
      </button>
      {{node.filename}}
   </mat-tree-node>
</mat-tree>
以下是修改后的 ts 文件app.component.ts的内容。
import {FlatTreeControl} from '@angular/cdk/tree';
import {Component, Injectable} from '@angular/core';
import {MatTreeFlatDataSource, MatTreeFlattener} from '@angular/material/tree';
import {BehaviorSubject, Observable, of as observableOf} from 'rxjs';
export class FileNode {
   children: FileNode[];
   filename: string;
   type: any;
}
export class FileFlatNode {
   constructor(
      public expandable: boolean, public filename: string, public level: number, public type: any) {}
}
const TREE_DATA = JSON.stringify({
   Documents: {
      angular: {
         src: {
            compiler: 'ts',
            core: 'ts'
         }
      },
      material2: {
         src: {
            button: 'ts',
            checkbox: 'ts',
            input: 'ts'
         }
      }
   }
});
@Injectable()
export class FileDatabase {
   dataChange = new BehaviorSubject<FileNode[]>([]);
   get data(): FileNode[] { return this.dataChange.value; }
   constructor() {
      this.initialize();
   }
   initialize() {
      const dataObject = JSON.parse(TREE_DATA);
      const data = this.buildFileTree(dataObject, 0);
      this.dataChange.next(data);
   }
   buildFileTree(obj: {[key: string]: any}, level: number): FileNode[] {
      return Object.keys(obj).reduce<FileNode[]>((accumulator, key) => {
         const value = obj[key];
         const node = new FileNode();
         node.filename = key;
         if (value != null) {
            if (typeof value === 'object') {
               node.children = this.buildFileTree(value, level + 1);
            } else {
               node.type = value;
            }
         }
         return accumulator.concat(node);
      }, []);
   }
}
@Component({
   selector: 'app-root',
   templateUrl: 'app.component.html',
   styleUrls: ['app.component.css'],
   providers: [FileDatabase]
})
export class AppComponent {
   treeControl: FlatTreeControl<FileFlatNode>;
   treeFlattener: MatTreeFlattener<FileNode, FileFlatNode>;
   dataSource: MatTreeFlatDataSource<FileNode, FileFlatNode>;
   constructor(database: FileDatabase) {
      this.treeFlattener = new MatTreeFlattener(this.transformer, this._getLevel,
      this._isExpandable, this._getChildren);
      this.treeControl = new FlatTreeControl<FileFlatNode>(this._getLevel, this._isExpandable);
      this.dataSource = new MatTreeFlatDataSource(this.treeControl, this.treeFlattener);
      database.dataChange.subscribe(data => this.dataSource.data = data);
   }
   transformer = (node: FileNode, level: number) => {
      return new FileFlatNode(!!node.children, node.filename, level, node.type);
   }
   private _getLevel = (node: FileFlatNode) => node.level;
   private _isExpandable = (node: FileFlatNode) => node.expandable;
   private _getChildren = (node: FileNode): Observable<FileNode[]> => observableOf(node.children);
   hasChild = (_: number, _nodeData: FileFlatNode) => _nodeData.expandable;
}
结果
验证结果。
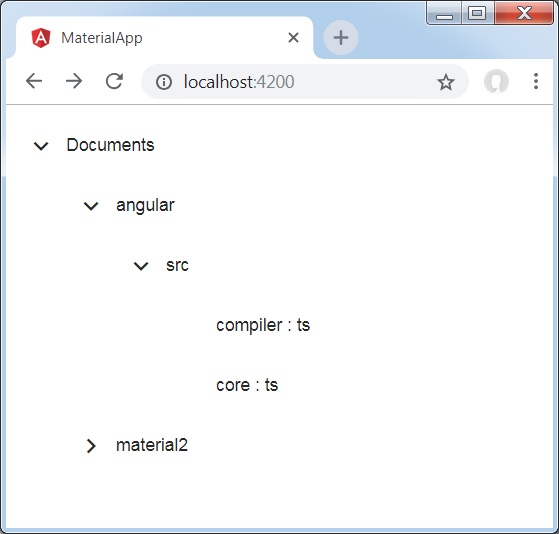
细节
- 首先,我们使用 mat-tree 和 mat-tree-node 创建树。
- 然后,我们在 ts 文件中创建数据源并将其与 mat-tree 绑定。