- GraphQL Tutorial
- GraphQL - Home
- GraphQL - Introduction
- GraphQL - Environment Setup
- GraphQL - Architecture
- GraphQL - Application Components
- GraphQL - Example
- GraphQL - Type System
- GraphQL - Schema
- GraphQL - Resolver
- GraphQL - Query
- GraphQL - Mutation
- GraphQL - Validation
- GraphQL - JQuery Integration
- GraphQL - React Integration
- GraphQL - Apollo Client
- GraphQL - Authenticating Client
- GraphQL - Caching
- GraphQL Useful Resources
- GraphQL - Quick Guide
- GraphQL - Useful Resources
- GraphQL - Discussion
GraphQL - 验证客户端
身份验证是验证用户或进程身份的过程或操作。应用程序对用户进行身份验证以确保匿名用户无法获取数据非常重要。在本节中,我们将学习如何对 GraphQL 客户端进行身份验证。
智威汤逊快递
在此示例中,我们将使用 jQuery 创建客户端应用程序。为了验证请求,我们将在服务器端使用 express-jwt模块。
express-jwt 模块是一个中间件,可让您使用 JWT 令牌对 HTTP 请求进行身份验证。JSON Web Token (JWT) 是一个长字符串,用于标识登录用户。
用户成功登录后,服务器会生成 JWT 令牌。该标记明确标识日志。换句话说,令牌是用户身份的表示。因此,下次客户端访问服务器时,必须出示此令牌才能获取所需的资源。客户端可以是移动应用程序或 Web 应用程序。

插图
我们将按照逐步的过程来理解这个插图。
设置服务器
以下是设置服务器的步骤 -
第 1 步 - 下载并安装项目所需的依赖项
创建文件夹 auth-server-app。 从终端将目录更改为 auth-server-app 。请按照“环境设置”一章中说明的步骤 3 至 5 进行操作。
第 2 步 - 创建架构
在项目文件夹 auth-server-app中 添加schema.graphql文件 并添加以下代码 -type Query
{
greetingWithAuth:String
}
步骤 3 - 添加解析器
在项目文件夹中创建文件resolvers.js并添加以下代码 -
解析器将验证经过身份验证的用户对象在 GraphQL 的上下文对象中是否可用。如果经过身份验证的用户不可用,它将引发异常。
const db = require('./db')

const Query = {
   greetingWithAuth:(root,args,context,info) => {

      //check if the context.user is null
      if (!context.user) {
         throw new Error('Unauthorized');
      }
      return "Hello from TutorialsPoint, welcome back : "+context.user.firstName;
   }
}

module.exports = {Query}
步骤 4 - 创建 Server.js 文件
身份验证中间件使用 JSON Web 令牌对调用者进行身份验证。身份验证的 URL 为 http://localhost:9000/login。
这是术后操作。用户必须提交他的电子邮件和密码,这些信息将从后端进行验证。如果使用 jwt.sign 方法生成有效令牌,客户端必须在后续请求的标头中发送此令牌。
如果令牌有效,则将使用解码后的 JSON 对象设置 req.user,以供后续中间件用于授权和访问控制。
以下代码使用两个模块 - jsonwebtoken 和express-jwt 来验证请求 -
当用户单击欢迎按钮时,将发出对 /graphql 路由的请求。如果用户未通过身份验证,系统将提示他进行身份验证。
用户会看到一个接受电子邮件 ID 和密码的表单。在我们的示例中,/login 路由负责对用户进行身份验证。
/login 路由验证是否在数据库中找到用户提供的凭据的匹配项。
如果凭据无效,则会向用户返回 HTTP 401 异常。
如果凭据有效,服务器会生成一个令牌。该令牌作为响应的一部分发送给用户。这是由 jwt.sign 函数完成的。
const expressJwt = require('express-jwt');
const jwt = require('jsonwebtoken');

//private key
const jwtSecret = Buffer.from('Zn8Q5tyZ/G1MHltc4F/gTkVJMlrbKiZt', 'base64');

app.post('/login', (req, res) => {
   const {email, password} = req.body;

   //check database
   const user = db.students.list().find((user) =>  user.email === email);
   if (!(user && user.password === password)) {
      res.sendStatus(401);
      return;
   }

   //generate a token based on private key, token doesn't have an expiry
   const token = jwt.sign({sub: user.id}, jwtSecret);
   res.send({token});
});
对于每个请求,都会调用 app.use() 函数。这反过来将调用expressJWT中间件。该中间件将解码 JSON Web Token。存储在令牌中的用户 ID 将被检索并存储为请求对象中的属性 user。
//decodes the JWT and stores in request object
app.use(expressJwt({
   secret: jwtSecret,
   credentialsRequired: false
}));
为了使用户属性在 GraphQL 上下文中可用,该属性被分配给 上下文 对象,如下所示 -
//Make req.user available to GraphQL context
app.use('/graphql', graphqlExpress((req) => ({
   schema,
   context: {user: req.user &&apm; db.students.get(req.user.sub)}
})));
在当前文件夹路径中创建 server.js 。完整的 server.js 文件如下 -
const bodyParser = require('body-parser');
const cors = require('cors');
const express = require('express');
const expressJwt = require('express-jwt'); //auth
const jwt = require('jsonwebtoken'); //auth
const db = require('./db');

var port = process.env.PORT || 9000
const jwtSecret = Buffer.from('Zn8Q5tyZ/G1MHltc4F/gTkVJMlrbKiZt', 'base64');
const app = express();

const fs = require('fs')
const typeDefs = fs.readFileSync('./schema.graphql',{encoding:'utf-8'})
const resolvers = require('./resolvers')
const {makeExecutableSchema} = require('graphql-tools')

const schema = makeExecutableSchema({typeDefs, resolvers})

app.use(cors(), bodyParser.json(), expressJwt({
   secret: jwtSecret,
   credentialsRequired: false
}));

const  {graphiqlExpress,graphqlExpress} = require('apollo-server-express')

app.use('/graphql', graphqlExpress((req) => ({
   schema,
   context: {user: req.user && db.students.get(req.user.sub)}
})));
app.use('/graphiql',graphiqlExpress({endpointURL:'/graphql'}))

//authenticate students
app.post('/login', (req, res) => {
   const email = req.body.email;
   const password = req.body.password;

   const user = db.students.list().find((user) =>  user.email === email);
   if (!(user && user.password === password)) {
      res.sendStatus(401);
      return;
   }
   const token = jwt.sign({sub: user.id}, jwtSecret);
   res.send({token});
});

app.listen(port, () => console.info(`Server started on port ${port}`));
第 5 步 - 运行应用程序
在终端中执行命令 npm start。服务器将在 9000 端口上启动并运行。在这里,我们使用 GraphiQL 作为客户端来测试应用程序。
打开浏览器并输入 URL http://localhost:9000/graphiql。在编辑器中输入以下查询 -
{
   greetingWithAuth
}
在下面的响应中,我们收到错误,因为我们不是经过身份验证的用户。
{
   "data": {
      "greetingWithAuth": null
   },
   "errors": [
      {
         "message": "Unauthorized",
         "locations": [
            {
               "line": 2,
               "column": 3
            }
         ],
         "path": [
            "greetingWithAuth"
         ]
      }
   ]
}
在下一节中,我们将创建一个客户端应用程序来进行身份验证。
设置 JQuery 客户端
在客户端应用程序中,提供了一个问候按钮,它将调用模式greetingWithAuth。如果您在未登录的情况下单击该按钮,则会出现如下错误消息 -

一旦您使用数据库中可用的用户登录,将出现以下屏幕 -
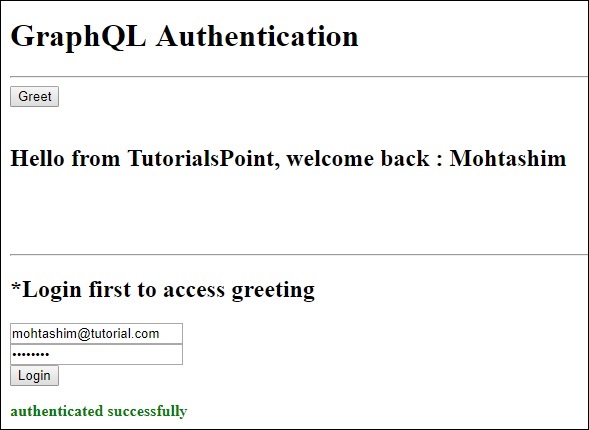
要访问greeting,我们需要首先访问URL http://localhost:9000/login 路由,如下所示。
响应将包含从服务器生成的令牌。
$.ajax({
   url:"http://localhost:9000/login",
   contentType:"application/json",
   type:"POST",
   data:JSON.stringify({email,password}),
   success:function(response) {
      loginToken = response.token;
      $('#authStatus')
      .html("authenticated successfully")
      .css({"color":"green",'font-weight':'bold'});
      $("#greetingDiv").html('').css({'color':''});
   },
   error:(xhr,err) =>  alert('error')
})
成功登录后,我们可以访问greetingWithAuth schema,如下所示。所有带有不记名令牌的后续请求都应该有一个 Authorizationheader。
{
   url: "http://localhost:9000/graphql",
   contentType: "application/json",
   headers: {"Authorization": 'bearer '+loginToken},  type:'POST',
   data: JSON.stringify({
   query:`{greetingWithAuth}`
}
以下是index.html的代码 -
<!DOCTYPE html>
<html>
   <head>
      <script src = "https://ajax.googleapis.com/ajax/libs/jquery/3.3.1/jquery.min.js"></script>
      <script>
         $(document).ready(function() {
            let loginToken = "";
            $("#btnGreet").click(function() {
                  $.ajax({url: "http://localhost:9000/graphql",
                  contentType: "application/json",
                  headers: {"Authorization": 'bearer '+loginToken},
                  type:'POST',
                  data: JSON.stringify({
                  query:`{greetingWithAuth}` }),
                  success: function(result) {
                  $("#greetingDiv").html("<h1>"+result.data.greetingWithAuth+"</h1>")
                  },
                  error:function(jQxhr,error) {
                     if(jQxhr.status == 401) {
                        $("#greetingDiv").html('please authenticate first!!')
                        .css({"color":"red",'font-weight':'bold'})
                        return;
                     }
                     $("#greetingDiv").html('error').css("color","red");
                  }
               });
            });
            $('#btnAuthenticate').click(function() {
               var email =  $("#txtEmail").val();
               var password =  $("#txtPwd").val();
               if(email && password) {
                  $.ajax({
                     url:"http://localhost:9000/login",
                     contentType:"application/json",
                     type:"POST",
                     data:JSON.stringify({email,password}),
                     success:function(response) {
                        loginToken =  response.token;
                        $('#authStatus')
                        .html("authenticated successfully")
                        .css({"color":"green",'font-weight':'bold'});
                        $("#greetingDiv").html('').css({'color':''});
                     },
                     error:(xhr,err) =>  alert('error')
                  })
               }else alert("email and pwd empty")
            })
         });
      </script>
   </head>

   <body>
      <h1> GraphQL Authentication </h1>
      <hr/>
      <section>
         <button id = "btnGreet">Greet</button>
         <br/> <br/>
         <div id = "greetingDiv"></div>
      </section>
      <br/> <br/> <br/>
      <hr/>

      <section id = "LoginSection">
         <header>
            <h2>*Login first to  access greeting </h2>
         </header>
         <input type = "text" value = "mohtashim.mohammad@tutorialpoint.org" placeholder = "enter email" id = "txtEmail"/>
         <br/>

         <input type = "password" value = "pass123" placeholder = "enter password" id = "txtPwd"/>
         <br/>

         <input type = "button" id = "btnAuthenticate"  value = "Login"/>
         <p id = "authStatus"></p>
      </section>
   </body>
</html>