
- Spring Boot 教程
- Spring Boot - 主页
- Spring Boot - 简介
- Spring Boot - 快速入门
- Spring Boot - 引导
- Spring Boot - Tomcat 部署
- Spring Boot - 构建系统
- Spring Boot - 代码结构
- Spring Bean 和依赖注入
- Spring Boot - 跑步者
- Spring Boot - 应用程序属性
- Spring Boot - 日志记录
- 构建 RESTful Web 服务
- Spring Boot - 异常处理
- Spring Boot - 拦截器
- Spring Boot - Servlet 过滤器
- Spring Boot - Tomcat 端口号
- Spring Boot - Rest 模板
- Spring Boot - 文件处理
- Spring Boot - 服务组件
- Spring Boot - Thymeleaf
- 使用 RESTful Web 服务
- Spring Boot - CORS 支持
- Spring Boot - 国际化
- Spring Boot - 调度
- Spring Boot - 启用 HTTPS
- Spring Boot-Eureka 服务器
- 向 Eureka 注册服务
- Zuul代理服务器和路由
- Spring Cloud配置服务器
- Spring Cloud 配置客户端
- Spring Boot - 执行器
- Spring Boot - 管理服务器
- Spring Boot - 管理客户端
- Spring Boot - 启用 Swagger2
- Spring Boot - 创建 Docker 镜像
- 追踪微服务日志
- Spring Boot - Flyway 数据库
- Spring Boot - 发送电子邮件
- Spring Boot-Hystrix
- Spring Boot - Web Socket
- Spring Boot - 批量服务
- Spring Boot-Apache Kafka
- Spring Boot - Twilio
- Spring Boot - 单元测试用例
- 休息控制器单元测试
- Spring Boot - 数据库处理
- 保护 Web 应用程序的安全
- Spring Boot - 使用 JWT 的 OAuth2
- Spring Boot - Google 云平台
- Spring Boot - Google OAuth2 登录
- Spring Boot 资源
- Spring Boot - 快速指南
- Spring Boot - 有用的资源
- Spring Boot - 讨论
Spring Boot - 快速指南
Spring Boot - 简介
Spring Boot 是一个基于 Java 的开源框架,用于创建微服务。它由 Pivotal Team 开发,用于构建独立且生产就绪的 Spring 应用程序。本章将向您介绍 Spring Boot 并熟悉其基本概念。
什么是微服务?
微服务是一种允许开发人员独立开发和部署服务的架构。每个服务运行都有自己的进程,从而实现了支持业务应用的轻量级模型。
优点
微服务为其开发人员提供以下优势 -
- 轻松部署
- 简单的可扩展性
- 与容器兼容
- 最低配置
- 更少的生产时间
什么是 Spring Boot?
Spring Boot 为 Java 开发人员提供了一个良好的平台来开发可以运行的独立且生产级的 Spring 应用程序。您可以从最少的配置开始,而不需要整个 Spring 配置设置。
优点
Spring Boot 为其开发人员提供了以下优势 -
- 易于理解和开发Spring应用程序
- 提高生产力
- 减少开发时间
目标
Spring Boot 的设计目标如下:
- 避免Spring中复杂的XML配置
- 以更简单的方式开发生产就绪的 Spring 应用程序
- 减少开发时间并独立运行应用程序
- 提供更简单的应用程序入门方法
为什么选择 Spring Boot?
您可以选择 Spring Boot,因为它提供的功能和优点如下 -
它提供了一种灵活的方法来配置 Java Bean、XML 配置和数据库事务。
它提供强大的批处理功能并管理 REST 端点。
在 Spring Boot 中,一切都是自动配置的;无需手动配置。
它提供基于注释的 spring 应用程序
简化依赖管理
它包括嵌入式 Servlet 容器
它是如何工作的?
Spring Boot 会根据您使用@EnableAutoConfiguration注解添加到项目中的依赖项自动配置您的应用程序。例如,如果 MySQL 数据库位于您的类路径上,但您尚未配置任何数据库连接,则 Spring Boot 会自动配置内存数据库。
Spring Boot应用程序的入口点是包含@SpringBootApplication注解和main方法的类。
Spring Boot使用@ComponentScan注解自动扫描项目中包含的所有组件。
Spring 启动启动器
对于大型项目来说,处理依赖管理是一项艰巨的任务。Spring Boot 通过为开发人员提供一组依赖项来解决这个问题。
例如,如果你想使用 Spring 和 JPA 来访问数据库,那么在你的项目中包含spring-boot-starter-data-jpa依赖就足够了。
请注意,所有 Spring Boot 启动程序都遵循相同的命名模式spring-boot-starter- *,其中 * 表示它是应用程序的一种类型。
例子
请参阅下面解释的以下 Spring Boot 启动器以更好地理解 -
Spring Boot Starter Actuator 依赖项用于监视和管理您的应用程序。其代码如下所示 -
<dependency>
   <groupId>org.springframework.boot</groupId>
   <artifactId>spring-boot-starter-actuator</artifactId>
</dependency>
Spring Boot Starter Security 依赖项用于 Spring Security。其代码如下所示 -
<dependency>
   <groupId>org.springframework.boot</groupId>
   <artifactId>spring-boot-starter-security</artifactId>
</dependency>
Spring Boot Starter Web 依赖项用于编写 Rest Endpoints。其代码如下所示 -
<dependency>
   <groupId>org.springframework.boot</groupId>
   <artifactId>spring-boot-starter-web</artifactId>
</dependency>
Spring Boot Starter Thyme Leaf 依赖项用于创建 Web 应用程序。其代码如下所示 -
<dependency>
   <groupId>org.springframework.boot</groupId>
   <artifactId>spring-boot-starter-thymeleaf</artifactId>
</dependency>
Spring Boot Starter Test 依赖用于编写测试用例。其代码如下所示 -
<dependency>
   <groupId>org.springframework.boot</groupId>
   <artifactId>spring-boot-starter-test</artifactId>
</dependency>
自动配置
Spring Boot 自动配置会根据您在项目中添加的 JAR 依赖项自动配置您的 Spring 应用程序。例如,如果 MySQL 数据库位于您的类路径上,但您尚未配置任何数据库连接,则 Spring Boot 会自动配置内存数据库。
为此,您需要在主类文件中添加@EnableAutoConfiguration注释或@SpringBootApplication注释。然后,您的 Spring Boot 应用程序将自动配置。
请观察以下代码以更好地理解 -
import org.springframework.boot.SpringApplication;
import org.springframework.boot.autoconfigure.EnableAutoConfiguration;

@EnableAutoConfiguration
public class DemoApplication {
   public static void main(String[] args) {
      SpringApplication.run(DemoApplication.class, args);
   }
}
Spring引导应用程序
Spring Boot应用程序的入口点是包含@SpringBootApplication注释的类。该类应该具有运行 Spring Boot 应用程序的 main 方法。@SpringBootApplication注解包括自动配置、组件扫描和Spring Boot配置。
如果在类中添加了@SpringBootApplication注解,则不需要添加@EnableAutoConfiguration、@ComponentScan和@SpringBootConfiguration注解。@SpringBootApplication注释包括所有其他注释。
请观察以下代码以更好地理解 -
import org.springframework.boot.SpringApplication;
import org.springframework.boot.autoconfigure.SpringBootApplication;

@SpringBootApplication
public class DemoApplication {
   public static void main(String[] args) {
      SpringApplication.run(DemoApplication.class, args);
   }
}
组件扫描
当应用程序初始化时,Spring Boot 应用程序会扫描所有 bean 和包声明。您需要为类文件添加@ComponentScan注释来扫描项目中添加的组件。
请观察以下代码以更好地理解 -
import org.springframework.boot.SpringApplication;
import org.springframework.context.annotation.ComponentScan;

@ComponentScan
public class DemoApplication {
   public static void main(String[] args) {
      SpringApplication.run(DemoApplication.class, args);
   }
}
Spring Boot - 快速入门
本章将教您如何使用 Maven 和 Gradle 创建 Spring Boot 应用程序。
先决条件
您的系统需要满足以下最低要求才能创建 Spring Boot 应用程序 -
- 爪哇7
- Maven 3.2
- 等级 2.5
Spring Boot CLI
Spring Boot CLI 是一个命令行工具,它允许我们运行 Groovy 脚本。这是使用 Spring Boot 命令行界面创建 Spring Boot 应用程序的最简单方法。您可以在命令提示符本身中创建、运行和测试应用程序。
本节向您介绍手动安装 Spring Boot CLI 所涉及的步骤。如需进一步帮助,您可以使用以下链接:https://docs.spring.io/springboot/docs/current-SNAPSHOT/reference/htmlsingle/#getting-started-installing-springboot
您还可以从 Spring Software 存储库下载 Spring CLI 发行版,网址为:https://docs.spring.io/spring-boot/docs/current-SNAPSHOT/reference/htmlsingle/#getting-started-manual-cli-installation
对于手动安装,您需要使用以下两个文件夹 -
spring-boot-cli-2.0.0.BUILD-SNAPSHOT-bin.zip
spring-boot-cli-2.0.0.BUILD-SNAPSHOT-bin.tar.gz
下载后,解压存档文件并按照 install.txt 文件中给出的步骤进行操作。并不是说它不需要任何环境设置。
在 Windows 中,在命令提示符中转到 Spring Boot CLI bin目录并运行命令spring --version以确保 spring CLI 已正确安装。执行命令后,您可以看到 spring CLI 版本,如下所示 -

使用 Groovy 运行 Hello World
创建一个包含 Rest Endpoint 脚本的简单 groovy 文件,并使用 spring boot CLI 运行该 groovy 文件。为此目的请观察此处显示的代码 -
@Controller
class Example {
   @RequestMapping("/")
   @ResponseBody
   public String hello() {
      "Hello Spring Boot"
   }
}
现在,使用名称hello.groovy保存 groovy 文件。请注意,在本示例中,我们将 groovy 文件保存在 Spring Boot CLI bin目录中。现在使用命令spring run hello.groovy运行应用程序,如下面的屏幕截图所示 -

运行 groovy 文件后,所需的依赖项将自动下载,并将在 Tomcat 8080 端口中启动应用程序,如下面的屏幕截图所示 -

Tomcat 启动后,转到 Web 浏览器并点击 URL http://localhost:8080/,您可以看到如图所示的输出。

Spring Boot - 引导
本章将向您解释如何在 Spring Boot 应用程序上执行引导。
弹簧初始化器
引导 Spring Boot 应用程序的方法之一是使用 Spring Initializer。为此,您必须访问 Spring Initializer 网页www.start.spring.io并选择您的构建、Spring Boot 版本和平台。此外,您还需要提供组、工件和运行应用程序所需的依赖项。
请观察以下屏幕截图,其中显示了一个示例,其中我们添加了spring-boot-starter-web依赖项来编写 REST 端点。
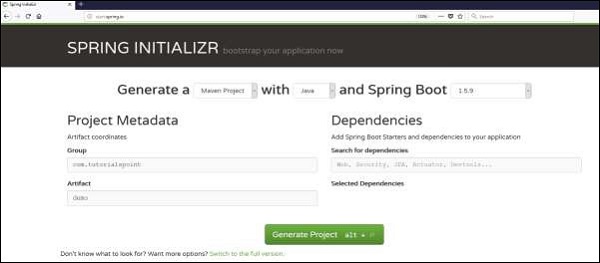
提供组、工件、依赖项、构建项目、平台和版本后,单击“生成项目”按钮。将下载 zip 文件并解压文件。
本节将向您介绍使用 Maven 和 Gradle 的示例。
梅文
下载项目后,解压缩文件。现在,您的pom.xml文件如下所示 -
<?xml version = "1.0" encoding = "UTF-8"?>
<project xmlns = "http://maven.apache.org/POM/4.0.0"
   xmlns:xsi = "http://www.w3.org/2001/XMLSchema-instance"
   xsi:schemaLocation = "http://maven.apache.org/POM/4.0.0
   http://maven.apache.org/xsd/maven-4.0.0.xsd">

   <modelVersion>4.0.0</modelVersion>
   <groupId>com.tutorialspoint</groupId>
   <artifactId>demo</artifactId>
   <version>0.0.1-SNAPSHOT</version>
   <packaging>jar</packaging>

   <name>demo</name>
   <description>Demo project for Spring Boot</description>

   <parent>
      <groupId>org.springframework.boot</groupId>
      <artifactId>spring-boot-starter-parent</artifactId>
      <version>1.5.8.RELEASE</version>
      <relativePath/> <!-- lookup parent from repository -->
   </parent>

   <properties>
      <project.build.sourceEncoding>UTF-8</project.build.sourceEncoding>
      <project.reporting.outputEncoding>UTF-8</project.reporting.outputEncoding>
      <java.version>1.8</java.version>
   </properties>

   <dependencies>
      <dependency>
         <groupId>org.springframework.boot</groupId>
         <artifactId>spring-boot-starter-web</artifactId>
      </dependency>

      <dependency>
         <groupId>org.springframework.boot</groupId>
         <artifactId>spring-boot-starter-test</artifactId>
         <scope>test</scope>
      </dependency>
   </dependencies>

   <build>
      <plugins>
         <plugin>
            <groupId>org.springframework.boot</groupId>
            <artifactId>spring-boot-maven-plugin</artifactId>
         </plugin>
      </plugins>
   </build>

</project>
摇篮
下载项目后,解压缩文件。现在您的build.gradle文件如下所示 -
buildscript {
   ext {
      springBootVersion = '1.5.8.RELEASE'
   }
   repositories {
      mavenCentral()
   }
   dependencies {
      classpath("org.springframework.boot:spring-boot-gradle-plugin:${springBootVersion}")
   }
}
apply plugin: 'java'
apply plugin: 'eclipse'
apply plugin: 'org.springframework.boot'

group = 'com.tutorialspoint'
version = '0.0.1-SNAPSHOT'
sourceCompatibility = 1.8

repositories {
   mavenCentral()
}
dependencies {
   compile('org.springframework.boot:spring-boot-starter-web')
   testCompile('org.springframework.boot:spring-boot-starter-test')
}
类路径依赖
Spring Boot 提供了许多Starters来将 jar 添加到我们的类路径中。例如,为了编写 Rest Endpoint,我们需要在类路径中添加spring-boot-starter-web依赖项。观察下面显示的代码以更好地理解 -
Maven 依赖
<dependencies>
   <dependency>
      <groupId>org.springframework.boot</groupId>
      <artifactId>spring-boot-starter-web</artifactId>
   </dependency>
</dependencies>
Gradle 依赖
dependencies {
   compile('org.springframework.boot:spring-boot-starter-web')
}
主要方法
主要方法应该是编写 Spring Boot Application 类。此类应使用@SpringBootApplication进行注释。这是Spring Boot应用程序启动的入口点。您可以在默认包的src/java/main目录下找到主类文件。
在此示例中,主类文件位于src/java/main目录,默认包为com.tutorialspoint.demo。观察此处显示的代码以更好地理解 -
package com.tutorialspoint.demo;

import org.springframework.boot.SpringApplication;
import org.springframework.boot.autoconfigure.SpringBootApplication;

@SpringBootApplication
public class DemoApplication {
   public static void main(String[] args) {
      SpringApplication.run(DemoApplication.class, args);
   }
}
编写休息端点
要在 Spring Boot 应用程序主类文件本身中编写一个简单的 Hello World Rest 端点,请按照以下步骤操作:
首先,在类的顶部添加@RestController注释。
现在,使用@RequestMapping注释编写一个请求 URI 方法。
然后,Request URI 方法应返回Hello World字符串。
现在,您的主 Spring Boot 应用程序类文件将如下所示:
package com.tutorialspoint.demo;

import org.springframework.boot.SpringApplication;
import org.springframework.boot.autoconfigure.SpringBootApplication;
import org.springframework.web.bind.annotation.RequestMapping;
import org.springframework.web.bind.annotation.RestController;

@SpringBootApplication
@RestController

public class DemoApplication {
   public static void main(String[] args) {
      SpringApplication.run(DemoApplication.class, args);
   }
   @RequestMapping(value = "/")
   public String hello() {
      return "Hello World";
   }
}
创建可执行 JAR
让我们在命令提示符中使用 Maven 和 Gradle 命令创建一个可执行 JAR 文件来运行 Spring Boot 应用程序,如下所示 -
使用 Maven 命令 mvn clean install ,如下所示 -

执行命令后,您可以在命令提示符处看到BUILD SUCCESS消息,如下所示 -

使用 Gradle 命令gradle clean build如下所示 -

执行命令后,您可以在命令提示符中看到BUILD SUCCESSFUL消息,如下所示 -

使用 Java 运行 Hello World
创建可执行 JAR 文件后,您可以在以下目录下找到它。
对于 Maven,您可以在目标目录下找到 JAR 文件,如下所示 -
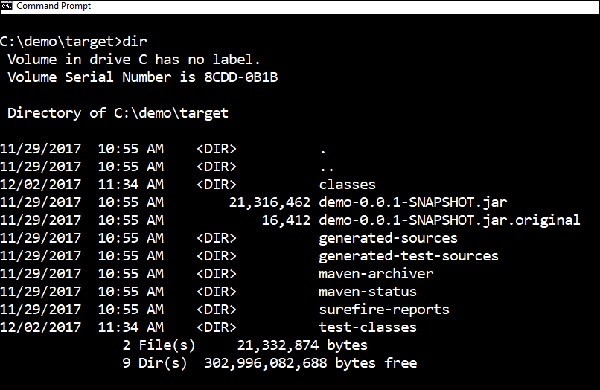
对于 Gradle,您可以在build/libs目录下找到 JAR 文件,如下所示 -
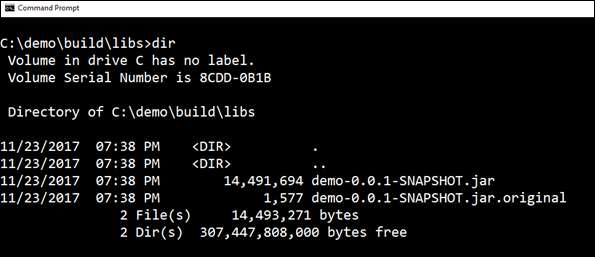
现在,使用命令java –jar <JARFILE>运行 JAR 文件。请注意,在上面的示例中,JAR 文件名为demo-0.0.1-SNAPSHOT.jar

运行 jar 文件后,您可以在控制台窗口中看到输出,如下所示 -

现在,查看控制台,Tomcat 在端口 8080 (http) 上启动。现在,转到 Web 浏览器并点击 URL http://localhost:8080/ ,您可以看到如下所示的输出 -

Spring Boot - Tomcat 部署
通过使用 Spring Boot 应用程序,我们可以创建一个 war 文件来部署到 Web 服务器中。在本章中,您将学习如何创建 WAR 文件并在 Tomcat Web 服务器中部署 Spring Boot 应用程序。
Spring Boot Servlet 初始化器
传统的部署方式是让 Spring Boot Application @SpringBootApplication类扩展SpringBootServletInitializer类。Spring Boot Servlet Initializer 类文件允许您在使用 Servlet 容器启动应用程序时对其进行配置。
用于 JAR 文件部署的 Spring Boot 应用程序类文件的代码如下 -
package com.tutorialspoint.demo;

import org.springframework.boot.SpringApplication;
import org.springframework.boot.autoconfigure.SpringBootApplication;

@SpringBootApplication
public class DemoApplication {
   public static void main(String[] args) {
      SpringApplication.run(DemoApplication.class, args);
   }
}
我们需要扩展SpringBootServletInitializer类来支持 WAR 文件部署。Spring Boot应用程序类文件的代码如下:
package com.tutorialspoint.demo;

import org.springframework.boot.SpringApplication;
import org.springframework.boot.autoconfigure.SpringBootApplication;
import org.springframework.boot.builder.SpringApplicationBuilder;
import org.springframework.boot.web.servlet.support.SpringBootServletInitializer;

@SpringBootApplication
public class DemoApplication  extends SpringBootServletInitializer {
   @Override
   protected SpringApplicationBuilder configure(SpringApplicationBuilder application) {
      return application.sources(DemoApplication.class);
   }
   public static void main(String[] args) {
      SpringApplication.run(DemoApplication.class, args);
   }
}
设置主类
在 Spring Boot 中,我们需要提及应该在构建文件中启动的主类。为此,您可以使用以下代码片段 -
对于 Maven,在pom.xml属性中添加启动类,如下所示 -
<start-class>com.tutorialspoint.demo.DemoApplication</start-class>
对于 Gradle,在 build.gradle 中添加主类名称,如下所示 -
mainClassName="com.tutorialspoint.demo.DemoApplication"
将打包JAR更新为WAR
我们必须使用以下代码片段将打包 JAR 更新为 WAR -
对于 Maven,在pom.xml中将打包添加为 WAR,如下所示 -
<packaging>war</packaging>
对于 Gradle,在build.gradle中添加应用程序插件和 war 插件,如下所示 -
apply plugin: ‘war’
apply plugin: ‘application’
现在,让我们编写一个简单的 Rest 端点来返回字符串“Hello World from Tomcat”。要编写 Rest Endpoint,我们需要将 Spring Boot Web starter 依赖项添加到构建文件中。
对于 Maven,使用如下所示的代码在 pom.xml 中添加 Spring Boot 启动器依赖项 -
<dependency>
   <groupId>org.springframework.boot</groupId>
   <artifactId>spring-boot-starter-web</artifactId>
</dependency>
对于 Gradle,使用如下所示的代码在build.gradle中添加 Spring Boot 启动器依赖项-
dependencies {
   compile('org.springframework.boot:spring-boot-starter-web')
}
现在,使用如下所示的代码在 Spring Boot 应用程序类文件中编写一个简单的 Rest Endpoint -
package com.tutorialspoint.demo;

import org.springframework.boot.SpringApplication;
import org.springframework.boot.autoconfigure.SpringBootApplication;
import org.springframework.boot.builder.SpringApplicationBuilder;
import org.springframework.boot.web.servlet.support.SpringBootServletInitializer;
import org.springframework.web.bind.annotation.RequestMapping;
import org.springframework.web.bind.annotation.RestController;

@SpringBootApplication
@RestController
public class DemoApplication  extends SpringBootServletInitializer {
   @Override
   protected SpringApplicationBuilder configure(SpringApplicationBuilder application) {
      return application.sources(DemoApplication.class);
   }
   public static void main(String[] args) {
      SpringApplication.run(DemoApplication.class, args);
   }

   @RequestMapping(value = "/")
   public String hello() {
      return "Hello World from Tomcat";
   }
}
打包您的应用程序
现在,使用 Maven 和 Gradle 命令创建一个 WAR 文件以部署到 Tomcat 服务器中,以打包您的应用程序,如下所示 -
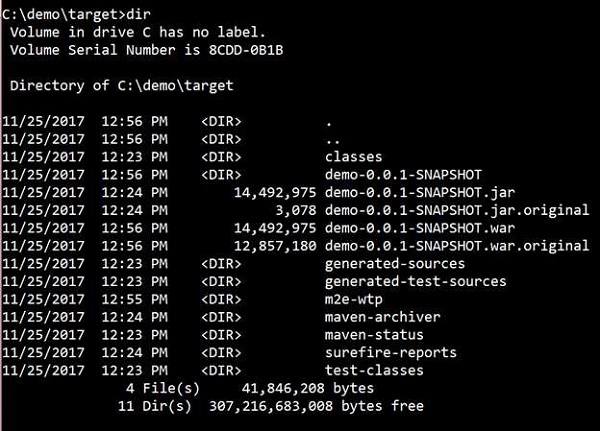
对于 Maven,请使用命令mvn package来打包应用程序。然后,将创建 WAR 文件,您可以在目标目录中找到它,如下面的屏幕截图所示 -

对于 Gradle,使用命令gradle clean build来打包您的应用程序。然后,您的 WAR 文件将被创建,您可以在build/libs目录下找到它。观察此处给出的屏幕截图以更好地理解 -


部署到 Tomcat
现在,运行 Tomcat 服务器,并将 WAR 文件部署到webapps目录下。观察此处显示的屏幕截图以更好地理解 -
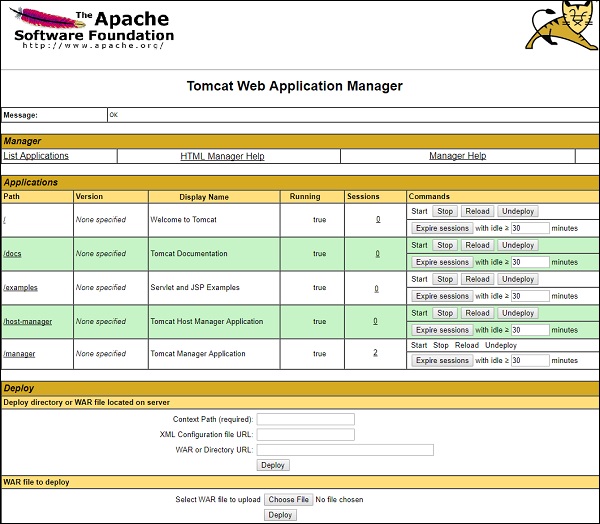

成功部署后,在 Web 浏览器中点击 URL http://localhost:8080/demo-0.0.1-SNAPSHOT/并观察输出将如下面的屏幕截图所示 -

下面给出了用于此目的的完整代码。
pom.xml
<?xml version = "1.0" encoding = "UTF-8"?>
<project xmlns = "http://maven.apache.org/POM/4.0.0"
   xmlns:xsi = "http://www.w3.org/2001/XMLSchema-instance"

xsi:schemaLocation = "http://maven.apache.org/POM/4.0.0 http://maven.apache.org/xsd/maven-4.0.0.xsd">
<modelVersion>4.0.0</modelVersion>

   <groupId>com.tutorialspoint</groupId>
   <artifactId>demo</artifactId>
   <version>0.0.1-SNAPSHOT</version>
   <packaging>war</packaging>
   <name>demo</name>
   <description>Demo project for Spring Boot</description>

   <parent>
      <groupId>org.springframework.boot</groupId>
      <artifactId>spring-boot-starter-parent</artifactId>
      <version>1.5.8.RELEASE</version>
      <relativePath/> <!-- lookup parent from repository -->
   </parent>

   <properties>
      <project.build.sourceEncoding>UTF-8</project.build.sourceEncoding>
      <project.reporting.outputEncoding>UTF-8</project.reporting.outputEncoding>
      <java.version>1.8</java.version>
      <start-class>com.tutorialspoint.demo.DemoApplication</start-class>
   </properties>

   <dependencies>
      <dependency>
         <groupId>org.springframework.boot</groupId>
         <artifactId>spring-boot-starter-web</artifactId>
      </dependency>
      <dependency>
         <groupId>org.springframework.boot</groupId>
         <artifactId>spring-boot-starter-test</artifactId>
         <scope>test</scope>
      </dependency>
   </dependencies>

   <build>
      <plugins>
         <plugin>
            <groupId>org.springframework.boot</groupId>
            <artifactId>spring-boot-maven-plugin</artifactId>
         </plugin>
      </plugins>
   </build>

</project>
构建.gradle
buildscript {
   ext {
      springBootVersion = '1.5.8.RELEASE'
   }
   repositories {
      mavenCentral()
   }
dependencies {
      classpath("org.springframework.boot:spring-boot-gradle-plugin:${springBootVersion}")
   }
}

apply plugin: 'java'
apply plugin: 'eclipse'
apply plugin: 'org.springframework.boot'
apply plugin: 'war'
apply plugin: 'application'

group = 'com.tutorialspoint'
version = '0.0.1-SNAPSHOT'
sourceCompatibility = 1.8
mainClassName = "com.tutorialspoint.demo.DemoApplication"

repositories {
   mavenCentral()
}
dependencies {
   compile('org.springframework.boot:spring-boot-starter-web')
   testCompile('org.springframework.boot:spring-boot-starter-test')
}
主要 Spring Boot 应用程序类文件的代码如下 -
package com.tutorialspoint.demo;

import org.springframework.boot.SpringApplication;
import org.springframework.boot.autoconfigure.SpringBootApplication;
import org.springframework.boot.builder.SpringApplicationBuilder;
import org.springframework.boot.web.servlet.support.SpringBootServletInitializer;
import org.springframework.web.bind.annotation.RequestMapping;
import org.springframework.web.bind.annotation.RestController;

@SpringBootApplication
@RestController
public class DemoApplication  extends SpringBootServletInitializer {
   @Override
   protected SpringApplicationBuilder configure(SpringApplicationBuilder application) {
      return application.sources(DemoApplication.class);
   }
   public static void main(String[] args) {
      SpringApplication.run(DemoApplication.class, args);
   }

   @RequestMapping(value = "/")
   public String hello() {
      return "Hello World from Tomcat";
   }
}
Spring Boot - 构建系统
在 Spring Boot 中,选择构建系统是一项重要任务。我们推荐 Maven 或 Gradle,因为它们为依赖管理提供了良好的支持。Spring 不能很好地支持其他构建系统。
依赖管理
Spring Boot 团队提供了一个依赖项列表来支持每个版本的 Spring Boot 版本。您不需要在构建配置文件中提供依赖项的版本。Spring Boot 会根据版本自动配置依赖项版本。请记住,当您升级 Spring Boot 版本时,依赖项也会自动升级。
注意- 如果您想指定依赖项的版本,您可以在配置文件中指定它。但是,Spring Boot团队强烈建议不需要指定依赖的版本。
Maven依赖
对于Maven配置,我们应该继承Spring Boot Starter父项目来管理Spring Boot Starters依赖项。为此,我们只需在pom.xml文件中继承起始父级,如下所示。
<parent>
   <groupId>org.springframework.boot</groupId>
   <artifactId>spring-boot-starter-parent</artifactId>
   <version>1.5.8.RELEASE</version>
</parent>
我们应该指定 Spring Boot Parent Starter 依赖项的版本号。那么对于其他starter依赖项,我们不需要指定Spring Boot版本号。观察下面给出的代码 -
<dependencies>
   <dependency>
      <groupId>org.springframework.boot</groupId>
      <artifactId>spring-boot-starter-web</artifactId>
   </dependency>
</dependencies>
等级依赖
我们可以将 Spring Boot Starters 依赖项直接导入到build.gradle文件中。我们不需要像 Maven for Gradle 这样的 Spring Boot 启动父依赖。观察下面给出的代码 -
buildscript {
   ext {
      springBootVersion = '1.5.8.RELEASE'
   }
   repositories {
      mavenCentral()
   }
   dependencies {
      classpath("org.springframework.boot:spring-boot-gradle-plugin:${springBootVersion}")
   }
}
同样,在Gradle中,我们不需要为依赖项指定Spring Boot版本号。Spring Boot 会根据版本自动配置依赖。
dependencies {
   compile('org.springframework.boot:spring-boot-starter-web')
}
Spring Boot - 代码结构
Spring Boot 没有任何可以使用的代码布局。但是,有一些最佳实践可以帮助我们。本章详细讨论它们。
默认套餐
没有任何包声明的类被视为默认包。请注意,通常不建议使用默认包声明。当您使用默认包时,Spring Boot 会导致自动配置或组件扫描故障等问题。
注意- Java 推荐的包声明命名约定是反向域名。例如 - com.tutorialspoint.myproject
典型布局
Spring Boot 应用程序的典型布局如下图所示 -

Application.java 文件应声明 main 方法以及 @SpringBootApplication。请观察下面给出的代码以更好地理解 -
package com.tutorialspoint.myproject;

import org.springframework.boot.SpringApplication;
import org.springframework.boot.autoconfigure.SpringBootApplication;

@SpringBootApplication
public class Application {
   public static void main(String[] args) {SpringApplication.run(Application.class, args);}
}
Bean 和依赖注入
在 Spring Boot 中,我们可以使用 Spring Framework 来定义我们的 bean 及其依赖注入。@ComponentScan注解用于查找bean以及相应的用@Autowired注解注入的bean。
如果您遵循 Spring Boot 典型布局,则无需为@ComponentScan注解指定任何参数。所有组件类文件都会自动注册到 Spring Beans 中。
以下示例提供了有关自动连接 Rest Template 对象并为其创建 Bean 的想法 -
@Bean
public RestTemplate getRestTemplate() {
   return new RestTemplate();
}
以下代码显示了主 Spring Boot 应用程序类文件中自动连接 Rest Template 对象和 Bean 创建对象的代码 -
package com.tutorialspoint.demo;

import org.springframework.beans.factory.annotation.Autowired;
import org.springframework.boot.SpringApplication;
import org.springframework.boot.autoconfigure.SpringBootApplication;
import org.springframework.context.annotation.Bean;
import org.springframework.web.client.RestTemplate;

@SpringBootApplication
public class DemoApplication {
@Autowired
   RestTemplate restTemplate;

   public static void main(String[] args) {
      SpringApplication.run(DemoApplication.class, args);
   }
   @Bean
   public RestTemplate getRestTemplate() {
      return new RestTemplate();
   }
}
Spring Boot - 跑步者
Application Runner 和 Command Line Runner 接口允许您在 Spring Boot 应用程序启动后执行代码。您可以在应用程序启动后立即使用这些接口执行任何操作。本章详细讨论它们。
应用程序运行者
Application Runner是Spring Boot应用程序启动后用于执行代码的接口。下面给出的示例显示了如何在主类文件上实现 Application Runner 接口。
package com.tutorialspoint.demo;

import org.springframework.boot.ApplicationArguments;
import org.springframework.boot.ApplicationRunner;
import org.springframework.boot.SpringApplication;
import org.springframework.boot.autoconfigure.SpringBootApplication;

@SpringBootApplication
public class DemoApplication implements ApplicationRunner {
   public static void main(String[] args) {
      SpringApplication.run(DemoApplication.class, args);
   }
   @Override
   public void run(ApplicationArguments arg0) throws Exception {
      System.out.println("Hello World from Application Runner");
   }
}
现在,如果您从 Application Runner观察 Hello World 下面的控制台窗口,就会发现 println 语句是在 Tomcat 启动后执行的。下面的截图是否相关?

命令行运行器
Command Line Runner 是一个界面。它用于在Spring Boot应用程序启动后执行代码。下面给出的示例显示了如何在主类文件上实现 Command Line Runner 接口。
package com.tutorialspoint.demo;

import org.springframework.boot.CommandLineRunner;
import org.springframework.boot.SpringApplication;
import org.springframework.boot.autoconfigure.SpringBootApplication;

@SpringBootApplication
public class DemoApplication implements CommandLineRunner {
   public static void main(String[] args) {
      SpringApplication.run(DemoApplication.class, args);
   }
   @Override
   public void run(String... arg0) throws Exception {
      System.out.println("Hello world from Command Line Runner");
   }
}
查看下面的控制台窗口“Hello world from Command Line Runner”println语句是在Tomcat启动后执行的。

Spring Boot - 应用程序属性
应用程序属性支持我们在不同的环境中工作。在本章中,您将学习如何配置和指定 Spring Boot 应用程序的属性。
命令行属性
Spring Boot 应用程序将命令行属性转换为 Spring Boot 环境属性。命令行属性优先于其他属性源。默认情况下,Spring Boot 使用 8080 端口号来启动 Tomcat。让我们了解如何使用命令行属性更改端口号。
步骤 1 - 创建可执行 JAR 文件后,使用命令java –jar <JARFILE>运行它。
步骤 2 - 使用下面屏幕截图中给出的命令,通过命令行属性更改 Spring Boot 应用程序的端口号。

注意- 您可以使用分隔符 - 来提供多个应用程序属性。
属性文件
属性文件用于在单个文件中保存“N”个属性,以便在不同的环境中运行应用程序。在 Spring Boot 中,属性保存在类路径下的application.properties文件中。
application.properties 文件位于src/main/resources目录中。示例application.properties文件的代码如下 -
server.port = 9090
spring.application.name = demoservice
请注意,在上面显示的代码中,Spring Boot 应用程序 demoservice 在端口 9090 上启动。
YAML 文件
Spring Boot 支持基于 YAML 的属性配置来运行应用程序。我们可以使用application.yml文件代替application.properties。此 YAML 文件也应保存在类路径中。下面给出了示例application.yml文件 -
spring:
   application:
      name: demoservice
   server:
port: 9090
外化属性
我们可以将属性保存在不同的位置或路径中,而不是将属性文件保存在类路径下。运行 JAR 文件时,我们可以指定属性文件路径。您可以在运行 JAR 时使用以下命令指定属性文件的位置 -
-Dspring.config.location = C:\application.properties

@Value注解的使用
@Value注释用于读取Java代码中的环境或应用程序属性值。读取属性值的语法如下所示 -
@Value("${property_key_name}")
请看以下示例,该示例显示了使用 @Value 注释读取Java 变量中的spring.application.name属性值的语法。
@Value("${spring.application.name}")
请观察下面给出的代码以更好地理解 -
import org.springframework.beans.factory.annotation.Value;
import org.springframework.boot.SpringApplication;
import org.springframework.boot.autoconfigure.SpringBootApplication;
import org.springframework.web.bind.annotation.RequestMapping;
import org.springframework.web.bind.annotation.RestController;

@SpringBootApplication
@RestController
public class DemoApplication {
   @Value("${spring.application.name}")
   private String name;
   public static void main(String[] args) {
      SpringApplication.run(DemoApplication.class, args);
   }
   @RequestMapping(value = "/")
   public String name() {
      return name;
   }
}
注意- 如果在运行应用程序时未找到该属性,Spring Boot 会抛出 Illegal Argument 异常,因为无法解析值 "${spring.application.name}" 中的占位符 'spring.application.name'。
要解决占位符问题,我们可以使用下面给出的 thr 语法设置属性的默认值 -
@Value("${property_key_name:default_value}")

@Value("${spring.application.name:demoservice}")
Spring Boot 活动配置文件
Spring Boot 根据 Spring 活动配置文件支持不同的属性。例如,我们可以保留两个单独的文件用于开发和生产来运行 Spring Boot 应用程序。
application.properties 中的 Spring 活动配置文件
让我们了解如何在 application.properties 中拥有 Spring 活动配置文件。默认情况下,应用程序。属性将用于运行 Spring Boot 应用程序。如果您想使用基于配置文件的属性,我们可以为每个配置文件保留单独的属性文件,如下所示 -
应用程序属性
server.port = 8080
spring.application.name = demoservice
应用程序-dev.properties
server.port = 9090
spring.application.name = demoservice
应用程序产品属性
server.port = 4431
spring.application.name = demoservice
运行 JAR 文件时,我们需要根据每个属性文件指定 spring 活动配置文件。默认情况下,Spring Boot 应用程序使用 application.properties 文件。设置弹簧活动配置文件的命令如下所示 -

您可以在控制台日志上看到活动配置文件名称,如下所示 -
2017-11-26 08:13:16.322  INFO 14028 --- [
   main] com.tutorialspoint.demo.DemoApplication  :
   The following profiles are active: dev
现在,Tomcat 已在端口 9090 (http) 上启动,如下所示 -
2017-11-26 08:13:20.185  INFO 14028 --- [
   main] s.b.c.e.t.TomcatEmbeddedServletContainer :
   Tomcat started on port(s): 9090 (http)
您可以设置生产活动配置文件,如下所示 -

您可以在控制台日志上看到活动配置文件名称,如下所示 -
2017-11-26 08:13:16.322  INFO 14028 --- [
   main] com.tutorialspoint.demo.DemoApplication  :
   The following profiles are active: prod
现在,Tomcat 在端口 4431 (http) 上启动,如下所示 -
2017-11-26 08:13:20.185  INFO 14028 --- [
   main] s.b.c.e.t.TomcatEmbeddedServletContainer :
   Tomcat started on port(s): 4431 (http)
application.yml 的 Spring 活动配置文件
让我们了解如何保持 application.yml 的 Spring 活动配置文件。我们可以将 Spring 活动配置文件属性保留在单个application.yml文件中。无需使用像 application.properties 这样的单独文件。
以下是在 application.yml 文件中保持 Spring 活动配置文件的示例代码。请注意,分隔符 (---) 用于分隔 application.yml 文件中的每个配置文件。
spring:
   application:
      name: demoservice
server:
   port: 8080

---
spring:
   profiles: dev
   application:
      name: demoservice
server:
   port: 9090

---
spring:
   profiles: prod
   application:
      name: demoservice
server:
   port: 4431
设置开发活动配置文件的命令如下 -

您可以在控制台日志上看到活动配置文件名称,如下所示 -
2017-11-26 08:41:37.202  INFO 14104 --- [
   main] com.tutorialspoint.demo.DemoApplication  :
   The following profiles are active: dev
现在,Tomcat 在端口 9090 (http) 上启动,如下所示 -
2017-11-26 08:41:46.650  INFO 14104 --- [
   main] s.b.c.e.t.TomcatEmbeddedServletContainer :
   Tomcat started on port(s): 9090 (http)
设置生产活动配置文件的命令如下 -

您可以在控制台日志上看到活动配置文件名称,如下所示 -
2017-11-26 08:43:10.743  INFO 13400 --- [
   main] com.tutorialspoint.demo.DemoApplication  :
   The following profiles are active: prod
这将在端口 4431 (http) 上启动 Tomcat,如下所示:
2017-11-26 08:43:14.473  INFO 13400 --- [
   main] s.b.c.e.t.TomcatEmbeddedServletContainer :
   Tomcat started on port(s): 4431 (http)
Spring Boot - 日志记录
Spring Boot 使用 Apache Commons 日志记录来记录所有内部日志记录。Spring Boot 的默认配置提供了对 Java Util Logging、Log4j2 和 Logback 的使用的支持。使用这些,我们可以配置控制台日志记录和文件日志记录。
如果您使用 Spring Boot Starters,Logback 将为日志记录提供良好的支持。除此之外,Logback还对Common Logging、Util Logging、Log4J和SLF4J提供了良好的支持。
日志格式
默认的 Spring Boot 日志格式如下面的屏幕截图所示。

它为您提供以下信息 -
日期和时间给出日志的日期和时间
日志级别显示 INFO、ERROR 或 WARN
进程号
--- 是分隔符
线程名称包含在方括号 [] 内
显示源类名称的记录器名称
日志消息
控制台日志输出
默认日志消息将打印到控制台窗口。默认情况下,“INFO”、“ERROR”和“WARN”日志消息将打印在日志文件中。
如果您必须启用调试级别日志,请使用下面所示的命令在启动应用程序时添加调试标志 -
java –jar demo.jar --debug
您还可以将调试模式添加到 application.properties 文件中,如下所示 -
debug = true
文件日志输出
默认情况下,所有日志都将打印在控制台窗口上,而不是打印在文件中。如果要打印文件中的日志,则需要在application.properties文件中设置属性logging.file或logging.path 。
您可以使用如下所示的属性指定日志文件路径。请注意,日志文件名为 spring.log。
logging.path = /var/tmp/
您可以使用下面所示的属性指定自己的日志文件名 -
logging.file = /var/tmp/mylog.log
注意- 文件大小达到 10 MB 后将自动旋转。
日志级别
Spring Boot 支持所有记录器级别,例如“TRACE”、“DEBUG”、“INFO”、“WARN”、“ERROR”、“FATAL”、“OFF”。您可以在 application.properties 文件中定义根记录器,如下所示 -
logging.level.root = WARN
注意- Logback 不支持“FATAL”级别日志。它映射到“ERROR”级别日志。
配置日志返回
Logback 支持基于 XML 的配置来处理 Spring Boot Log 配置。日志记录配置详细信息在logback.xml文件中配置。logback.xml 文件应放置在类路径下。
您可以使用下面给出的代码在 Logback.xml 文件中配置 ROOT 级别日志 -
<?xml version = "1.0" encoding = "UTF-8"?>
<configuration>
   <root level = "INFO">
   </root>
</configuration>
您可以在下面给出的 Logback.xml 文件中配置控制台附加程序。
<?xml version = "1.0" encoding = "UTF-8"?>
<configuration>
   <appender name = "STDOUT" class = "ch.qos.logback.core.ConsoleAppender"></appender>
   <root level = "INFO">
      <appender-ref ref = "STDOUT"/>
   </root>
</configuration>
您可以使用下面给出的代码在 Logback.xml 文件中配置文件附加器。请注意,您需要在文件附加器内指定日志文件路径。
<?xml version = "1.0" encoding = "UTF-8"?>
<configuration>
   <appender name = "FILE" class = "ch.qos.logback.core.FileAppender">
      <File>/var/tmp/mylog.log</File>
   </appender>
   <root level = "INFO">
      <appender-ref ref = "FILE"/>
   </root>
</configuration>
您可以使用下面给出的代码在logback.xml文件中定义日志模式。您还可以使用下面给出的代码在控制台或文件日志附加程序中定义一组支持的日志模式 -
<pattern>[%d{yyyy-MM-dd'T'HH:mm:ss.sss'Z'}] [%C] [%t] [%L] [%-5p] %m%n</pattern>
下面给出了完整 logback.xml 文件的代码。您必须将其放在类路径中。
<?xml version = "1.0" encoding = "UTF-8"?>
<configuration>
   <appender name = "STDOUT" class = "ch.qos.logback.core.ConsoleAppender">
      <encoder>
         <pattern>[%d{yyyy-MM-dd'T'HH:mm:ss.sss'Z'}] [%C] [%t] [%L] [%-5p] %m%n</pattern>
      </encoder>
   </appender>

   <appender name = "FILE" class = "ch.qos.logback.core.FileAppender">
      <File>/var/tmp/mylog.log</File>
      <encoder>
         <pattern>[%d{yyyy-MM-dd'T'HH:mm:ss.sss'Z'}] [%C] [%t] [%L] [%-5p] %m%n</pattern>
      </encoder>
   </appender>

   <root level = "INFO">
      <appender-ref ref = "FILE"/>
      <appender-ref ref = "STDOUT"/>
   </root>
</configuration>
下面给出的代码显示了如何在 Spring Boot 主类文件中添加 slf4j 记录器。
package com.tutorialspoint.demo;

import org.slf4j.Logger;
import org.slf4j.LoggerFactory;
import org.springframework.boot.SpringApplication;
import org.springframework.boot.autoconfigure.SpringBootApplication;

@SpringBootApplication
public class DemoApplication {
   private static final Logger logger = LoggerFactory.getLogger(DemoApplication.class);

   public static void main(String[] args) {
      logger.info("this is a info message");
      logger.warn("this is a warn message");
      logger.error("this is a error message");
      SpringApplication.run(DemoApplication.class, args);
   }
}
您可以在控制台窗口中看到的输出如下所示 -

您可以在日志文件中看到的输出如下所示 -

Spring Boot - 构建 RESTful Web 服务
Spring Boot 为企业应用构建 RESTful Web Services 提供了非常好的支持。本章将详细解释如何使用 Spring Boot 构建 RESTful Web 服务。
注意- 为了构建 RESTful Web 服务,我们需要将 Spring Boot Starter Web 依赖项添加到构建配置文件中。
如果您是 Maven 用户,请使用以下代码在pom.xml文件中添加以下依赖项 -
<dependency>
   <groupId>org.springframework.boot</groupId>
   <artifactId>spring-boot-starter-web</artifactId>
</dependency>
如果您是 Gradle 用户,请使用以下代码在build.gradle文件中添加以下依赖项。
compile('org.springframework.boot:spring-boot-starter-web')
完整的构建配置文件Maven build – pom.xml的代码如下 -
<?xml version = "1.0" encoding = "UTF-8"?>
<project xmlns = "http://maven.apache.org/POM/4.0.0"
   xmlns:xsi = "http://www.w3.org/2001/XMLSchema-instance"
   xsi:schemaLocation = "http://maven.apache.org/POM/4.0.0
   http://maven.apache.org/xsd/maven-4.0.0.xsd">

   <modelVersion>4.0.0</modelVersion>
   <groupId>com.tutorialspoint</groupId>
   <artifactId>demo</artifactId>
   <version>0.0.1-SNAPSHOT</version>
   <packaging>jar</packaging>
   <name>demo</name>
   <description>Demo project for Spring Boot</description>

   <parent>
      <groupId>org.springframework.boot</groupId>
      <artifactId>spring-boot-starter-parent</artifactId>
      <version>1.5.8.RELEASE</version>
      <relativePath/>
   </parent>

   <properties>
      <project.build.sourceEncoding>UTF-8</project.build.sourceEncoding>
      <project.reporting.outputEncoding>UTF-8</project.reporting.outputEncoding>
      <java.version>1.8</java.version>
   </properties>

   <dependencies>
      <dependency>
         <groupId>org.springframework.boot</groupId>
         <artifactId>spring-boot-starter-web</artifactId>
      </dependency>
      <dependency>
         <groupId>org.springframework.boot</groupId>
         <artifactId>spring-boot-starter-test</artifactId>
         <scope>test</scope>
      </dependency>
   </dependencies>

   <build>
      <plugins>
         <plugin>
            <groupId>org.springframework.boot</groupId>
            <artifactId>spring-boot-maven-plugin</artifactId>
         </plugin>
      </plugins>
   </build>

</project>
完整构建配置文件Gradle Build – build.gradle的代码如下 -
buildscript {
   ext {
      springBootVersion = '1.5.8.RELEASE'
   }
   repositories {
      mavenCentral()
   }
   dependencies {
      classpath("org.springframework.boot:spring-boot-gradle-plugin:${springBootVersion}")
   }
}

apply plugin: 'java'
apply plugin: 'eclipse'
apply plugin: 'org.springframework.boot'

group = 'com.tutorialspoint'
version = '0.0.1-SNAPSHOT'
sourceCompatibility = 1.8

repositories {
   mavenCentral()
}
dependencies {
   compile('org.springframework.boot:spring-boot-starter-web')
   testCompile('org.springframework.boot:spring-boot-starter-test')
}
在继续构建 RESTful Web 服务之前,建议您了解以下注释 -
休息控制器
@RestController 注解用于定义 RESTful Web 服务。它提供 JSON、XML 和自定义响应。其语法如下所示 -
@RestController
public class ProductServiceController {
}
请求映射
@RequestMapping 注释用于定义访问 REST 端点的请求 URI。我们可以定义Request方法来消费和生产对象。默认请求方法为 GET。
@RequestMapping(value = "/products")
public ResponseEntity<Object> getProducts() { }
请求正文
@RequestBody 注解用于定义请求正文内容类型。
public ResponseEntity<Object> createProduct(@RequestBody Product product) {
}
路径变量
@PathVariable 注释用于定义自定义或动态请求 URI。请求 URI 中的 Path 变量定义为大括号 {},如下所示 -
public ResponseEntity<Object> updateProduct(@PathVariable("id") String id) {
}
请求参数
@RequestParam注解用于从Request URL中读取请求参数。默认情况下,它是必需参数。我们还可以设置请求参数的默认值,如下所示 -
public ResponseEntity<Object> getProduct(
   @RequestParam(value = "name", required = false, defaultValue = "honey") String name) {
}
获取API
默认的 HTTP 请求方法是 GET。此方法不需要任何请求正文。您可以发送请求参数和路径变量来定义自定义或动态 URL。
定义 HTTP GET 请求方法的示例代码如下所示。在这个例子中,我们使用HashMap来存储Product。请注意,我们使用 POJO 类作为要存储的产品。
这里,请求 URI 是/products,它将返回 HashMap 存储库中的产品列表。下面给出了包含 GET 方法 REST Endpoint 的控制器类文件。
package com.tutorialspoint.demo.controller;

import java.util.HashMap;
import java.util.Map;

import org.springframework.http.HttpStatus;
import org.springframework.http.ResponseEntity;
import org.springframework.web.bind.annotation.RequestMapping;
import org.springframework.web.bind.annotation.RestController;

import com.tutorialspoint.demo.model.Product;

@RestController
public class ProductServiceController {
   private static Map<String, Product> productRepo = new HashMap<>();
   static {
      Product honey = new Product();
      honey.setId("1");
      honey.setName("Honey");
      productRepo.put(honey.getId(), honey);

      Product almond = new Product();
      almond.setId("2");
      almond.setName("Almond");
      productRepo.put(almond.getId(), almond);
   }
   @RequestMapping(value = "/products")
   public ResponseEntity<Object> getProduct() {
      return new ResponseEntity<>(productRepo.values(), HttpStatus.OK);
   }
}
发布API
HTTP POST 请求用于创建资源。该方法包含请求正文。我们可以发送请求参数和路径变量来定义自定义或动态 URL。
以下示例显示了定义 HTTP POST 请求方法的示例代码。在这个例子中,我们使用HashMap来存储Product,其中product是一个POJO类。
这里,请求URI是/products,它将产品存储到HashMap存储库后返回String。
package com.tutorialspoint.demo.controller;

import java.util.HashMap;
import java.util.Map;

import org.springframework.http.HttpStatus;
import org.springframework.http.ResponseEntity;
import org.springframework.web.bind.annotation.RequestBody;
import org.springframework.web.bind.annotation.RequestMapping;
import org.springframework.web.bind.annotation.RequestMethod;
import org.springframework.web.bind.annotation.RestController;

import com.tutorialspoint.demo.model.Product;

@RestController
public class ProductServiceController {
   private static Map<String, Product> productRepo = new HashMap<>();

   @RequestMapping(value = "/products", method = RequestMethod.POST)
   public ResponseEntity<Object> createProduct(@RequestBody Product product) {
      productRepo.put(product.getId(), product);
      return new ResponseEntity<>("Product is created successfully", HttpStatus.CREATED);
   }
}
放置API
HTTP PUT 请求用于更新现有资源。该方法包含一个请求主体。我们可以发送请求参数和路径变量来定义自定义或动态 URL。
下面给出的示例显示了如何定义 HTTP PUT 请求方法。在这个例子中,我们使用HashMap来更新现有的Product,其中product是一个POJO类。
这里的请求 URI 是/products/{id},它将把产品后面的字符串返回到 HashMap 存储库中。请注意,我们使用了 Path 变量{id}来定义需要更新的产品 ID。
package com.tutori