- Struts 2 教程
- Struts2 - 主页
- Struts2 - 基本 MVC 架构
- Struts2 - 概述
- Struts2 - 环境设置
- Struts2 - 架构
- Struts2 - 示例
- Struts2 - 配置
- Struts2 - 动作
- Struts2 - 拦截器
- Struts2 - 结果类型
- Struts2 - 价值堆栈/OGNL
- Struts2 - 文件上传
- Struts2 - 数据库访问
- Struts2 - 发送电子邮件
- Struts2 - 验证
- Struts2 - 本地化
- Struts2 - 类型转换
- Struts2 - 主题/模板
- Struts2 - 异常处理
- Struts2 - 注释
- Struts 2 集成
- Struts2-Spring
- Struts2 - 瓷砖
- Struts2-Hibernate
- Struts 2 有用资源
- Struts2 - 问题与解答
- Struts2 - 快速指南
- Struts2 - 有用的资源
- Struts2 - 讨论
Struts 2 和 Hibernate 集成
Hibernate 是一种高性能对象/关系持久性和查询服务,已获得开源 GNU 宽通用公共许可证 (LGPL) 的许可,并且可以免费下载。在这一章当中。我们将学习如何实现 Struts 2 与 Hibernate 的集成。如果您不熟悉 Hibernate,那么您可以查看我们的Hibernate 教程。
数据库设置
在本教程中,我将使用“struts2_tutorial”MySQL 数据库。我使用用户名“root”连接到我的计算机上的该数据库,没有密码。首先,您需要运行以下脚本。该脚本创建一个名为Student的新表,并在该表中创建一些记录 -
CREATE TABLE IF NOT EXISTS `student` (
   `id` int(11) NOT NULL AUTO_INCREMENT,
   `first_name` varchar(40) NOT NULL,
   `last_name` varchar(40) NOT NULL,
   `marks` int(11) NOT NULL,
   PRIMARY KEY (`id`)
);

--
-- Dumping data for table `student`
--

INSERT INTO `student` (`id`, `first_name`, `last_name`, `marks`)
   VALUES(1, 'George', 'Kane', 20);
INSERT INTO `student` (`id`, `first_name`, `last_name`, `marks`)
   VALUES(2, 'Melissa', 'Michael', 91);
INSERT INTO `student` (`id`, `first_name`, `last_name`, `marks`)
   VALUES(3, 'Jessica', 'Drake', 21);
Hibernate配置
接下来让我们创建 hibernate.cfg.xml,它是 hibernate 的配置文件。
<?xml version = '1.0' encoding = 'utf-8'?>
<!DOCTYPE hibernate-configuration PUBLIC
   "-//Hibernate/Hibernate Configuration DTD//EN"
   "http://hibernate.sourceforge.net/hibernate-configuration-3.0.dtd">

<hibernate-configuration>
   <session-factory>
      <property name = "hibernate.connection.driver_class">c
         om.mysql.jdbc.Driver
      </property>

      <property name = "hibernate.connection.url">
         jdbc:mysql://www.tutorialspoint.com/struts_tutorial
      </property>

      <property name = "hibernate.connection.username">root</property>

      <property name = "hibernate.connection.password"></property>

      <property name = "hibernate.connection.pool_size">10</property>

      <property name = "show_sql">true</property>

      <property name = "dialect">
         org.hibernate.dialect.MySQLDialect
      </property>

      <property name = "hibernate.hbm2ddl.auto">update</property>

      <mapping class = "com.tutorialspoint.hibernate.Student" />
   </session-factory>
</hibernate-configuration>
让我们浏览一下Hibernate配置文件。首先,我们声明我们正在使用 MySQL 驱动程序。然后我们声明了用于连接数据库的 jdbc url。然后我们声明连接的用户名、密码和池大小。我们还表示希望通过将“show_sql”设置为 true 来查看日志文件中的 SQL。请阅读 hibernate 教程以了解这些属性的含义。
最后,我们将映射类设置为 com.tutorialspoint.hibernate.Student,我们将在本章中创建它。
环境设置
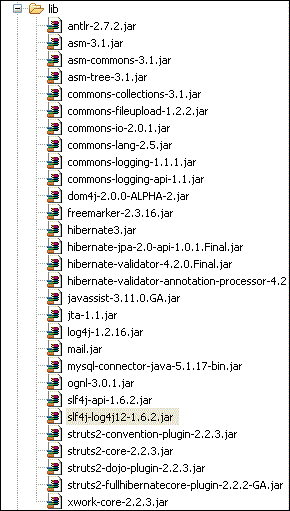
接下来,这个项目需要大量的罐子。附件是所需 JAR 文件的完整列表的屏幕截图 -
大多数 JAR 文件都可以作为 struts 发行版的一部分获得。如果您安装了诸如 glassfish、websphere 或 jboss 之类的应用程序服务器,那么您可以从应用程序服务器的 lib 文件夹中获取大部分剩余的 jar 文件。如果没有,您可以单独下载文件 -
Hibernate jar 文件 - Hibernate.org
Struts Hibernate插件 - Struts Hibernate插件
JTA 文件 - JTA 文件
Dom4j 文件 - Dom4j
log4j 文件 - log4j
其余文件,您应该能够从 Struts2 发行版中获取。
Hibernate类
现在让我们为 hibernate 集成创建所需的 java 类。以下是Student.java的内容-
package com.tutorialspoint.hibernate;

import javax.persistence.Column;
import javax.persistence.Entity;
import javax.persistence.GeneratedValue;
import javax.persistence.Id;
import javax.persistence.Table;

@Entity
@Table(name = "student")
public class Student {

   @Id
   @GeneratedValue
   private int id;
   @Column(name = "last_name")
   private String lastName;
   @Column(name = "first_name")
   private String firstName;
   private int marks;

   public int getId() {
    return id;
   }

   public void setId(int id) {
    this.id = id;
   }

   public String getLastName() {
      return lastName;
   }

   public void setLastName(String lastName) {
      this.lastName = lastName;
   }

   public String getFirstName() {
      return firstName;
   }

   public void setFirstName(String firstName) {
      this.firstName = firstName;
   }

   public int getMarks() {
      return marks;
   }

   public void setMarks(int marks) {
      this.marks = marks;
   }
}
这是一个 POJO 类,根据 Hibernate 规范表示学生表。它具有属性 id、firstName 和 lastName,它们对应于学生表的列名。接下来让我们创建StudentDAO.java文件,如下所示 -
package com.tutorialspoint.hibernate;

import java.util.ArrayList;
import java.util.List;

import org.hibernate.Session;
import org.hibernate.Transaction;

import com.googlecode.s2hibernate.struts2.plugin.\
   annotations.SessionTarget;
import com.googlecode.s2hibernate.struts2.plugin.\
   annotations.TransactionTarget;

public class StudentDAO {

   @SessionTarget
   Session session;

   @TransactionTarget
   Transaction transaction;

   @SuppressWarnings("unchecked")
   public List<Student> getStudents() {
      List<Student> students = new ArrayList<Student>();

      try {
         students = session.createQuery("from Student").list();
      } catch(Exception e) {
         e.printStackTrace();
      }
      return students;
   }

   public void addStudent(Student student) {
      session.save(student);
   }
}
StudentDAO 类是 Student 类的数据访问层。它有方法列出所有学生,然后保存新的学生记录。
动作类
以下文件AddStudentAction.java定义了我们的操作类。我们这里有两个操作方法 -execute() 和 listStudents()。execute() 方法用于添加新的学生记录。我们使用 dao 的 save() 方法来实现这一点。
另一种方法 listStudents() 用于列出学生。我们使用 dao 的 list 方法来获取所有学生的列表。
package com.tutorialspoint.struts2;

import java.util.ArrayList;
import java.util.List;

import com.opensymphony.xwork2.ActionSupport;
import com.opensymphony.xwork2.ModelDriven;
import com.tutorialspoint.hibernate.Student;
import com.tutorialspoint.hibernate.StudentDAO;

public class AddStudentAction extends ActionSupport implements ModelDriven<Student> {

   Student student  = new Student();
   List<Student> students = new ArrayList<Student>();
   StudentDAO dao = new StudentDAO();
   @Override

  public Student getModel() {
      return student;
   }

   public String execute() {
      dao.addStudent(student);
      return "success";
   }

   public String listStudents() {
      students = dao.getStudents();
      return "success";
   }

   public Student getStudent() {
      return student;
   }

   public void setStudent(Student student) {
      this.student = student;
   }

   public List<Student> getStudents() {
      return students;
   }

   public void setStudents(List<Student> students) {
      this.students = students;
   }

}
您会注意到我们正在实现 ModelDriven 接口。当您的操作类处理具体模型类(例如 Student)而不是单个属性(例如 firstName、lastName)时,将使用此方法。ModelAware 接口要求您实现一个方法来返回模型。在我们的例子中,我们返回“student”对象。
创建视图文件
现在让我们创建包含以下内容的Student.jsp视图文件 -
<%@ page contentType = "text/html; charset = UTF-8"%>
<%@ taglib prefix = "s" uri = "/struts-tags"%>

<html>
   <head>
      <title>Hello World</title>
      <s:head />
   </head>

   <body>
      <s:form action = "addStudent">
         <s:textfield name = "firstName" label = "First Name"/>
         <s:textfield name = "lastName" label = "Last Name"/>
         <s:textfield name = "marks" label = "Marks"/>
         <s:submit/>
         <hr/>

         <table>
            <tr>
               <td>First Name</td>
               <td>Last Name</td>
               <td>Marks</td>
            </tr>

            <s:iterator value = "students">
               <tr>
                  <td><s:property value = "firstName"/></td>
                  <td><s:property value = "lastName"/></td>
                  <td><s:property value = "marks"/></td>
                 </tr>
            </s:iterator>
         </table>
      </s:form>
   </body>
</html>
Student.jsp 非常简单。在顶部,我们有一个提交到“addStudent.action”的表单。它接受名字、姓氏和标记。由于 addStudent 操作与 ModelAware“AddSudentAction”相关联,因此将自动创建一个学生 bean,并自动填充名字、姓氏和标记的值。
在底部部分,我们浏览学生列表(请参阅 AddStudentAction.java)。我们迭代列表并在表中显示名字、姓氏和标记的值。
Struts配置
让我们使用struts.xml将它们放在一起-
<?xml version = "1.0" Encoding = "UTF-8"?>
<!DOCTYPE struts PUBLIC
   "-//Apache Software Foundation//DTD Struts Configuration 2.0//EN"
   "http://struts.apache.org/dtds/struts-2.0.dtd">

<struts>
   <constant name = "struts.devMode" value = "true" />
   <package name = "myhibernate" extends = "hibernate-default">

      <action name = "addStudent" method = "execute"
         class = "com.tutorialspoint.struts2.AddStudentAction">
         <result name = "success" type = "redirect">
            listStudents
         </result>
      </action>

      <action name = "listStudents" method = "listStudents"
         class = "com.tutorialspoint.struts2.AddStudentAction">
         <result name = "success">/students.jsp</result>
      </action>

   </package>
</struts>
这里需要注意的重要一点是,我们的包“myhibernate”扩展了名为“hibernate-default”的 struts2 默认包。然后我们声明两个操作 - addStudent 和 listStudents。addStudent 调用 AddStudentAction 类上的execute(),然后在成功后调用 listStudents 操作方法。
listStudent 操作方法调用 AddStudentAction 类上的 listStudents() 并使用 Student.jsp 作为视图。
现在,右键单击项目名称,然后单击“导出”>“WAR 文件”以创建一个 War 文件。然后将此 WAR 部署到 Tomcat 的 webapps 目录中。最后,启动 Tomcat 服务器并尝试访问 URL http://localhost:8080/HelloWorldStruts2/student.jsp。这将产生以下屏幕 -
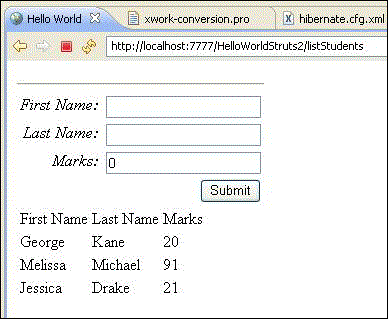
在顶部部分,我们得到一个表单来输入新学生记录的值,底部部分列出了数据库中的学生。继续添加新的学生记录并按提交。每次单击“提交”时,屏幕都会刷新并显示更新的列表。