
- Joomla 基础教程
- Joomla - 主页
- Joomla - 概述
- Joomla - 安装
- Joomla - 建筑
- Joomla - 控制面板
- Joomla - 工具栏
- Joomla - 菜单 菜单
- Joomla - 内容菜单
- Joomla - 组件菜单
- Joomla - 扩展菜单
- Joomla - 帮助菜单
- Joomla 模块
- Joomla - 创建模块
- Joomla - 面包屑模块
- Joomla - 提要显示模块
- Joomla - 页脚模块
- Joomla - 最新新闻模块
- Joomla - 搜索模块
- Joomla - 随机图像模块
- Joomla - 谁在线模块
- Joomla - 联合模块
- Joomla - 捐赠模块
- Joomla 全局设置
- Joomla - 系统设置
- Joomla - 媒体设置
- Joomla - 语言管理器
- Joomla - 私人消息
- Joomla - 群发电子邮件
- Joomla - 缓存管理
- Joomla - 用户设置
- Joomla - 调试
- Joomla 高级版
- Joomla - 模板管理器
- Joomla - 自定义模板
- Joomla - 添加模板
- Joomla - 创建模板
- Joomla - 自定义徽标
- Joomla - 类别管理
- Joomla - 添加内容
- Joomla - 格式化内容
- Joomla - 文章元数据
- Joomla - 添加横幅
- Joomla - 添加联系人
- Joomla - 添加新闻源
- Joomla - 添加论坛
- Joomla - 添加网页链接
- Joomla - 插件管理器
- Joomla - 扩展管理器
- Joomla - 网站备份
- Joomla - 网站 SEO
- Joomla 有用资源
- Joomla - 问题与解答
- Joomla - 快速指南
- Joomla - 有用的资源
- Joomla - 讨论
Joomla - 添加菜单项
在本章中,我们将学习如何在 Joomla 中添加新菜单项的分步过程。菜单项可以在主菜单(menu1)中创建,我们已经在Joomla - 创建菜单一章中创建了该菜单项。
添加菜单项
以下是在 Joomla 中添加菜单项的简单步骤。
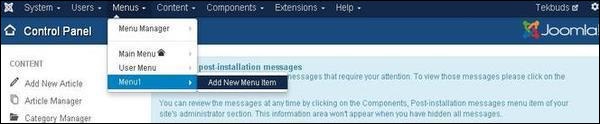
步骤 1 - 单击菜单→菜单 1 →添加新菜单项,如下所示。
步骤 2 - 单击添加新菜单项后,将显示菜单管理器 - 新菜单项页面,如下所示。
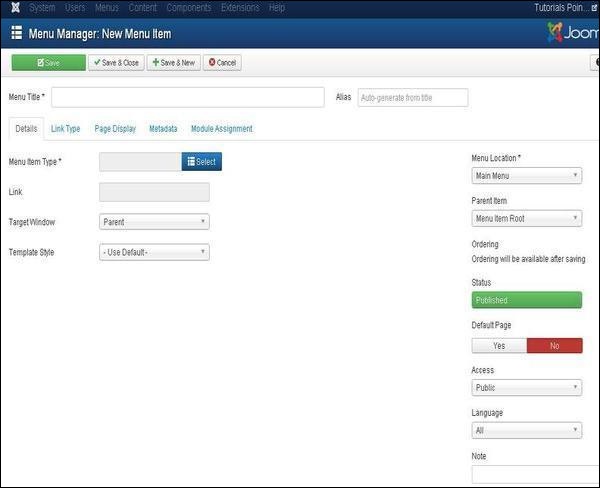
您可以查看此页面中存在的各种选项卡。默认情况下, “详细信息”选项卡处于活动状态。
新菜单项下有两个主要部分-
菜单标题- 显示菜单项的标题。
别名- 用作 SEF URL。Joomla 将自动填充标题中的值。它将生成 UTF-8 别名,但不允许任何空格和下划线。
菜单项类型- 在菜单项类型中,它指定菜单项的类型,例如文章、标签、网页链接、系统链接、联系人等。在这里,您可以通过单击“选择”按钮来选择菜单项类型。单击此按钮,将出现如下所示的屏幕。
.jpg)
单击“文章”菜单类型,您将看到以下屏幕。现在选择单篇文章,如下所示。
.jpg)
选择“单篇文章”后,您将看到以下屏幕。
.jpg)
选择文章- 从列表中选择文章。
链接- 指定菜单项的链接引用。
模板样式- 您可以通过单击下拉菜单为您的网站选择模板样式,该菜单为您提供Beez3 - 默认和Protostar - 默认样式或为您的网站提供默认模板。
目标窗口- 它以菜单项的窗口为目标,例如“ Parent”、“带导航的新窗口”和“不带导航的新窗口”。
菜单位置- 它指定哪个菜单链接将出现在主菜单或用户菜单中。
Parent Item - 它通过选择Menu Item Root或Home来选择父项。
状态- 它显示文章的状态,例如Published、Unpublished和Trashed。
默认页面- 它提供“是”或“否”选项来将菜单项设置为站点的默认页面或主页。
Access − It allows access only to selected users from the dropdown list such as Guest, Public, Super Users, Registered and Special option to view the items.
Language − It specifies the language of the site. It provides either ALL or English (UK) options.
Note − It is used to enter the text information.
After selecting Menu Item Type it will generate an Options tab automatically.
Step 3 − When we click on Options tab we will get the following screen.

Step 4 − Click on Link Type tab we will get the following screen.

Link Title Attribute − It specifies description for the title attribute of the given hyperlink.
Link CSS Style − It applies custom CSS style to the hyperlink.
Link Image − It uses an image to be used with hyperlink.
Add Menu Title − It provides Yes or No options and adds the menu title next to the image. The default is Yes.
Step 5 − Click on Page Display tab we will get the following screen.

Browser Page Title − It specifies the description for the browser page title.
Show Page Heading − It provides Yes or No option to show the page heading.
Page Heading − It specifies the text for the page heading.
Page Class − It defines the optional CSS class to style the elements in the page.
Step 6 − Click on Metadata tab we get the screen given below.

Meta Description − It is used as optional paragraph which includes description of the page and displays in the results of the search engines.
Meta Keywords − These are the optional keywords to be used in the html page.
Robots − It specifies robotic instructions such as Use Global, Index, Follow, No Index, No follow
Secure − It defines whether link must use SSL or Secure Site URL. It provides three options such as Off, On and Ignore.
Step 7 − The Module Assignment controls the module display on the page by assigning modules in menu items.

Toolbar
Below, we have mentioned details of the functions of the toolbar buttons present while adding menu items.
Save − Saves your created menu items.
Save & Close − Saves the menu item and closes the current screen.
保存并新建- 菜单项将被保存,并将打开一个新的添加菜单项屏幕。
取消- 取消当前操作。