- Joomla 基础教程
- Joomla - 主页
- Joomla - 概述
- Joomla - 安装
- Joomla - 建筑
- Joomla - 控制面板
- Joomla - 工具栏
- Joomla - 菜单 菜单
- Joomla - 内容菜单
- Joomla - 组件菜单
- Joomla - 扩展菜单
- Joomla - 帮助菜单
- Joomla 模块
- Joomla - 创建模块
- Joomla - 面包屑模块
- Joomla - 提要显示模块
- Joomla - 页脚模块
- Joomla - 最新新闻模块
- Joomla - 搜索模块
- Joomla - 随机图像模块
- Joomla - 谁在线模块
- Joomla - 联合模块
- Joomla - 捐赠模块
- Joomla 全局设置
- Joomla - 系统设置
- Joomla - 媒体设置
- Joomla - 语言管理器
- Joomla - 私人消息
- Joomla - 群发电子邮件
- Joomla - 缓存管理
- Joomla - 用户设置
- Joomla - 调试
- Joomla 高级版
- Joomla - 模板管理器
- Joomla - 自定义模板
- Joomla - 添加模板
- Joomla - 创建模板
- Joomla - 自定义徽标
- Joomla - 类别管理
- Joomla - 添加内容
- Joomla - 格式化内容
- Joomla - 文章元数据
- Joomla - 添加横幅
- Joomla - 添加联系人
- Joomla - 添加新闻源
- Joomla - 添加论坛
- Joomla - 添加网页链接
- Joomla - 插件管理器
- Joomla - 扩展管理器
- Joomla - 网站备份
- Joomla - 网站 SEO
- Joomla 有用资源
- Joomla - 问题与解答
- Joomla - 快速指南
- Joomla - 有用的资源
- Joomla - 讨论
Joomla - 创建模块
在本章中,我们将学习在 Joomla 中创建模块。模块是灵活、轻量级且对页面渲染有用的扩展。
创建模块
以下是在 Joomla 中创建模块的简单步骤。
步骤 1 -在Joomla →模块文件夹中创建一个名为mod_firstmodule 的文件夹。

步骤 2 - 在mod_firstmodule文件夹中创建一个名为“helper.php”的文件。该文件包含类名作为帮助程序,它有助于在模块输出中显示检索到的数据。
帮助程序.php
<?php
   /**
      * Helper class for Hello World! module
      *
      * @package    Joomla.Tutorials
      * @subpackage Modules
      * @link http://docs.joomla.org/J3.x:Creating_a_simple_module/Developing_a_Basic_Module
      * @license        GNU/GPL, see LICENSE.php
      * mod_helloworld is free software. This version may have been modified pursuant
      * to the GNU General Public License, and as distributed it includes or
      * is derivative of works licensed under the GNU General Public License or
      * other free or open source software licenses.
   */

   class ModHelloWorldHelper {
      /**
         * Retrieves the hello message
         *
         * @param   array  $params An object containing the module parameters
         *
        * @access public
      */

      public static function getHello($params) {
         return 'Hello, World!';
      }
   }

?>
步骤 3 - 创建一个名为mod_helloworld.php的文件。它是模块的入口点,执行初始化例程、收集必要的数据并使用模板显示模块输出。
mod_helloworld.php
<?php
   /**
      * Hello World! Module Entry Point
      *
      * @package    Joomla.Tutorials
      * @subpackage Modules
      * @license    GNU/GPL, see LICENSE.php
      * @link       http://docs.joomla.org/J3.x:Creating_a_simple_module/Developing_a_Basic_Module
      * mod_helloworld is free software. This version may have been modified pursuant
      * to the GNU General Public License, and as distributed it includes or
      * is derivative of works licensed under the GNU General Public License or
      * other free or open source software licenses.
   */

   // No direct access
   defined('_JEXEC') or die;

   // Include the syndicate functions only once
   require_once dirname(__FILE__) . '/helper.php';

   $hello = modHelloWorldHelper::getHello($params);
   require JModuleHelper::getLayoutPath('mod_helloworld');
?>
步骤 4 - 创建mod_helloworld.xml 文件。该文件包含有关模块的信息。此 xml 文件包含要在 Joomla 中安装的模块的文件信息。
mod_helloworld.xml 文件
<?xml version = "1.0" encoding = "utf-8"?>

<extension type = "module" version = "3.1.0" client = "site" method="upgrade">

   <name>Hello, World!</name>
   <author>Tutorials Point</author>
   <version>1.0.0</version>
   <description>A simple Hello World! module.</description>

   <files>
      <filename>mod_helloworld.xml</filename>
      <filename module = "mod_helloworld">mod_helloworld.php</filename>
      <filename>index.html</filename>
      <filename>helper.php</filename>
      <filename>tmpl/default.php</filename>
      <filename>tmpl/index.html</filename>
   </files>

   <config>
   </config>

</extension>
步骤 5 - 创建一个名为index.html的简单 html 文件。写这个文件的目的是,创建的目录不应该被浏览。当用户浏览这些目录时,会显示index.html 文件。您甚至可以将此文件保留为空。
索引.html
<html>
   <body> Welcome to Tutorials Point!!!!! </body>
</html>
步骤 6 - 创建一个名为tmpl的文件夹。将如下所示的default.php文件和index.html(在步骤(5)中创建)放置在tmpl文件夹下。default.php 文件是显示模块输出的模板。
默认.php
<?php
   /**
      * @package Joomla.Site
      * @subpackage mod_firstmodule
      * @copyright Copyright (C) 2005 - 2012 Open Source Matters, Inc. All rights reserved.
      * @license GNU General Public License version 2 or later; see LICENSE.txt
   */
defined('_JEXEC') or die;
>

<p>Hello World!!!!!!</p>
创建完所有这些文件后,压缩整个文件夹mod_firstmodule。
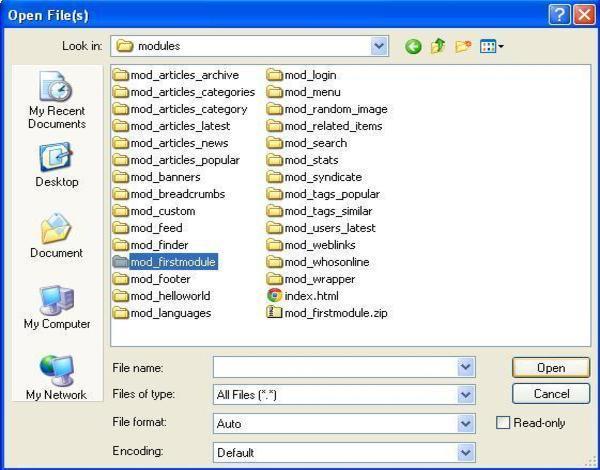
步骤 7 - 转到Joomla 管理员中的扩展→扩展管理器,您将看到以下屏幕。在这里您可以上传并安装您创建的模块文件,即mod_firstmodule文件夹。单击“选择文件”并选择创建的模块文件(压缩文件)。单击“上传并安装”按钮上传模块文件。

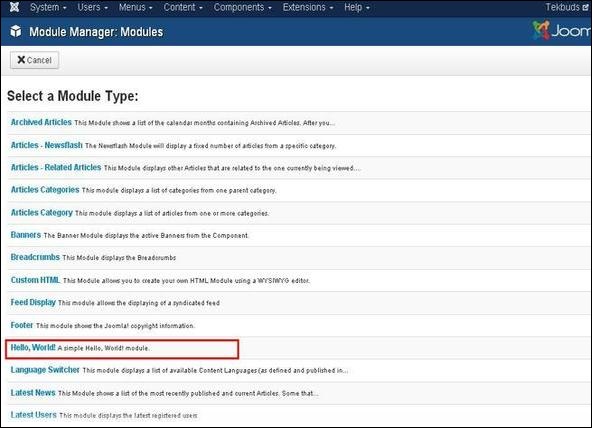
步骤 8 - 上传和安装后,转到模块管理器并单击新建。在那里您可以查看创建的模块文件,如下所示。

步骤 9 - 您可以像其他模块一样分配此模块,然后发布它。
