
- 微软Azure教程
- 微软 Azure - 主页
- 云计算 - 概述
- 微软 Azure - Windows
- Microsoft Azure - 组件
- Microsoft Azure - 计算模块
- Microsoft Azure - 结构控制器
- 微软 Azure - 存储
- Microsoft Azure - Blob
- Microsoft Azure - 队列
- Microsoft Azure - 表格
- 微软Azure-CDN
- 微软 Azure - 应用程序
- 微软 Azure - 安全
- 微软 Azure - 数据中心
- Microsoft Azure - 场景
- 微软Azure高级版
- Microsoft Azure - 管理门户
- Azure - 创建虚拟网络
- Azure - 部署虚拟机
- Azure - 端点配置
- Azure - 点到站点连接
- Azure - 站点到站点连接
- Microsoft Azure - 流量管理器
- 微软Azure-PowerShell
- Azure - 监控虚拟机
- Azure - 设置警报规则
- Azure - 应用程序部署
- Microsoft Azure - 备份和恢复
- Azure - 自助服务功能
- Azure - 多重身份验证
- Azure - 最前沿身份管理器
- Azure - 数据导入和导出作业
- 微软 Azure - 网站
- 微软 Azure - 可扩展性
- Microsoft Azure - 磁盘配置
- Microsoft Azure - 磁盘缓存
- Microsoft Azure - 个性化访问
- Azure - 个性化公司品牌
- Azure - 自助密码重置
- Microsoft Azure - 自助服务组
- Microsoft Azure - 创建组
- Azure - 安全报告和警报
- Azure - 精心安排的恢复
- Microsoft Azure - 健康监控
- Microsoft Azure - 升级
- 微软 Azure 有用资源
- 微软 Azure - 快速指南
- Microsoft Azure - 有用的资源
- 微软 Azure - 讨论
Microsoft Azure - 表格
这里存储表并不是指关系型数据库。Azure 存储只能存储一个表,没有任何外键或任何其他类型的关系。这些表具有高度可扩展性,非常适合处理大量数据。表可以存储和查询大量数据。关系数据库可以使用 SQL 数据服务来存储,这是一项单独的服务。
服务的三个主要部分是 -
- 表格
- 实体
- 特性
例如,如果“Book”是一个实体,则其属性将为 Id、Title、Publisher、Author 等。将为实体集合创建表。可以有 252 个自定义属性和 3 个系统属性。实体始终具有 PartitionKey、RowKey 和 Timestamp 等系统属性。时间戳是系统生成的,但在将数据插入表时必须指定 PartitionKey 和 RowKey。下面的例子会更清楚。表名称和属性名称区分大小写,创建表时应始终考虑这一点。
如何使用 PowerShell 管理表
步骤 1 - 下载并安装 Windows PowerShell,如本教程前面所述。
步骤 2 - 右键单击“Windows PowerShell”,选择“固定到任务栏”将其固定在计算机的任务栏上。
步骤 3 - 选择“以管理员身份运行 ISE”。
创建表
步骤 1 - 复制以下命令并粘贴到屏幕中。将突出显示的文本替换为您的帐户。
第 2 步- 登录您的帐户。
$StorageAccountName = "mystorageaccount"
$StorageAccountKey = "mystoragekey"
$Ctx = New-AzureStorageContext $StorageAccountName - StorageAccountKey
$StorageAccountKey
步骤 3 - 创建一个新表。
$tabName = "Mytablename"
New-AzureStorageTable –Name $tabName –Context $Ctx
下图显示了正在创建的名为“book”的表。
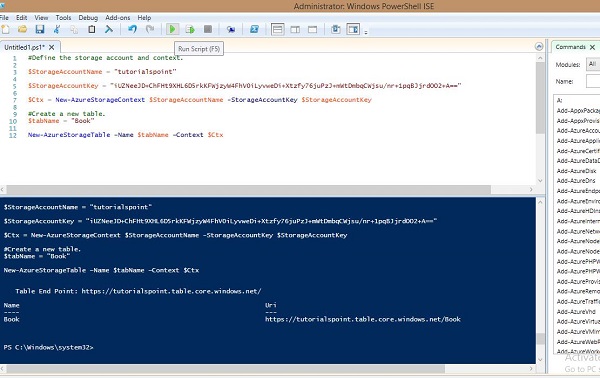
您可以看到它给出了以下终点结果。
https://tutorialspoint.table.core.windows.net/Book
同样,您可以使用 PowerShell 中的预设命令检索、删除数据以及将数据插入表中。
检索表
$tabName = "Book"
Get-AzureStorageTable –Name $tabName –Context $Ctx
删除表
$tabName = "Book"
Remove-AzureStorageTable –Name $tabName –Context $Ctx
将行插入表中
function Add-Entity() {
   [CmdletBinding()]

   param(
      $table,
      [String]$partitionKey,
      [String]$rowKey,
      [String]$title,
      [Int]$id,
      [String]$publisher,
      [String]$author
   )

   $entity = New-Object -TypeName Microsoft.WindowsAzure.Storage.Table.DynamicTableEntity
      -ArgumentList $partitionKey, $rowKey

   $entity.Properties.Add("Title", $title)
   $entity.Properties.Add("ID", $id)
   $entity.Properties.Add("Publisher", $publisher)
   $entity.Properties.Add("Author", $author)


   $result = $table.CloudTable.Execute(
      [Microsoft.WindowsAzure.Storage.Table.TableOperation]
      ::Insert($entity))
}

$StorageAccountName = "tutorialspoint"
$StorageAccountKey = Get-AzureStorageKey -StorageAccountName $StorageAccountName
$Ctx = New-AzureStorageContext $StorageAccountName - StorageAccountKey
   $StorageAccountKey.Primary

$TableName = "Book"

$table = Get-AzureStorageTable –Name $TableName -Context $Ctx -ErrorAction Ignore

#Add multiple entities to a table.
Add-Entity -Table $table -PartitionKey Partition1 -RowKey Row1 -Title .Net -Id 1
   -Publisher abc -Author abc
Add-Entity -Table $table -PartitionKey Partition2 -RowKey Row2 -Title JAVA -Id 2
   -Publisher abc -Author abc
Add-Entity -Table $table -PartitionKey Partition3 -RowKey Row3 -Title PHP -Id 3
   -Publisher xyz -Author xyz
Add-Entity -Table $table -PartitionKey Partition4 -RowKey Row4 -Title SQL -Id 4
   -Publisher xyz -Author xyz
检索表数据
$StorageAccountName = "tutorialspoint"
$StorageAccountKey = Get-AzureStorageKey - StorageAccountName $StorageAccountName
$Ctx = New-AzureStorageContext – StorageAccountName $StorageAccountName -
   StorageAccountKey $StorageAccountKey.Primary;

$TableName = "Book"

#Get a reference to a table.
$table = Get-AzureStorageTable –Name $TableName -Context $Ctx

#Create a table query.
$query = New-Object Microsoft.WindowsAzure.Storage.Table.TableQuery

#Define columns to select.
$list = New-Object System.Collections.Generic.List[string]
$list.Add("RowKey")
$list.Add("ID")
$list.Add("Title")
$list.Add("Publisher")
$list.Add("Author")

#Set query details.
$query.FilterString = "ID gt 0"
$query.SelectColumns = $list
$query.TakeCount = 20

#Execute the query.
$entities = $table.CloudTable.ExecuteQuery($query)

#Display entity properties with the table format.

$entities  | Format-Table PartitionKey, RowKey, @{ Label = "Title";
Expression={$_.Properties["Title"].StringValue}}, @{ Label = "ID";
Expression={$_.Properties[“ID”].Int32Value}}, @{ Label = "Publisher";
Expression={$_.Properties[“Publisher”].StringValue}}, @{ Label = "Author";
Expression={$_.Properties[“Author”].StringValue}} -AutoSize
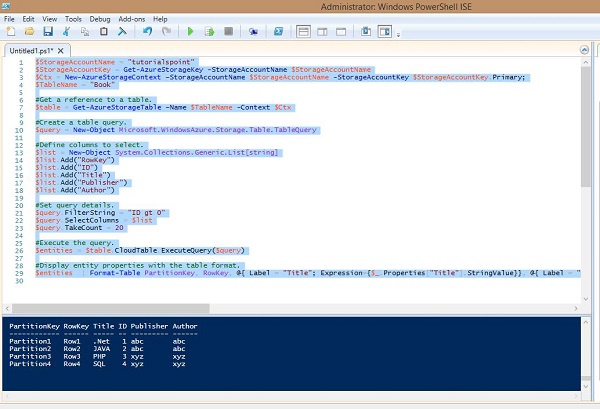
输出将如下图所示。
从表中删除行
$StorageAccountName = "tutorialspoint"

$StorageAccountKey = Get-AzureStorageKey - StorageAccountName $StorageAccountName
$Ctx = New-AzureStorageContext – StorageAccountName $StorageAccountName -
   StorageAccountKey $StorageAccountKey.Primary

#Retrieve the table.
$TableName = "Book"
$table = Get-AzureStorageTable -Name $TableName -Context $Ctx -ErrorAction
Ignore

#If the table exists, start deleting its entities.
if ($table -ne $null) {
   #Together the PartitionKey and RowKey uniquely identify every
   #entity within a table.

   $tableResult = $table.CloudTable.Execute(
      [Microsoft.WindowsAzure.Storage.Table.TableOperation]
      ::Retrieve(“Partition1”, "Row1"))

   $entity = $tableResult.Result;

   if ($entity -ne $null) {
      $table.CloudTable.Execute(
         [Microsoft.WindowsAzure.Storage.Table.TableOperation]
         ::Delete($entity))
   }
}
上面的脚本将从表中删除第一行,您可以看到我们在脚本中指定了 Partition1 和 Row1。删除行后,您可以通过运行检索行的脚本来检查结果。在那里您将看到第一行已被删除。
运行这些命令时,请确保您已将 accountname 替换为您的帐户名,将 accountkey 替换为您的帐户密钥。
如何使用 Azure 存储资源管理器管理表
步骤 1 - 登录您的 Azure 帐户并转到您的存储帐户。
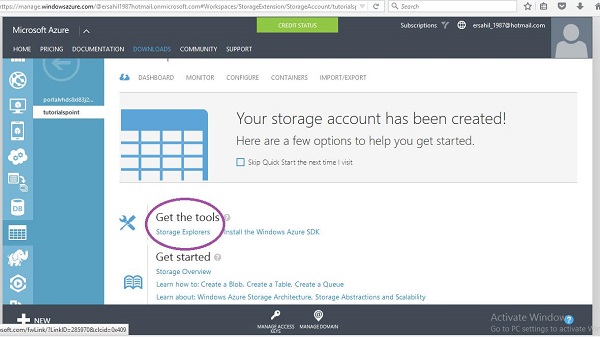
步骤 2 - 单击链接“存储资源管理器”,如下图紫色圆圈所示。
步骤 3 - 从列表中选择“适用于 Windows 的 Azure 存储资源管理器”。它是一个免费工具,您可以下载并安装在您的计算机上。
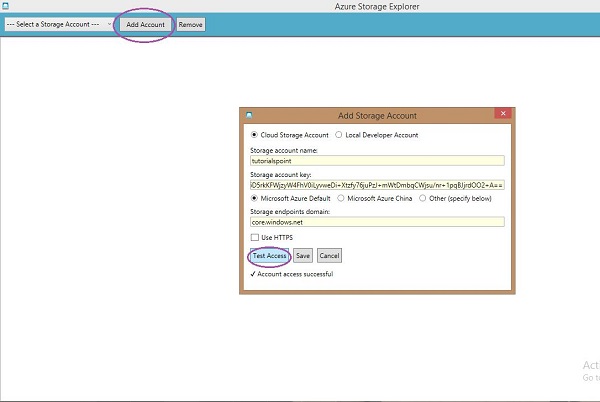
步骤 4 - 在您的计算机上运行此程序,然后单击顶部的“添加帐户”按钮。
步骤 5 - 输入“存储帐户名称”和“存储帐户密钥”,然后单击“测试访问”。这些按钮如下图所示。
步骤 6 - 如果您已经存储了任何表格,您将在左侧面板的“表格”下看到。您可以通过单击行来查看它们。
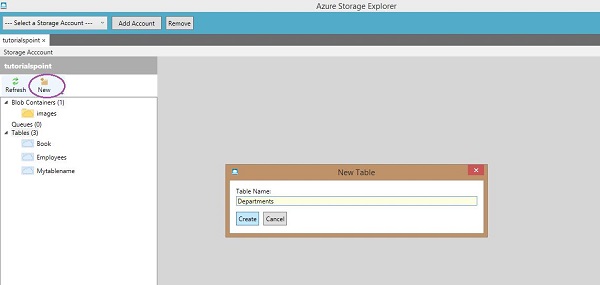
创建一个表
步骤 1 - 单击“新建”并输入表名称,如下图所示。
将行插入表中
步骤 1 - 单击“新建”。
步骤 2 - 输入字段名称。
步骤 3 - 从下拉列表中选择数据类型并输入字段值。
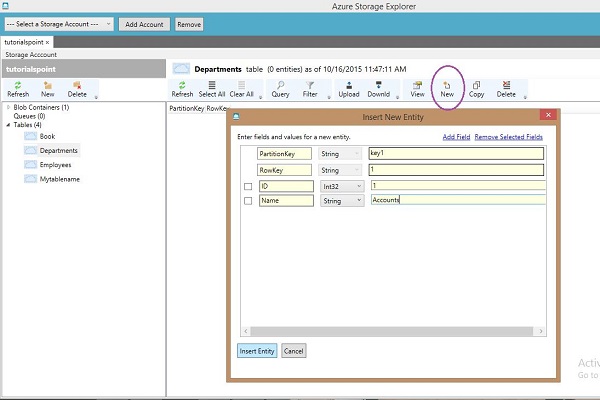
步骤 4 - 要查看创建的行,请单击左侧面板中的表名称。
Azure 存储资源管理器是管理表的非常基本且简单的界面。您可以使用此界面轻松创建、删除、上传和下载表格。与在 Windows PowerShell 中编写冗长的脚本相比,这使得开发人员的任务变得非常容易。