WebGL - 示例应用程序
我们已经讨论了 WebGL 和 WebGL 管道(渲染图形应用程序所遵循的过程)的基础知识。在本章中,我们将使用一个示例应用程序来使用 WebGL 创建三角形,并观察应用程序中遵循的步骤。
WebGL应用程序的结构
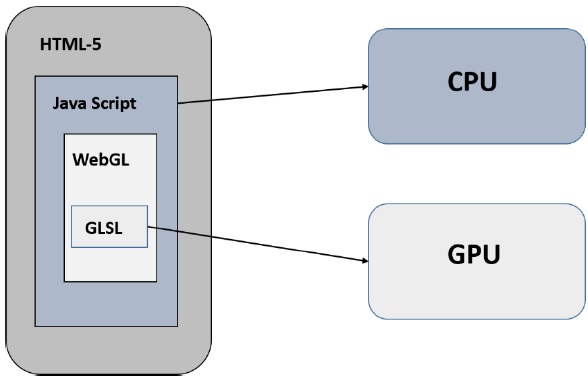
WebGL应用程序代码是JavaScript和OpenGL着色器语言的组合。
- 需要 JavaScript 才能与 CPU 通信
- 与 GPU 通信需要 OpenGL 着色器语言。
申请样本
现在让我们通过一个简单的例子来学习如何使用WebGL绘制一个带有2D坐标的简单三角形。
<!doctype html>
<html>
   <body>
      <canvas width = "300" height = "300" id = "my_Canvas"></canvas>

      <script>
         /* Step1: Prepare the canvas and get WebGL context */

         var canvas = document.getElementById('my_Canvas');
         var gl = canvas.getContext('experimental-webgl');

         /* Step2: Define the geometry and store it in buffer objects */

         var vertices = [-0.5, 0.5, -0.5, -0.5, 0.0, -0.5,];

         // Create a new buffer object
         var vertex_buffer = gl.createBuffer();

         // Bind an empty array buffer to it
         gl.bindBuffer(gl.ARRAY_BUFFER, vertex_buffer);

         // Pass the vertices data to the buffer
         gl.bufferData(gl.ARRAY_BUFFER, new Float32Array(vertices), gl.STATIC_DRAW);

         // Unbind the buffer
         gl.bindBuffer(gl.ARRAY_BUFFER, null);

         /* Step3: Create and compile Shader programs */

         // Vertex shader source code
         var vertCode =
            'attribute vec2 coordinates;' +
            'void main(void) {' + ' gl_Position = vec4(coordinates,0.0, 1.0);' + '}';

         //Create a vertex shader object
         var vertShader = gl.createShader(gl.VERTEX_SHADER);

         //Attach vertex shader source code
         gl.shaderSource(vertShader, vertCode);

         //Compile the vertex shader
         gl.compileShader(vertShader);

         //Fragment shader source code
         var fragCode = 'void main(void) {' + 'gl_FragColor = vec4(0.0, 0.0, 0.0, 0.1);' + '}';

         // Create fragment shader object
         var fragShader = gl.createShader(gl.FRAGMENT_SHADER);

         // Attach fragment shader source code
         gl.shaderSource(fragShader, fragCode);

         // Compile the fragment shader
         gl.compileShader(fragShader);

         // Create a shader program object to store combined shader program
         var shaderProgram = gl.createProgram();

         // Attach a vertex shader
         gl.attachShader(shaderProgram, vertShader);

         // Attach a fragment shader
         gl.attachShader(shaderProgram, fragShader);

         // Link both programs
         gl.linkProgram(shaderProgram);

         // Use the combined shader program object
         gl.useProgram(shaderProgram);

         /* Step 4: Associate the shader programs to buffer objects */

         //Bind vertex buffer object
         gl.bindBuffer(gl.ARRAY_BUFFER, vertex_buffer);

         //Get the attribute location
         var coord = gl.getAttribLocation(shaderProgram, "coordinates");

         //point an attribute to the currently bound VBO
         gl.vertexAttribPointer(coord, 2, gl.FLOAT, false, 0, 0);

         //Enable the attribute
         gl.enableVertexAttribArray(coord);

         /* Step5: Drawing the required object (triangle) */

         // Clear the canvas
         gl.clearColor(0.5, 0.5, 0.5, 0.9);

         // Enable the depth test
         gl.enable(gl.DEPTH_TEST);

         // Clear the color buffer bit
         gl.clear(gl.COLOR_BUFFER_BIT);

         // Set the view port
         gl.viewport(0,0,canvas.width,canvas.height);

         // Draw the triangle
         gl.drawArrays(gl.TRIANGLES, 0, 3);
      </script>
   </body>
</html>
它将产生以下结果 -
如果您仔细观察上面的程序,我们会按照五个连续的步骤使用 WebGL 绘制一个简单的三角形。步骤如下 -
步骤 1 - 准备画布并获取 WebGL 渲染上下文
我们获取当前的 HTML 画布对象并获取其 WebGL 渲染上下文。
步骤 2 - 定义几何图形并将其存储在缓冲区对象中
我们定义几何体的属性,例如顶点、索引、颜色等,并将它们存储在 JavaScript 数组中。然后,我们创建一个或多个缓冲区对象,并将包含数据的数组传递给相应的缓冲区对象。在示例中,我们将三角形的顶点存储在 JavaScript 数组中,并将该数组传递给顶点缓冲区对象。
步骤 3 - 创建并编译着色器程序
我们编写顶点着色器和片段着色器程序,对其进行编译,并通过链接这两个程序来创建组合程序。
步骤 4 - 将着色器程序与缓冲区对象关联
我们将缓冲区对象和组合的着色器程序关联起来。
步骤 5 - 绘制所需的对象(三角形)
此步骤包括清除颜色、清除缓冲区位、启用深度测试、设置视口等操作。最后,您需要使用以下方法之一绘制所需的图元:drawArrays()或drawElements ( )。
本教程将进一步解释所有这些步骤。