
- 谷歌AMP教程
- Google AMP - 主页
- Google AMP - 概述
- 谷歌 AMP - 简介
- Google AMP - 图片
- Google AMP - 表单
- Google AMP - Iframe
- Google AMP - 视频
- Google AMP - 按钮
- Google AMP - Timeago
- Google AMP - 数学
- Google AMP - 适合文本
- Google AMP - 日期倒计时
- Google AMP - 日期选择器
- Google AMP - 故事
- Google AMP - 选择器
- Google AMP - 链接
- Google AMP - 字体
- Google AMP - 列表
- Google AMP - 用户通知
- Google AMP - 下一页
- Google AMP - 属性
- 样式和自定义 CSS
- Google AMP - 动态 CSS 类
- Google AMP - 操作和事件
- Google AMP - 动画
- Google AMP - 数据绑定
- Google AMP - 布局
- 谷歌 AMP - ADS
- Google AMP - 分析
- Google AMP - 社交小部件
- Google AMP - 媒体
- Html 页面到 Amp 页面
- Google AMP - 基本语法
- Google AMP - 验证
- Google AMP - 缓存
- Google AMP - 自定义 Javascript
- Google AMP - Cors
- Google AMP 有用资源
- Google AMP - 快速指南
- Google AMP - 有用的资源
- Google AMP - 讨论
Google AMP - 快速指南
Google AMP - 概述
Google Accelerated Mobile Pages (Google-AMP) 是 Google 的新开源项目,专门用于使用 amp html 构建轻量级网页。该项目的主要目标是确保 amp 代码在所有可能的设备(例如智能手机、平板电脑等)上正常运行并快速加载。
什么是AMP?
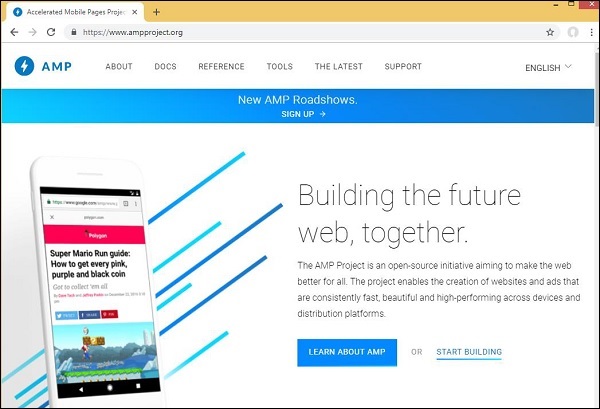
Accerated Mobile Pages (AMP) 是 Google 的开源项目,专门设计用于通过使其在任何浏览器中更快、更流畅且响应灵敏地呈现内容,从而使网页适合移动设备。
Google amp 的官方网站是 - https://www.ampproject.org/
为什么选择安普?
任何用户都希望网站能够非常快地加载内容。然而,当页面几乎充斥着图像、视频、动画、社交小部件时,情况可能并非如此,这使得页面非常沉重,从而增加了加载时间。这种情况长期下去可能会导致网站用户流失。
Google AMP 旨在解决这个问题。AMP有一种特殊的方式来处理图像、iframe、javascript、广告、视频、动画、css、加载的字体等。AMP页面的内容都缓存在Google端,因此每次用户点击搜索结果时内容由缓存提供。缓存版本也及时更新,以便用户始终获得最新更新的页面。
为什么选择AMP?
本节告诉您为什么必须为您的网站选择 AMP -
优先出现在 Google 搜索上
今天,当您在 Google 上搜索某些内容时,您会发现顶部显示一个带有页面的 Google 轮播,后面是作为对您搜索的响应的页面列表。显示的新闻轮播都是有效的 AMP 网站。这意味着谷歌优先考虑放大器页面,并根据新闻轮播中的排名显示它们。
这里给出了在 Google 中使用关键字“最新印度新闻”进行搜索的示例-
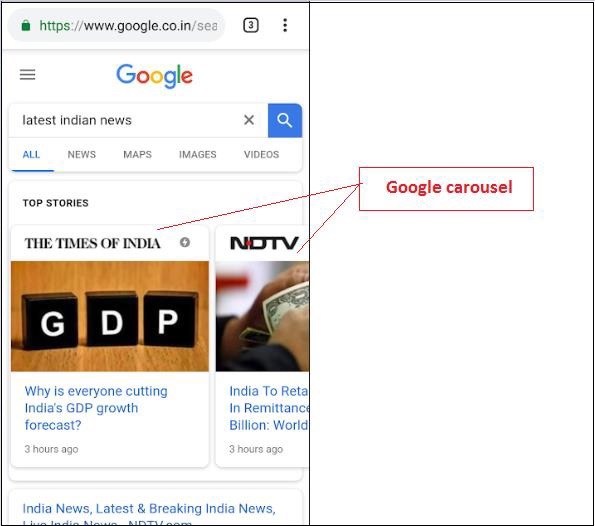
所有排名靠前的 AMP 页面都会显示在 Google 轮播的开头,如上图所示。
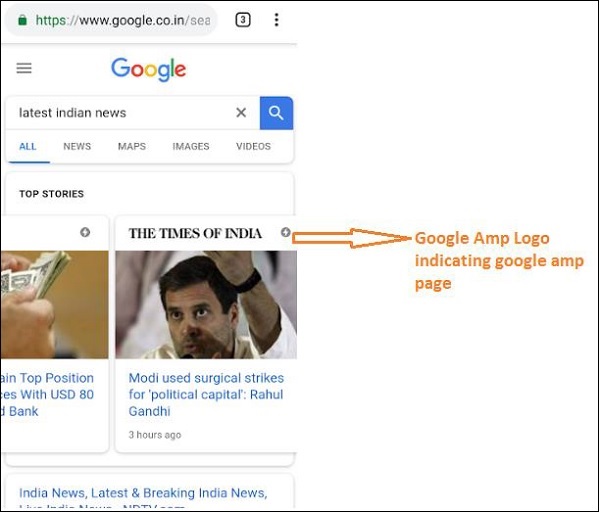
当用户在 Google 搜索中搜索某些内容时,Google AMP 页面如下所示。请注意,AMP 页面上有 Google AMP 徽标。
更快的加载时间
当您的页面经过 AMP 转换后,与非 AMP 页面相比,加载时间会短得多。更快的加载时间也是 Google 搜索中页面排名的一个重要因素。
无弹出窗口
使用 Google AMP 可以带来愉快的网络浏览体验,因为用户不会看到使用 Google AMP 设计的页面出现任何不需要的弹出窗口。
产生流量
当页面加载速度很快时,它会自动增加查看者的数量,从而增加页面的流量。
AMP 如何运作?
用于构建网站的最重要组件是 javascript、图像、视频、字体、CSS 等。AMP 页面设计是通过以独特的方式考虑所有这些因素来完成的。在本节中,让我们简要讨论 AMP 究竟是如何使页面更快的。
异步 JavaScript
JavaScript 在页面上扮演着重要的角色,因为它有助于以动画、DOM 更改等形式向页面添加交互性。它还会增加页面的速度,并可能阻止其他内容在页面上呈现。
AMP 如何处理 JavaScript?
AMP 异步加载 JavaScript。AMP 页面内严格不允许自定义 JavaScript。请注意,AMP 添加了很多组件,其中一些是现有 html 标签的替代品;例如 amp-img、amp-iframe、amp-video、amp-lightbox、amp-animations 等。
对于每个组件,都有一个要加载的 JavaScript 文件,该文件的 script 标记中添加了 async 属性。页面上仅允许使用与 amp 组件相关的 JavaScript 文件,而不允许 AMP 页面内的任何其他 JavaScript 或第三方 JavaScript 文件。由于 AMP 使用 Google AMP 缓存,因此文件是从缓存中预加载的,因此加载速度更快。
HTML 标签的尺寸
必须指定图像、iframe、视频标签的大小,以便 amp 页面可以定位页面上的空间,而无需加载资源。要加载的资源按 amp 页面的优先顺序排列。内容比要加载的资源具有更高的优先级。
社交小部件/广告
Amp 提供了特殊的组件,即 amp-facebook、amp-twitter、amp-ad、amp-sticky 来处理页面上显示的社交小部件。AMP-ad 组件用于在页面上投放广告。AMP 在处理组件时特别小心,并根据要求优先加载内容。
CSS
AMP 页面中不允许使用外部 CSS。可以使用 amp-custom 属性在样式标签内添加自定义 CSS(如果有)。内联 CSS 也是允许的。AMP 以所有可能的方式减少 http 请求。
字体
amp页面中允许使用字体,加载字体的优先级由AMP决定。
动画片
AMP 支持 amp-animation 组件,并允许现代浏览器支持的过渡。
考虑到上面列出的所有要点,AMP 对针对字体、图像、iframe、要提供的广告等发出的 HTTP 请求非常特别。首先呈现页面折叠上方的可用资源,然后优先呈现折叠下方的可用资源。
其他要点
Google AMP 缓存是另一个重要因素,当从缓存中获取内容时,它有助于更快地呈现内容。
发布商必须维护两个站点(amp 页面)和非 amp 页面。例如,假设该网站的地址为 - https://www.mypage.com。然后,在桌面上提供非 amp 的内部页面将为https://www.mypage.com/news。对于设备或 AMP,它将是:https://www.mypage/com/news/amp/
Google 如何识别 AMP 和非 AMP 网页?
现在,让我们了解Google如何识别AMP和非AMP页面。
当Google搜索抓取页面时,如果恰好在html中得到amp或<html amp>或<html ⚡>,它就知道这是一个AMP页面。
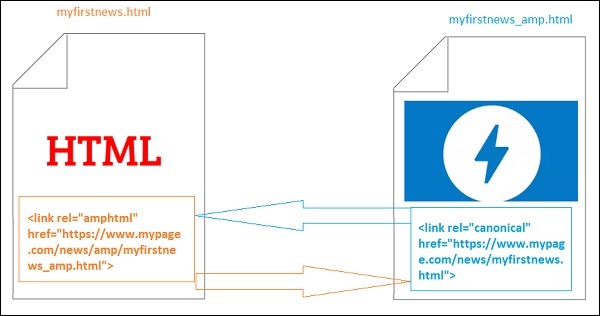
另外,如果 Google 遇到非 amp 页面,首先要了解 amp 页面,必须在 amp 页面和非 amp 页面的 html 页面的 head 部分添加以下链接标记。
非 amp 页面的页面 url
<link rel = "amphtml" href = "https://www.mypage.com/news/amp/myfirstnews_amp.html">
这里指定rel = ”amphtml”为非 amp 页面指向 amp 版本,以便 Google 根据平台显示正确的页面。
amp-page 的页面 url
<link rel = "canonical" href = "https://www.mypage.com/news/myfirstnews.html">
这里在amp页面中指定rel =“canonical”指向html的标准版本,以便Google根据平台显示正确的版本。
如果您的网站只有一个 amp 页面,您仍然不应忘记添加 rel = ”canonical” ,它将指向自身 -
<link rel = "canonical" href = "https://www.mypage.com/news/amp/myfirstnews_amp.html">
下图显示了对指向 amp 页面的 rel=”amphtml” 和指向标准 html 页面的 rel=”canonical” 的引用。
谷歌AMP的特点
在本节中,让我们讨论 Google AMP 提供的重要功能 -
放大器缓存
Google Amp 缓存是 amp 添加的核心功能之一。它提供基于代理的内容交付网络来服务纯amp页面。默认情况下,所有有效的amp页面都可以使用amp缓存。与非amp页面相比,它有助于更快地渲染页面。目前Google有2个amp缓存提供商AMP 缓存和 Cloudflare AMP 缓存。当用户点击并重定向到 amp 页面时,内容将从 Google 缓存中提供。
放大器组件
Amp 拥有大量专为各种目的而设计的组件。其中一些列于下面 -
amp-img - 用于在 amp 页面上显示图像。
amp-iframe - 用于显示 iframe 以及要在页面上显示的外部内容。请注意,使用的 iframe 是沙盒的,这意味着它需要权限才能在 amp 页面上显示数据。因此,必须为沙箱属性指定跨源详细信息。
amp-video - 在页面上显示视频。
amp-audio - 在页面上显示音频。
amp-datepicker - 用于在页面上显示日期小部件。您不必使用任何第三方日期选择器,因为 amp 可以直接使用。
amp-story - 在页面上显示故事的媒介。
amp-selector - 是一个放大器组件,显示选项菜单,用户可以在选项之间进行选择。显示的选项可以是文本、图像或任何其他放大器组件。
amp-list - 是一个 amp 组件,它调用 CORS json 端点,并且 json 文件中的数据显示在模板内。
广告
广告对于发布商来说非常重要,因为他们的收入完全取决于页面上投放的广告。Amp 不允许在页面上添加任何外部 JavaScript,但引入了一个名为 amp-ad 的特殊 amp 组件,该组件负责在页面上投放广告。
发布商希望在其页面上投放的广告网络需要支持 amp-ad。例如,要在页面上投放双击广告,双击需要支持使用 amp-ad 组件投放广告。以下代码显示了 doubleclick 的 amp-ad 代码。
<amp-ad width = "300"
   height = "200"
   type = "doubleclick"
   data-slot = "/4119129/ad-layout">
   <div placeholder>
      <b>Placeholder here!!!</b>
   </div>
</amp-ad>
Amp 还支持 amphtmlad,它们是从 AMP 组件和 html 开发的纯 ampad。Amp 还支持 amp-sticky-ads,即显示在页面底部的页脚广告。amp 中广告的详细信息将在 amp 广告章节中讨论。
社交小工具
Facebook、Twitter、Instagram 等社交小部件在发布商页面上显示变得非常重要,以便页面在社交媒体上共享。AMP 通过开发 amp-facebook、amp-twitter、amp-instagram、amp-pinterest 等 AMP 组件,将其支持扩展到页面上使用的所有重要社交媒体小部件。
放大器媒体
页面上的另一个重要组成部分是媒体,用于显示视频并在视频之间提供广告作为中贴片广告。AMP 提供了一种使用 amp-jwplayer、amp-youtube 等实现此目的的媒介。您无需加载任何额外的第三方文件即可在您的页面上显示 jwplayer、youtube。
放大器分析
Amp 分析是一个 AMP 组件,用于跟踪给定页面上的数据。页面上的所有用户交互都可以记录并保存,以分析数据以实现进一步改进或实现业务目的。
放大器动画
Amp-animation 是一个 amp 组件,它定义要在其他 amp 组件上使用的动画。它支持动画、过渡,与现代浏览器配合良好。您不必使用任何外部 CSS 库来执行动画,并且可以使用 amp-animation 组件。
放大器布局
AMP-Layout 是 google-amp 中提供的重要功能之一。Amp 布局可确保加载页面时正确呈现 amp 组件,而不会导致任何闪烁或滚动问题。
Google AMP 确保在完成任何其他远程资源(例如图像的 http 请求、数据调用)之前在页面上完成布局渲染。可用于布局的属性包括所有 amp 组件的宽度/高度、具有响应式、填充、固定等值的布局属性、当资源需要时间加载或出现任何错误时显示的占位符属性、当资源加载时间较长或出现任何错误时显示的后备属性资源有任何错误。
放大器显示布局
Amp 支持许多用于在页面上显示内容的组件,无需任何第三方库或无需在页面上制作任何繁重的 CSS。该列表包括
Accordion - Amp-accordion 是一个放大器组件,用于以展开折叠格式显示内容。用户可以轻松地在移动设备上查看它,他们可以根据自己的选择从手风琴中选择部分。
Carousel - Amp-carousel 是一个 amp 组件,用于在屏幕上显示一组相似的内容,并使用箭头在内容之间切换。
Lightbox - Amp-lightbox 是一个放大器组件,它将占据整个视口并像覆盖层一样显示。
Slider - Amp-image-slider 是一个放大器组件,用于通过添加滑块在图像上垂直移动来比较 2 个图像。
Sidebar - Amp 侧边栏是一个 amp 组件,用于显示点击按钮时从窗口侧面滑动的内容。
AMP的优点
AMP 页面轻量且加载速度更快
Google 在 Google 搜索中优先考虑 AMP 页面。AMP 页面以轮播格式列出在页面顶部。为了获得更高的排名,将您的页面放在 AMP 中是一个很好的优势。
AMP 页面适合移动设备,因为内容具有响应能力,并且可以在所有浏览器中很好地调整,而无需任何额外的样式。
用户对 AMP 页面的满意度提高,因为与非 AMP 页面相比,页面加载速率更快,从而节省了带宽和移动电池。
AMP 的缺点
Amp 具有以下缺点 -
发布商必须为其页面维护两个版本:amp 和非amp。
用户必须付出额外的努力才能将非 amp 页面转换为 amp 页面。由于 amp 不支持自定义 javascript 或加载外部 javascript,因此必须使用 amp 提供的任何内容来实现相同的效果。
谷歌 AMP - 简介
Google Accelerated Mobile Pages (Google-AMP) 是 Google 的新开源项目,专门用于使用 amp html 构建轻量级网页。该项目的主要目标是确保 AMP 代码在所有可能的设备(例如智能手机和平板电脑)上正常运行并快速加载。
AMP 只是标准 HTML 的扩展。HTML 标签很少发生变化,并且 AMP 添加了对其使用的限制。在本章中,我们将列出已更改的 html 标签以及对其添加的限制。处理加载外部资源(例如图像、CSS、JS、表单提交、视频、音频等)的标签已更改。
此外,amp 还添加了许多新功能,例如 amp-date-picker、amp-facebook、amp-ad、amp-analytics、amp-ad、amp-lightbox 等,可以直接在 html 页面中使用。其余用于展示的内容均按原样使用。
凭借所有这些更改和新功能,AMP 承诺在实时环境中使用时提供更快的加载速度和更好的页面性能。
当您在手机上的 Google 搜索中搜索任何内容时,顶部的 google 轮播中看到的显示大部分是 amp 页面,如下所示 -

当您点击 AMP 页面时,您在地址栏中得到的 URL 如下 -
https://www.google.co.in/amp/s/m.timesofindia.com/sports/cricket/india-in-australia/to-hell-with-the-nets-boys-need-rest-ravi-shastri/amp_articleshow/67022458.cms

该 URL 并非直接来自发布商,但 Google 将其指向 Google 服务器上自己的副本,该副本是缓存版本,与非 amp 页面相比,有助于更快地呈现内容。这只会在设备上或在 Google 模拟器模式下发生。
示例放大器页面
amp 页面的示例如下所示 -
<!doctype html>
<html amp>
   <head>
      <meta charset = "utf-8">
      <title>Amp Sample Page</title>
      <link rel = "canonical" href = "./regular-html-version.html">
      <meta name = "viewport" content = "width = device-width,
         minimum-scale = 1,initial-scale = 1">
      <style amp-custom>
         h1 {color: red}
      </style>
      <script type = application/json>{
         "vars": {
            "uid": "23870",
            "domain": "dummyurl.com",
            "sections": "us",
            "authors": "Hello World"
         }
      }
      </script>
      <style amp-boilerplate>
         body{
            -webkit-animation:
            -amp-start 8s steps(1,end) 0s 1 normal both;-moz-animation:
            -amp-start 8s steps(1,end) 0s 1 normal both;-ms-animation:
            -amp-start 8s steps(1,end) 0s 1 normal both;animation:
            -amp-start 8s steps(1,end) 0s 1 normal both
         }
         @-webkit-keyframes
         -amp-start{from{visibility:hidden}to{visibility:visible}}@-moz-keyframes
         -amp-start{from{visibility:hidden}to{visibility:visible}}@-ms-keyframes
         -amp-start{from{visibility:hidden}to{visibility:visible}}@-o-keyframes
         -amp-start{from{visibility:hidden}to{visibility:visible}}@keyframes
         -amp-start{from{visibility:hidden}to{visibility:visible}}
      </style>
      <noscript>
         <style amp-boilerplate>
            body{
               -webkit-animation:none;
               -moz-animation:none;
               -ms-animation:none;
               animation:none}
         </style>
      </noscript>

      <script async src = "https://cdn.ampproject.org/v0.js"></script>
   </head>
   <body>
      <h1>Amp Sample Page</h1>
      <p>
         <amp-img src = "imgurl.jpg" width = "300" height = "300"
            layout = "responsive"></amp-img>
      </p>
      <amp-ad width = "300" height = "250" type = "doubleclick"
         data-slot = "/4119129/no-ad">
         <div fallback>
            <p style = "color:green;font-size:25px;">No ads to Serve!</p>
         </div>
      </amp-ad>
   </body>
</html>
AMP 页面中的注意事项
让我们了解程序员在 AMP 页面中必须遵循的一些注意事项。
强制标签
放大器页面中包含一些强制性标签,如下所示 -
我们必须确保 html 标签中添加了 amp 或 ⚡,如下所示 -
<html amp>
   OR
<html ⚡>
<head> 和 <body> 标签应添加到 html 页面中。
应在页面的头部添加以下强制元标记;否则放大器验证将失败
<meta charset = "utf-8">
<meta name = "viewport" content = "width=device-width, minimum-scale = 1, initial-scale = 1">
rel = "canonical" 的链接添加到 head 标签内
<link rel = "canonical" href = "./regular-html-version.html">
带有 amp-boilerplate 的样式标签 -
<style amp-boilerplate>
   body{
      -webkit-animation:
      -amp-start 8s steps(1,end) 0s 1 normal both;-moz-animation:
      -amp-start 8s steps(1,end) 0s 1 normal both;-ms-animation:
      -amp-start 8s steps(1,end) 0s 1 normal both;animation:
      -amp-start 8s steps(1,end) 0s 1 normal both
   }
   @-webkit-keyframes
   -amp-start{from{visibility:hidden}to{visibility:visible}}@-moz-keyframes
   -amp-start{from{visibility:hidden}to{visibility:visible}}@-ms-keyframes
   -amp-start{from{visibility:hidden}to{visibility:visible}}@-o-keyframes
   -amp-start{from{visibility:hidden}to{visibility:visible}}@keyframes
   -amp-start{from{visibility:hidden}to{visibility:visible}}
</style>
带有 amp-boilerplate 的 Noscript 标签 -
<noscript>
   <style amp-boilerplate>
      body{
         -webkit-animation:none;
         -moz-animation:none;
         -ms-animation:none;
         animation:none
      }
   </style>
</noscript>
添加了异步的 amp 脚本标签非常重要,如下所示 -
<script async src = "https://cdn.ampproject.org/v0.js"> </script>
如果您想向页面添加自定义 CSS,请在此处注明,我们无法在 amp 页面中调用外部样式表。要添加自定义 CSS ,所有 CSS 都必须放在此处,如下所示 -
<style amp-custom>
   //all your styles here
</style>
style 标签应添加 amp-custom 属性。
AMP 组件的脚本
请注意,amp 页面中严格不允许使用 src 和 type = ”text/javascript” 的脚本。仅允许在 head 部分添加异步且与 amp-components 相关的脚本标签。
本节列出了用于放大器组件的一些脚本,如下所示 -
amp 广告
<script async custom-element = "amp-ad"
   src = "https://cdn.ampproject.org/v0/amp-ad-0.1.js">
</script>
amp-iframe
<script async custom-element = "amp-iframe"
   src = "https://cdn.ampproject.org/v0/amp-iframe-0.1.js">
</script>
请注意,该脚本具有 async 和 custom-element 属性以及要加载的 amp 组件的名称。Amp 根据异步和自定义元素属性验证脚本标签,并且不允许加载任何其他脚本。它确实需要我们在示例文件中添加的type=application/json ,如下所示
<type = application/json>
{
   "vars": {
      "uid": "23870",
      "domain": "dummyurl.com",
      "sections": "us",
      "authors": "Hello World"
   }
}
</script>
如果需要,上述脚本可以与其他 amp 组件一起使用,例如 amp-analytics。
HTML标签
到目前为止,我们已经看到了 amp 页面中所需的强制标签。现在我们将讨论允许/不允许的 HTML 元素以及对它们施加的限制。
以下是允许/不允许的 HTML 标签列表 -
| 先生编号 | HTML 标签和描述 |
|---|---|
| 1 | 图像 该标签已替换为 amp-img。AMP 页面中不允许使用直接 img 标记 |
| 2 | 视频 替换为 amp-video |
| 3 | 声音的 替换为 amp-audio |
| 4 | 内嵌框架 替换为 amp-iframe |
| 5 | 目的 不允许 |
| 6 | 嵌入 不允许 |
| 7 | 形式 可以用作<form>。我们需要添加脚本以处理 AMP 页面中的表单。 示例 - <script async custom-element = "amp-form" src = "https://cdn.ampproject.org/v0/amp-form-0.1.js"> </script> |
| 8 | 输入元素 Allowed.<input[type = image]>, <input[type = button]>, <input[type = password]>, <input[type = file]> are not allowed |
| 9 | <字段集> 允许 |
| 10 | <标签> 允许 |
| 11 | P、div、页眉、页脚、部分 允许 |
| 12 | 按钮 允许 |
| 13 | A 允许使用 <a> 标签,但条件如下,href 不应以 javascript 开头。如果存在,目标属性值必须为 _blank。 |
| 14 | svg 不允许 |
| 15 | 元 允许 |
| 16 | 关联 允许。但不允许加载外部样式表。 |
| 17 号 | 风格 允许。它需要具有 amp-boilerplate 或 amp-custom 属性。 |
| 18 | 根据 不允许 |
| 19 | 无脚本 允许 |
评论
不允许有条件的 html 注释。例如 -
<!--[if Chrome]> This browser is chrome (any version) <![endif]-->
HTML 事件
我们在 html 页面中使用的事件(例如 onclick、onmouseover)在 AMP 页面中是不允许的。
我们可以使用事件如下 -
on = "eventName:elementId[.methodName[(arg1 = value, arg2 = value)]]"
这是输入元素上使用的事件的示例 -
<input id = "txtname" placeholder = "Type here"
on = "inputthrottled:
AMP.setState({name: event.value})">
使用的事件是输入控制的。
课程
您的页面中不能包含带有-amp- 或 i-amp-等前缀的类。此外,您可以根据您的要求使用类名称。
识别码
您的 html 元素的 id 不能以 -amp 或 i-amp- 为前缀。此外,您可以根据您的要求在 html 元素中使用 ids。
链接
amp 页面中不允许使用 JavaScript 进行 href。
例子
<a href = "javascript:callfunc();">click me</a>
样式表
AMP 页面中不允许使用外部样式表。可以在里面添加页面所需的样式 -
<style amp-custom> //all your styles here </style>
style 标签应添加amp-custom属性。
@-规则
样式表中允许使用以下@规则 -
不允许@font-face、@keyframes、@media、@page、@supports.@import。未来将添加对相同内容的支持。
@keyframes 允许在<style amp-custom >内使用。如果 @keyframes 太多,最好创建<style amp-keyframes>标签并在 amp 文档末尾调用此标签。
类名、id、标签名和属性不应以-amp-和i-amp-为前缀,因为它们在 amp 代码中内部使用,如果在运行时也在页面上定义,可能会导致冲突。
!important属性不允许在样式内部使用,因为 amp 希望在需要时控制元素大小。
自定义字体
AMP 页面中允许使用自定义字体的样式表。
例子
<link rel = "stylesheet" href = "https://fonts.googleapis.com/css?family=Tangerine">
来自以下来源的字体已列入白名单,可在 AMP 页面内使用。
Fonts.com - https://fast.fonts.net
谷歌字体 - https://fonts.googleapis.com
很棒的字体 - https://maxcdn.bootstrapcdn.com
Typekit - https://use.typekit.net/kitId.css (相应地替换 kitId)
注意- amp 页面中允许使用 @font-face 自定义字体。
例子
@font-face {
font-family: myFirstFont;
src: url(dummyfont.woff);
}
AMP运行时
一旦加载 amp 核心文件就决定了 amp 运行时环境 -
<script async src = "https://cdn.ampproject.org/v0.js"></script>
核心文件负责加载外部资源,决定何时加载它们的优先级,并且在将 #development=1 添加到 amp URL 时帮助验证 amp 文档。
例子
http://localhost:8080/googleamp/amppage.html#development=1
上述 URL 在浏览器中执行时,如果 amp 验证失败,将列出错误;如果没有错误,则显示 amp 验证成功消息。
AMP 组件
Amp 添加了很多放大器组件。它们基本上用于以有效的方式处理资源的加载。它还包含处理动画、显示数据、广告显示、社交小部件等的组件。
AMP 中有 2 种类型的组件。
- 内置
- 外部的
注意- <amp-img> 是内置组件,如果添加核心 amp js 文件则可用。<amp-ad>、<amp-facebook>、<amp-video> 等外部组件需要与要添加的组件相关的相应 js 文件。
通用属性
宽度、高度、布局、占位符和后备等属性将适用于几乎所有可用的 AMP 组件。这些属性对于任何 AMP 组件都非常重要,因为它决定组件在 AMP 页面中的显示。
上面列出的所有 AMP 功能都将在本教程的后续章节中详细讨论。
请注意,本教程中的所有示例均针对设备进行了测试,并使用 Google 移动模拟器模式。现在让我们详细了解一下这一点。
谷歌手机模拟器
要使用 Google 移动模拟器,请打开 Chrome 浏览器,右键单击并打开开发者控制台,如下所示 -

我们可以看到Chrome的开发者工具如上图。在浏览器中点击您要测试的链接。观察页面以桌面模式显示。

要获取上述页面来测试设备,请单击“切换设备”工具栏,如下所示 -

您也可以使用快捷键 Ctrl+shift+M。这会将桌面模式更改为设备模式,如下所示 -

设备列表如下所示 -

您可以选择要测试页面的设备。请注意,这些教程中的所有页面都在 Google 移动模拟器上进行了测试,如上所示。Firefox 和最新的 Internet Explorer 浏览器也可以使用相同的功能。
Google AMP - 图片
Google AMP 页面中使用的图像与标准 html 页面中使用的图像类似,但唯一的区别是标签名称与一些附加属性的使用方式。本章详细讨论这些内容。
观察下面所示的语法 -
标准HTML
<img src = ”example.jpg” width = ”300” height = ”250” alt = ”Example” ></img>
在 AMP 页面中
<amp-img src = "example.jpg" alt = "Example" height = "300" width = "250" ><//amp-img>
请注意, img中的标签已更改为amp-img。
为什么使用amp-img而不是img?
将 img 更改为 amp-img 的原因是为了更好地控制页面布局和加载图像的网络请求。Amp 向图像资源添加延迟加载,并根据页面上可用的其他资源确定加载的优先级。
例子
请观察以下代码以更好地理解 -
<!doctype html>
<html amp lang = "en">
<head>
<meta charset = "utf-8">
<script async src = "https://cdn.ampproject.org/v0.js"></script>
<title>Google AMP - Image</title>
<link rel = "canonical" href = "http://example.ampproject.org/articlemetadata.html">
<meta name = "viewport" content = "width = device-width,
minimum-scale = 1,initialscale = 1">
<style amp-boilerplate>
body{
-webkit-animation:
-amp-start 8s steps(1,end) 0s1 normal both;-moz-animation:
-amp-start 8s steps(1,end) 0s 1 normal both;-msanimation:
- amp-start 8s steps(1,end) 0s 1 normal both;animation:
-amp-start 8s steps(1,end) 0s 1 normal both
}
@-webkit-keyframes
-ampstart{from{visibility:hidden}to{visibility:visible}}@-moz-keyframes
-ampstart{from{visibility:hidden}to{visibility:visible}}@-ms-keyframes
-ampstart{from{visibility:hidden}to{visibility:visible}}@-o-keyframes
-ampstart{from{visibility:hidden}to{visibility:visible}}@keyframes
amp-start{from{visibility:hidden}to{visibility:visible}}
</style>
<noscript>
<style amp-boilerplate>
body{
-webkit-animation:none;
-moz-animation:none;
-msanimation:none;
animation:none
}
</style>
</noscript>
</head>
<body>
<h1>Google AMP - Image Example</h1>
<amp-img alt = "Beautiful Flower" src = "images/flower.jpg"
width = "246"
height = "205">
</amp-img>
</body>
</html>
输出
当您执行上面所示的代码时,您将发现结果如下所示 -

您还可以通过将属性layout =“responsive”添加到amp-img标签来使图像响应,如下所示
例子
请观察以下代码以更好地理解 -
<amp-img alt = "Beautiful Flower" src = "images/flower.jpg" width = "246" height = "205" layout = "responsive"> </amp-img>
输出
当您执行上面所示的代码时,您将发现结果如下所示 -

Google AMP - 表单
本章介绍如何在 Google AMP 中使用表单。
请注意,表单标签与标准 HTML 中的标签相同。AMP 对表单的使用添加了特殊限制,因此我们需要添加 amp-form JavaScript 文件才能使用表单。
amp-form 的脚本
<script async custom-element = "amp-form" src = "https://cdn.ampproject.org/v0/ampform-0.1.js"></script>
要在 AMP 页面中使用表单,我们需要将上述脚本包含在 .html 文件中。amp-form JavaScript 文件支持http和xmlhttprequest进行表单提交。使用 HTTP 请求会重新加载页面,而使用xmlhttprequest则不会重新加载页面,就像 ajax 请求一样。
AMP 中的表单标签
For xmlhttprequest : <form method = "post" class = "p2" action-xhr = "submitform.php" target = "_top"> //Input fields here </form> For http : <form method = "post" class = "p2" action = "submitform.php" target = "_top"> //Input fields here </form>
amp-form提供了特殊的属性,即submit-error和submit-success来处理表单提交时的错误和成功。
例子
amp-form 的示例如下所示 -
<!doctype html>
<html amp lang = "en">
<head>
<meta charset = "utf-8">
<script async src = "https://cdn.ampproject.org/v0.js"></script>
<title>Google AMP - Form</title>
<link rel = "canonical" href = "ampform.html">
<meta name = "viewport" conten t = "width = device-width,
minimum-scale = 1,initialscale = 1">
<style amp-boilerplate>
body{
-webkit-animation:
-amp-start 8s steps(1,end) 0s1 normal both;-moz-animation:
-amp-start 8s steps(1,end) 0s 1 normal both;-msanimation:
-amp-start 8s steps(1,end) 0s 1 normal both;animation:
-amp-start 8s steps(1,end) 0s 1 normal both
}
@-webkit-keyframes
-ampstart{from{visibility:hidden}to{visibility:visible}}@-moz-keyframes
-ampstart{from{visibility:hidden}to{visibility:visible}}@-ms-keyframes
-ampstart{from{visibility:hidden}to{visibility:visible}}@-o-keyframes
-ampstart{from{visibility:hidden}to{visibility:visible}}@keyframes
-ampstart{from{visibility:hidden}to{visibility:visible}}
</style>
<noscript>
<style amp-boilerplate>
body{
-webkit-animation:none;
-moz-animation:none;
-msanimation:none;
animation:none
}
</style>
</noscript>
<script async custom-element = "amp-form"
   src = "https://cdn.ampproject.org/v0/amp-form-0.1.js">
</script>
<script async custom-template = "amp-mustache"
src = "https://cdn.ampproject.org/v0/amp-mustache-0.2.js">
</script>
<style amp-custom>
form.amp-form-submit-success [submit-success],
form.amp-form-submit-error [submit-error]{
margin-top: 16px;
}
form.amp-form-submit-success [submit-success] {
color: white;
background-color:gray;
}
form.amp-form-submit-error [submit-error] {
color: red;
}
form.amp-form-submit-success.hide-inputs > input {
display: none;
}
</style>
</head>
<body>
<h3>Google AMP - Form</h3>
<form method = "post"
class = "p2"
action-xhr = "submitform.php"
target = "_top">
<p>AMP - Form Example</p>
<div>
<input type = "text" name = "name" placeholder = "Enter
Name" required><br/><br/>
<input type = "email" name = "email"
placeholder = "Enter Email" required>
<br/>
<br/>
</div>
<input type = "submit" value = "Submit">
<div submit-success>
<template type = "amp-mustache">
Form Submitted! Thanks {{name}}.
</template>
</div>
<div submit-error>
<template type = "amp-mustache">
Error! {{name}}, please try again.
</template>
</div>
</form>
</body>
</html>
输出
当您执行上面所示的代码时,您将发现结果如下所示 -

现在,输入详细信息并单击“提交”按钮。显示的输出屏幕如下 -

请注意,我们使用 amp-mustache 进行数据绑定。该表单使用 action-xhr 即 xmlhttprequest 来提交表单。我们使用了Submitform.php文件,它以 json 格式返回数据。
<form method = "post" class = "p2" action-xhr = "submitform.php"
   target = "_top">
</form>
提交表单.php
<?php
   if(!empty($_POST)){
      $domain_url = (isset($_SERVER['HTTPS']) ? "https" : "http") .      "://$_SERVER[HTTP_HOST]";
      header("Content-type: application/json");
      header("AMP-Access-Control-Allow-Source-Origin: " . $domain_url);
      header("Access-Control-Expose-Headers: AMP-Access-Control-Allow-Source-Origin");
      $myJSON = json_encode($_POST);
      echo $myJSON;
   }
?>
为了使表单能够使用 xmlhttprequest,我们需要根据 CORS 规范添加标头。添加到 Submitform.php 的响应标头的详细信息如下所示 -

为了使表单正常工作,我们需要添加标头,例如带有值AMP-Access-Control-Allow-Source-Origin和amp-access-controlallow-source-origin - http://localhost 的 access-control-expose-headers: 8080。
请注意,我们使用的是 php 文件和 apache 服务器。在 php 文件中,我们添加了所需的标头,如下所示 -
<?php

   if(!empty($_POST)){
      $domain_url = (isset($_SERVER['HTTPS']) ? "https" : "http") .  "://$_SERVER[HTTP_HOST]";
      header("Content-type: application/json");
      header("AMP-Access-Control-Allow-Source-Origin: " . $domain_url);
      header("Access-Control-Expose-Headers: AMP-Access-Control-Allow-Source-Origin");
      $myJSON = json_encode($_POST);
      echo $myJSON;
   }
   ?
?>
如果我们使用普通的 http 请求,页面将重新加载,如下所示 -
对于 http 请求,我们使用的形式如下 -
<form method = "GET" class = "p2" action = "submitform.php"
   target = "_top">
</form>
例子
请观察以下代码以更好地理解 -
<!doctype html>
<html amp lang = "en">
   <head>
      <meta charset = "utf-8">
      <script async src = "https://cdn.ampproject.org/v0.js"></script>
      <title>Google AMP - Form</title>
      <link rel = "canonical" href = "ampform.html">
      <meta name = "viewport" content = "width = device-width,minimum-scale = 1,initialscale = 1">

      <style amp-boilerplate>
         body{
            -webkit-animation:
            -amp-start 8s steps(1,end) 0s1 normal both;-moz-animation:
            -amp-start 8s steps(1,end) 0s 1 normal both;-msanimation:
            -amp-start 8s steps(1,end) 0s 1 normal both;animation:
            -amp-start 8s steps(1,end) 0s 1 normal both
         }
         @-webkit-keyframes
         -ampstart{from{visibility:hidden}to{visibility:visible}}@-moz-keyframes
         -ampstart{from{visibility:hidden}to{visibility:visible}}@-ms-keyframes
         -ampstart{from{visibility:hidden}to{visibility:visible}}@-o-keyframes
         -ampstart{from{visibility:hidden}to{visibility:visible}}@keyframes
         -ampstart{from{visibility:hidden}to{visibility:visible}}
      </style>
      <noscript>
         <style amp-boilerplate>
            body {
               -webkit-animation:none;
               -moz-animation:none;
               -msanimation:none;
               animation:none}
         >/style>
      </noscript>

      <script async custom-element = "amp-form"
         src = "https://cdn.ampproject.org/v0/amp-form-0.1.js">
      </script>
      <script async custom-template = "amp-mustache"
         src = "https://cdn.ampproject.org/v0/amp-mustache-0.2.js">
      </script>

      <style amp-custom>
         form.amp-form-submit-success [submit-success],
         form.amp-form-submit-error [submit-error]{
            margin-top: 16px;
         }
         form.amp-form-submit-success [submit-success] {
            color: white;
            background-color:gray;
         }
         form.amp-form-submit-error [submit-error] {
            color: red;
         }
         form.amp-form-submit-success.hide-inputs >
            input {
            display: none;
         }
      </style>
   </head>
   <body>
      <h3>Google AMP - Form</h3>
      <form method = "GET" class = "p2" action = "submitform.php" target = "_top">
         <p>AMP - Form Example</p>
         <div>
            <input type = "text" name = "name" placeholder = "Enter Name" required>
            <br/>
            <br/>
            <input type = "email" name = "email" placeholder = "Enter Email" required>
            <br/>
            <br/>
         <div>

         <input type = "submit" value = "Submit">
         <div submit-success>
            <template type = "amp-mustache">
               Form Submitted! Thanks {{name}}.
            </template>
         </div>
         <div submit-error>
            <template type = "amp-mustache">
               Error! {{name}}, please try again.
            </template>
         </div>
      </form>
   </body>
</html>
输出
当您执行上面所示的代码时,您将发现结果如下所示 -


Google AMP - Iframe
Google amp-iframe用于在页面上显示 iframe。 amp-iframe 需要添加一些条件,因此我们无法在页面上使用普通的 iframe。本章将对此进行更多讨论。
iFrame 需遵循的条件
在 AMP 页面中使用 iframe 时要注意的条件如下:
iframe 上使用的 url 必须是https请求或data-URI或使用srcdoc属性。
amp-iframe 默认情况下会添加沙箱属性。沙箱属性将设置为空。沙箱的空值意味着 iframe 是最大沙箱(对 iframe 的额外限制)。我们可以向沙箱添加值,这将在下面的示例的帮助下进行讨论。
amp-iframe 无法显示在页面顶部,它应该距离顶部近 600 像素,或者在顶部滚动时位于视口的前 75% 范围内。如果您必须在开始时显示 iframe,则需要向 iframe 添加占位符,我们将在本教程后面的示例的帮助下讨论这一点。
amp-iframe 不得与容器具有相同的来源。例如,如果您的主站点位于 www.xyz.com ,则您不能将 iframe src 设置为www.xyz.com/urlname。它可以采用其他,例如.xyz.com、example.xyz.com 等。
要使用 iframe,我们需要添加以下脚本 -
<script async custom-element = "amp-iframe"
   src = "https://cdn.ampproject.org/v0/amp-iframe-0.1.js"></script>
Amp-iframe 格式如下 -
<amp-iframe width = "600" title = "Google map"
   height = "400" layout = "responsive"
   sandbox = "allow-scripts allow-same-origin allow-popups"
   frameborder = "0"
   src = "https://maps.google.com/maps?q=telangana&t=&z=13&ie=UTF8&iwloc=&output=embed">
</amp-iframe>
让我们借助一个工作示例来理解这一点,该示例将使用 iframe 来显示 Google 地图,如下所示。
例子
<!doctype html>
<html amp lang = "en">
   <head>
      <meta charset = "utf-8">
      <script async src = "https://cdn.ampproject.org/v0.js"></script>
      <title>Google AMP - Amp Iframe</title>
      <link rel = "canonical" href = "http://example.ampproject.org/article-metadata.html">
      <meta name = "viewport" content = "width = device-width,minimum-scale = 1,initial-scale = 1">

      <style amp-boilerplate>
         body{
            -webkit-animation:-amp-start 8s steps(1,end) 0s
            1 normal both;-moz-animation:
            -amp-start 8s steps(1,end) 0s 1 normal both;-ms-animation:
            -amp-start 8s steps(1,end) 0s 1 normal both;animation:
            -amp-start 8s steps(1,end) 0s 1 normal both}
         @-webkit-keyframes
         -amp-start{from{visibility:hidden}to{visibility:visible}}@-moz-keyframes
         -amp-start{from{visibility:hidden}to{visibility:visible}}@-ms-keyframes
         -amp-start{from{visibility:hidden}to{visibility:visible}}@-o-keyframes
         -amp-start{from{visibility:hidden}to{visibility:visible}}@keyframes
         -amp-start{from{visibility:hidden}to{visibility:visible}}
      </style><noscript>
      <style amp-boilerplate>
         body{-webkit-animation:none;-moz-animation:
         none;-ms-animation:none;animation:none}
      </style></noscript>

      <script async custom-element = "amp-iframe"
         src = "https://cdn.ampproject.org/v0/amp-iframe-0.1.js"
      ></script>

      <style>
         div {
            height:850px;
            text-align:center;
         }
      </style>
   </head>
   <body>
      <h3>Google AMP - Amp Iframe</h3>
      <div>
         Google Maps in Iframe
      </div>
      <h3>Google AMP - Amp Iframe</h3>
      <amp-iframe width = "600"
         title = "Google map"
         height = "400"
         layout = "responsive"
         sandbox = "allow-scripts allow-same-origin allow-popups"
         frameborder = "0" src = "https://maps.google.com/maps?q=telangana&t=&z=13&ie=UTF8&iwloc=&output=embed">
      </amp-iframe>
   </body>
</html>
输出

请注意,我们已将 iframe 放置在距顶部超过 600 像素的位置。它给出一个错误,如下所示 -
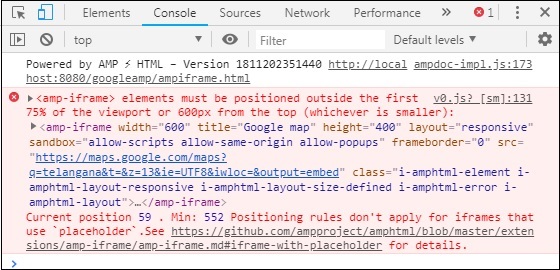
在上面的示例中,我们使用了沙箱,其值如下 -
sandbox = "allow-scripts allow-same-origin allow-popups"
Sandbox 属性的作用类似于在 iframe 中加载内容的权限。在这里,我们允许加载来自 Google 地图链接的所有脚本。如果我们没有提供沙箱属性,则会显示此错误,该错误会阻止在 iframe 中加载内容 -

请注意,我们必须授予沙箱正确的权限。您可以在此处找到授予沙箱的所有权限的详细信息 - https://developer.mozilla.org/en-US/docs/Web/HTML/Element/iframe#attr-sandbox。
我们可以利用 amp-iframe 中的 placeholder 属性来摆脱超过 600px 的情况。
下面给出了相同的工作示例 -
<!doctype html>
<html amp lang = "en">
   <head>
      <meta charset = "utf-8">
      <script async src = "https://cdn.ampproject.org/v0.js"></script>
      <title>Google AMP - Amp Iframe</title>
      <link rel = "canonical" href = "http://example.ampproject.org/article-metadata.html">
      <meta name = "viewport" content = "width = device-width,  minimum-scale=1,initial-scale=1">

      <style amp-boilerplate>
         body{
            -webkit-animation:-amp-start 8s steps(1,end) 0s
            1 normal both;-moz-animation:
            -amp-start 8s steps(1,end) 0s 1 normal both;-ms-animation:
            -amp-start 8s steps(1,end) 0s 1 normal both;animation:
            -amp-start 8s steps(1,end) 0s 1 normal both
         }
         @-webkit-keyframes
         -amp-start{from{visibility:hidden}to{visibility:visible}}@-moz-keyframes
         -amp-start{from{visibility:hidden}to{visibility:visible}}@-ms-keyframes
         -amp-start{from{visibility:hidden}to{visibility:visible}}@-o-keyframes
         -amp-start{from{visibility:hidden}to{visibility:visible}}@keyframes
         -amp-start{from{visibility:hidden}to{visibility:visible}}
      </style>
      <noscript>
         <style amp-boilerplate>
            body{
               -webkit-animation:none;
               -moz-animation:none;
               -ms-animation:none;
               animation:none
            }
         </style>
      </noscript>

      <script async custom-element = "amp-iframe"
         src = "https://cdn.ampproject.org/v0/amp-iframe-0.1.js">
      </script>

      <style>
         div {
            height:850px;
            text-align:center;
         }
      </style>
   </head>
   <body>
      <h3>Google AMP - Amp Iframe</h3>

      <amp-iframe width = "600"
         title = "Google map"
         height = "400"
         layout = "responsive"
         sandbox = "allow-scripts allow-same-origin allow-popups"
         frameborder = "0"
         src = "https://maps.google.com/maps?q=telangana&t=&z=13&ie=UTF8&iwloc=&output=embed">

         <amp-img layout = "fill" src = "images/loading.jpg" placeholder></amp-img>
      </amp-iframe>
   </body>
</html>
我们使用 amp-img 作为占位符,如下 -
<amp-iframe width = "600"
   title = "Google map"
   height = "400"
   layout = "responsive"
   sandbox = "allow-scripts allow-same-origin allow-popups"
   frameborder = "0"
   src = "https://maps.google.com/maps?q=telangana&t=&z=13&ie = UTF8&iwloc = &output = embed">

   <amp-img layout = "fill" src = "images/loading.jpg" placeholder></amp-img>
</amp-iframe>
在这种情况下,不考虑 75% 视口中 600px 和 amp-iframe 的限制。图像上显示的加载指示器(三个点)用作占位符,这基本上用于 amp-iframe src。加载 iframe 内容后,图像将被删除,iframe 内容将显示在输出中,如下所示 -
输出


Google AMP - 视频
amp 中的 amp-video 是用于播放直接视频嵌入的标准 html5 视频。在本章中,让我们了解如何使用 amp-video。
要使用 amp-video,我们需要添加以下脚本 -
<script async custom-element = "amp-video"
   src = "https://cdn.ampproject.org/v0/amp-video-0.1.js">
</script>
amp-video 具有 src 属性,该属性具有要加载的视频资源,该资源由 amp 在运行时延迟加载。此外,所有功能与html5视频标签几乎相同。
以下是要添加到放大器视频的节点 -
源- 您可以使用此标签添加要播放的不同媒体文件。
Track - 此标签可让您启用视频的字幕。
占位符- 此占位符标签将在视频开始之前显示内容。
Fallback - 当浏览器不支持 HTML5 视频时将调用此标签。
amp-video 标签的格式
amp-video 标签的格式如下所示 -
<amp-video controls width = "640" height = "360"
   layout = "responsive" poster = "images/videoposter.png">
   <source src = "video/bunny.webm" type = "video/webm" />
   <source src = "video/samplevideo.mp4" type = "video/mp4" />

   <div fallback>
      <p>This browser does not support the video element.</p>
   </div>
</amp-video>
让我们使用如下所示的工作示例来理解 amp-video -
例子
<!doctype html>
<html amp lang = "en">
   <head>
      <meta charset = "utf-8">
      <script async src = "https://cdn.ampproject.org/v0.js"></script>
      <title>Google AMP - Amp Video</title>
      <link rel = "canonical" href =  "http://example.ampproject.org/article-metadata.html">
      <meta name = "viewport" content = "width = device-width, minimum-scale = 1,initial-scale=1">

      <style amp-boilerplate>
         body {
            -webkit-animation:
            -amp-start 8s steps(1,end) 0s 1 normal both;-moz-animation:
            -amp-start 8s steps(1,end) 0s 1 normal both;-ms-animation:
            -amp-start 8s steps(1,end) 0s 1 normal both;animation:
            -amp-start 8s steps(1,end) 0s 1 normal both}
         @-webkit-keyframes
         -amp-start{from{visibility:hidden}to{visibility:visible}}@-moz-keyframes
         -amp-start{from{visibility:hidden}to{visibility:visible}}@-ms-keyframes
         -amp-start{from{visibility:hidden}to{visibility:visible}}@-o-keyframes
         -amp-start{from{visibility:hidden}to{visibility:visible}}@keyframes
         -amp-start{from{visibility:hidden}to{visibility:visible}}
      </style>
      <noscript>
         <style amp-boilerplate>
            body {
               -webkit-animation:none;
               -moz-animation:none;
               -ms-animation:none;
               animation:none
            }
         </style>
      </noscript>

      <script async custom-element = "amp-video"
         src = "https://cdn.ampproject.org/v0/amp-video-0.1.js">
      </script>
   </head>
   <body>
      <h3>Google AMP - Amp Video</h3>
      <amp-video controls
         width = "640"
         height = "360"
         layout = "responsive"
         poster = "images/videoposter.png">
         <source src = "video/bunny.webm" type = "video/webm" />
         <source src = "video/samplevideo.mp4" type = "video/mp4" />

         <div fallback>
            <p>This browser does not support the video element.</p>
         </div>
      </amp-video>
   </body>
</html>
输出
上面给出的代码的输出如下所示 -

可用于 amp-video 的属性
amp-video 可用的属性列于此处的表中 -
| 先生编号 | 属性和描述 |
|---|---|
| 1 | 源代码 如果 <source> 节点不存在,则必须指定 src,并且它必须是 https:// url。 |
| 2 | 海报 海报采用视频开始前显示的 img url。 |
| 3 | 自动播放 如果浏览器支持,在 amp-video 上设置此属性将自动播放视频。视频将以静音模式播放,用户必须点击视频才能取消静音。 |
| 4 | 控制 在 amp-video 上设置此属性将在视频上显示类似于 html5 视频的控件。 |
| 5 | 环形 如果 amp-video 上存在此属性,则视频播放完毕后将再次播放。 |
| 6 | 跨域 如果播放视频的资源位于不同的来源,则此属性就会出现。 |
| 7 | 旋转至全屏 如果视频可见,则在用户将设备旋转为横向模式后,视频将显示全屏 |
自动播放 AMP 视频
如果我们需要自动播放视频,我们可以使用自动播放属性。此功能将根据浏览器支持工作。请注意,自动播放时视频将处于静音状态。当用户点击视频时,视频将取消静音。
让我们借助下面给出的工作示例来实现自动播放功能 -
例子
<!doctype html>
<html amp lang = "en">
   <head>
      <meta charset = "utf-8">
      <script async src = "https://cdn.ampproject.org/v0.js"></script>
      <title>Google AMP - Amp Video</title>
      <link rel = "canonical" href = "http://example.ampproject.org/article-metadata.html">

      <meta name = "viewport" content = "width=device-width,minimum-scale