- Ubuntu Tutorial
- Ubuntu - Home
- Ubuntu - Overview
- Ubuntu - Flavors
- Ubuntu - Environment
- Ubuntu - Device Drivers
- Ubuntu - Software Center
- Ubuntu - Browsers
- Ubuntu - Email
- Ubuntu - Messaging
- Ubuntu - Media Players
- Ubuntu - User Management
- Ubuntu - Files & Folders
- Ubuntu - Word Writer
- Ubuntu - Spreadsheets
- Ubuntu - LibreOffice
- Ubuntu - Command Line
- Ubuntu - Scripting
- Ubuntu - Networking
- Ubuntu - Server Installation
- Ubuntu - Secure Shell
- Ubuntu - Development
- Ubuntu - Nginx
- Ubuntu - Virtual Machines
- Ubuntu - Installing MySQL & Python
- Ubuntu - Node.js
- Ubuntu - Docker
- Ubuntu - On the Cloud
- Ubuntu Useful Resources
- Ubuntu - Quick Guide
- Ubuntu - Useful Resources
- Ubuntu - Discussion
Ubuntu - 安装 MySQL 和 Python
MySQL和Python分别是著名的数据库和开发软件。它们通常安装在基于 Linux 的系统上。让我们看看如何将它们安装在 Ubuntu 服务器环境上。
安装Python
首先要做的是找出系统上安装的Python版本是什么。我们可以通过以下命令找到它。
Python –v
其中–v选项指定显示安装的 Python 版本。以下屏幕截图显示了上述命令的输出示例。

从上面的输出中,我们可以看到安装的Python版本是2.7版本。
还有另一种方法可以通过以下命令查看Python是否安装。
Python –V
Python3 –V
后面的命令用于查看安装的 Python 版本 3。

如果我们想安装最新版本的Python,那么我们需要发出以下语句。
sudo apt-get install python3
上面的命令将下载 Python 所需的包并进行安装。
安装MySQL
要安装MySQL,需要遵循以下步骤。
步骤 1 - 发出 apt-get 命令以确保所有操作系统软件包都是最新的。
sudo apt-get update

步骤 2 - 更新所有软件包后,就可以获取 MySQL 的软件包了。
sudo apt-get install mysql-server
上面的命令将开始下载 MySQL 的所有相关包。
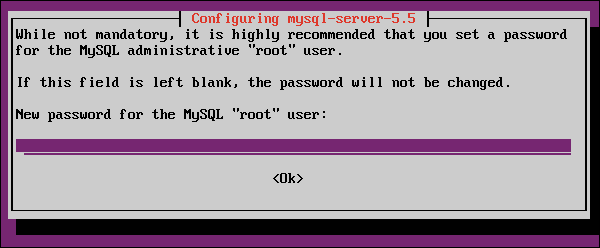
下载完成并开始安装后,安装程序将首先要求配置 root 密码。
步骤 3 - 输入所需的密码,然后单击“确定”按钮。它还会提示重新输入密码。

步骤 4 - 要查看 MySQL 进程正在运行,请运行以下命令。
ps –ef | grep mysql
下面的截图显示了mysqld ,它是在后台运行的mysql的守护进程。

步骤 5 - 要配置 mysql,请运行以下命令。
/usr/bin/mysql_secure_installation

提示输入root密码,该密码是在安装过程中输入的。
步骤 6 - 输入密码并按 Enter 键。
现在,它会提示我们是否要更改root密码。
步骤 7 - 输入“N”表示“否”并继续。
它再次提示我们是否要删除匿名访问。

步骤 8 - 当从此数据库上的其他计算机连接时,建议将匿名用户的默认选项保留为“ N ”,并禁止远程 root 登录。

步骤 9 - 建议将“删除测试数据库”选项也提供为“否” 。我们可以输入“ Y ”来重新加载权限表。
最后MySQL的配置就完成了。