- OpenCV 教程
- OpenCV - 主页
- OpenCV - 概述
- OpenCV - 环境
- OpenCV - 存储图像
- OpenCV - 读取图像
- OpenCV - 写入图像
- OpenCV-图形用户界面
- 绘图功能
- OpenCV - 画一个圆
- OpenCV - 画一条线
- OpenCV - 绘制矩形
- OpenCV - 绘制椭圆
- OpenCV - 绘制折线
- OpenCV - 绘制凸折线
- OpenCV - 绘制箭头线
- OpenCV - 添加文本
- 过滤
- OpenCV - 双边滤波器
- OpenCV - 盒式过滤器
- OpenCV - SQRBox 滤波器
- OpenCV - Filter2D
- OpenCV - 膨胀
- OpenCV - 侵蚀
- OpenCV - 形态运算
- OpenCV - 图像Pyramid
- 摄像头和人脸检测
- OpenCV - 使用相机
- OpenCV - 图片中的人脸检测
- 使用相机进行人脸检测
- OpenCV 有用资源
- OpenCV - 快速指南
- OpenCV - 有用的资源
- OpenCV - 讨论
OpenCV - 快速指南
OpenCV - 概述
OpenCV 是一个跨平台库,我们可以使用它来开发实时计算机视觉应用程序。它主要专注于图像处理、视频捕获和分析,包括人脸检测和物体检测等功能。
让我们从定义术语“计算机视觉”开始本章。
计算机视觉
计算机视觉可以定义为一门学科,它解释如何根据场景中存在的结构的属性从 2D 图像重建、中断和理解 3D 场景。它涉及使用计算机软件和硬件建模和复制人类视觉。
计算机视觉与以下领域有显着重叠 -
图像处理- 它专注于图像处理。
模式识别- 它解释了对模式进行分类的各种技术。
摄影测量- 它涉及从图像中获得准确的测量结果。
计算机视觉与图像处理
图像处理涉及图像到图像的转换。图像处理的输入和输出都是图像。
计算机视觉是根据物理对象的图像对物理对象进行明确、有意义的描述。计算机视觉的输出是 3D 场景中结构的描述或解释。
计算机视觉的应用
在这里,我们列出了计算机视觉大量使用的一些主要领域。
机器人应用
定位 - 自动确定机器人位置
导航
避障
组装(钉孔、焊接、喷漆)
操纵(例如PUMA机器人操纵器)
人机交互 (HRI) - 与人类交互和服务的智能机器人
医药应用
- 分类和检测(例如病变或细胞分类和肿瘤检测)
- 2D/3D 分割
- 3D人体器官重建(MRI或超声波)
- 视觉引导机器人手术
工业自动化应用
- 工业检验(缺陷检测)
- 集会
- 条形码和包装标签读取
- 对象排序
- 文档理解(例如 OCR)
安全应用
生物识别(虹膜、指纹、人脸识别)
监视 - 检测某些可疑活动或Behave
交通应用
- 自动驾驶汽车
- 安全,例如驾驶员警惕性监控
OpenCV 库的特点
使用 OpenCV 库,您可以 -
读取和写入图像
捕捉并保存视频
处理图像(过滤、变换)
执行特征检测
检测视频或图像中的特定对象,例如面部、眼睛、汽车。
分析视频,即估计其中的运动、减去背景并跟踪其中的对象。
OpenCV 最初是用 C++ 开发的。除此之外,还提供了 Python 和 Java 绑定。OpenCV 可以运行在各种操作系统上,例如 windows、Linux、OSx、FreeBSD、Net BSD、Open BSD 等。
本教程通过使用 Java 绑定的示例解释了 OpenCV 的概念。
OpenCV 库模块
以下是 OpenCV 库的主要库模块。
核心功能
该模块涵盖了用于构建 OpenCV 应用程序的基本数据结构,例如标量、点、范围等。除此之外,它还包括多维数组Mat,用于存储图像。在 OpenCV 的 Java 库中,该模块作为一个名为org.opencv.core 的包包含在内。
图像处理
该模块涵盖了各种图像处理操作,例如图像过滤、几何图像变换、色彩空间转换、直方图等。在 OpenCV 的 Java 库中,该模块作为名为 org.opencv.imgproc 的包包含在内。
视频
该模块涵盖了视频分析概念,例如运动估计、背景扣除和对象跟踪。在 OpenCV 的 Java 库中,该模块作为一个名为org.opencv.video 的包包含在内。
视频输入/输出
本模块介绍了使用 OpenCV 库的视频捕获和视频编解码器。在 OpenCV 的 Java 库中,该模块作为一个名为org.opencv.videoio 的包包含在内。
校准3d
该模块包括有关基本多视图几何算法、单立体相机校准、物体姿态估计、立体对应和 3D 重建元素的算法。在 OpenCV 的 Java 库中,该模块作为一个名为org.opencv.calib3d 的包包含在内。
二维特征
该模块包括特征检测和描述的概念。在 OpenCV 的 Java 库中,该模块作为一个名为org.opencv.features2d 的包包含在内。
对象检测
该模块包括对预定义类的对象和实例的检测,例如面部、眼睛、杯子、人、汽车等。在 OpenCV 的 Java 库中,该模块作为名为 org.opencv.objdetect 的包包含在内。
高级图形界面
这是一个易于使用的界面,具有简单的 UI 功能。在 OpenCV 的 Java 库中,该模块的功能包含在两个不同的包中,即org.opencv.imgcodecs和org.opencv.videoio。
OpenCV 简史
OpenCV 最初是英特尔的一项研究计划,旨在为 CPU 密集型应用程序提供建议。它于1999年正式推出。
- 2006年,它的第一个主要版本OpenCV 1.0发布。
- 2009年10月,第二个主要版本OpenCV 2发布。
- 2012 年 8 月,OpenCV 被非营利组织 OpenCV.org 收购。
OpenCV - 环境
在本章中,您将学习如何安装 OpenCV 并在系统中设置其环境。
安装 OpenCV
首先,您需要将 OpenCV 下载到您的系统上。请按照下面给出的步骤操作。
步骤 1 -单击以下链接打开OpenCV的主页: http://opencv.org/单击后,您将看到其主页,如下所示。
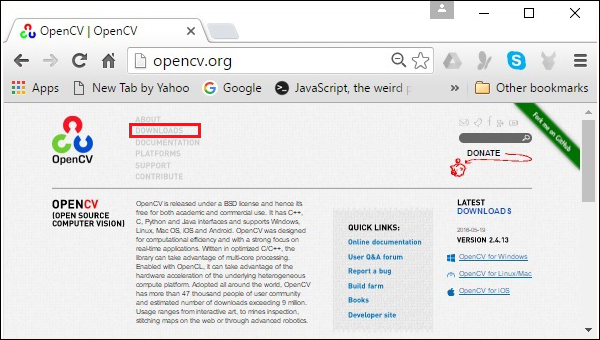
步骤 2 - 现在,单击上面屏幕截图中突出显示的下载链接。单击后,您将进入 OpenCV 的下载页面。
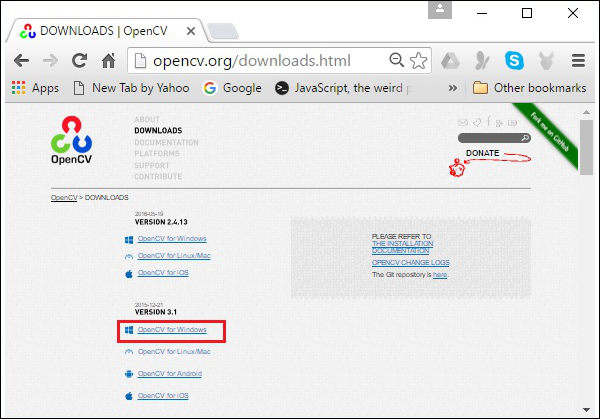
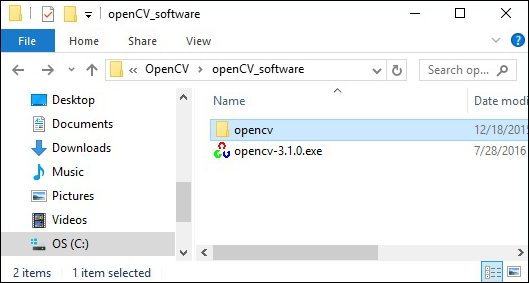
步骤 3 - 单击上面屏幕截图中突出显示的链接,将下载一个名为opencv-3.1.0.exe的文件。解压该文件以在系统中生成一个文件夹opencv,如下图所示。
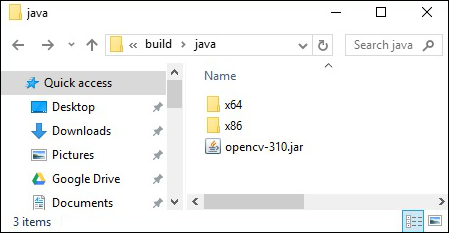
步骤 4 - 打开文件夹OpenCV → build → java。在这里您将找到名为opencv-310.jar的 OpenCV jar 文件。将此文件保存在单独的文件夹中以供进一步使用。
Eclipse 安装
下载所需的 JAR 文件后,您必须将这些 JAR 文件嵌入到您的 Eclipse 环境中。您可以通过设置这些 JAR 文件的构建路径并使用pom.xml来完成此操作。
设置构建路径
以下是在 Eclipse 中设置 OpenCV 的步骤 -
步骤 1 - 确保您已在系统中安装 Eclipse。如果没有,请在您的系统中下载并安装 Eclipse。
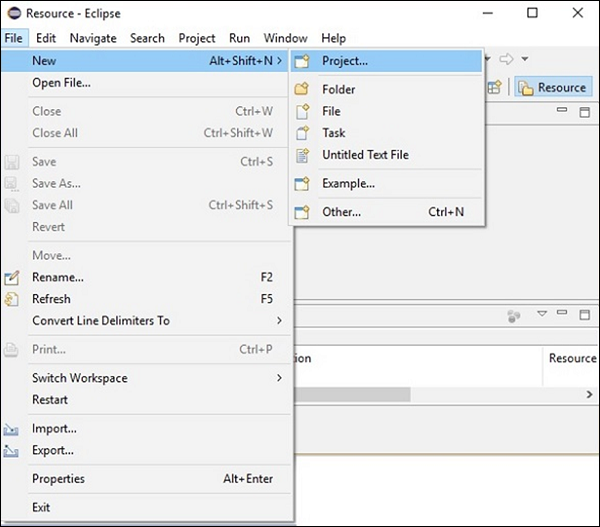
步骤 2 - 打开 Eclipse,单击“文件”、“新建”,然后打开一个新项目,如以下屏幕截图所示。
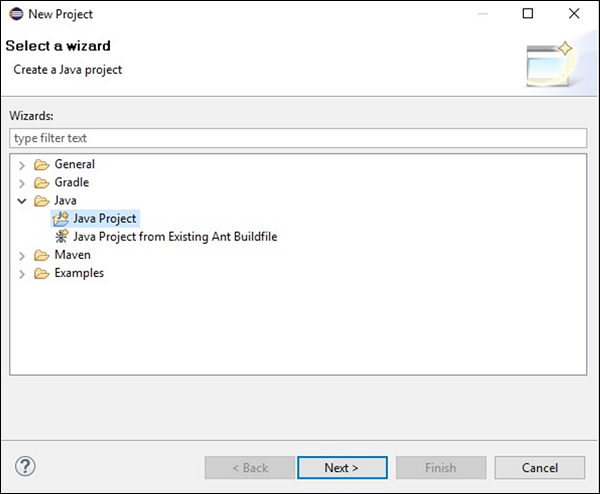
步骤 3 - 选择项目后,您将获得新建项目向导。在此向导中,选择 Java 项目并单击“下一步”按钮继续,如以下屏幕截图所示。
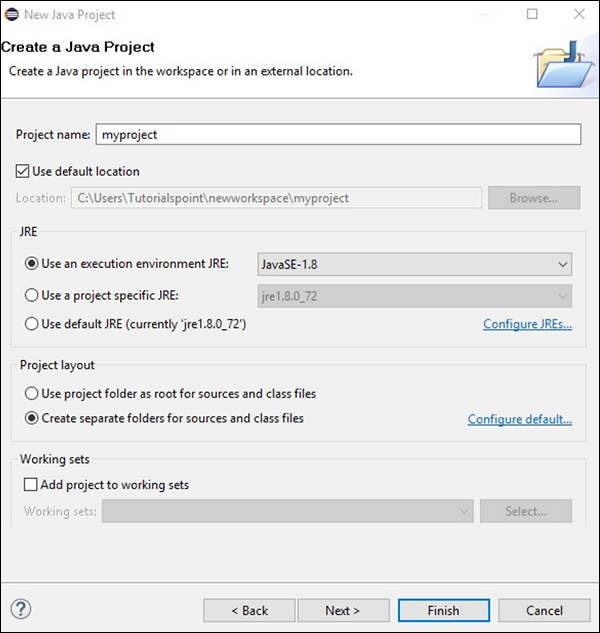
步骤 4 - 继续操作时,您将被引导至“新建 Java 项目”向导。创建一个新项目,然后单击“下一步”,如下图所示。
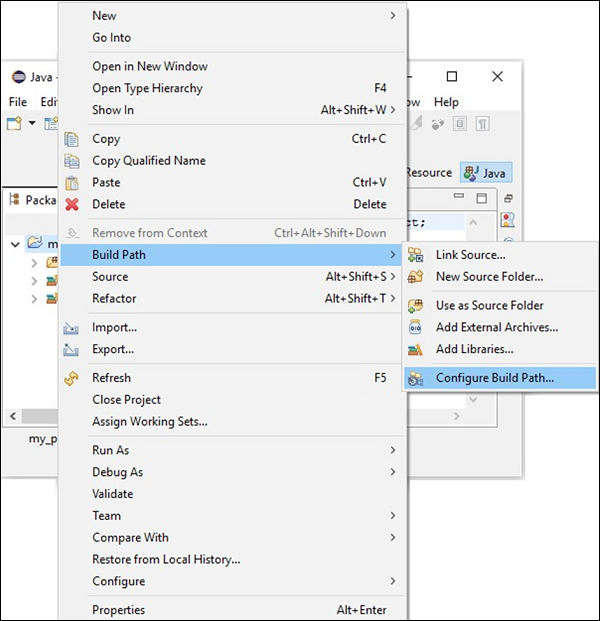
步骤 5 - 创建新项目后,右键单击它。选择构建路径并单击配置构建路径...,如以下屏幕截图所示。
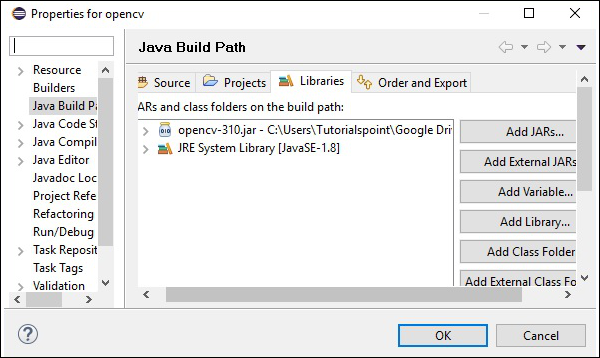
步骤 6 - 单击“构建路径”选项后,您将进入“Java 构建路径”向导。单击添加外部 JAR按钮,如以下屏幕截图所示。
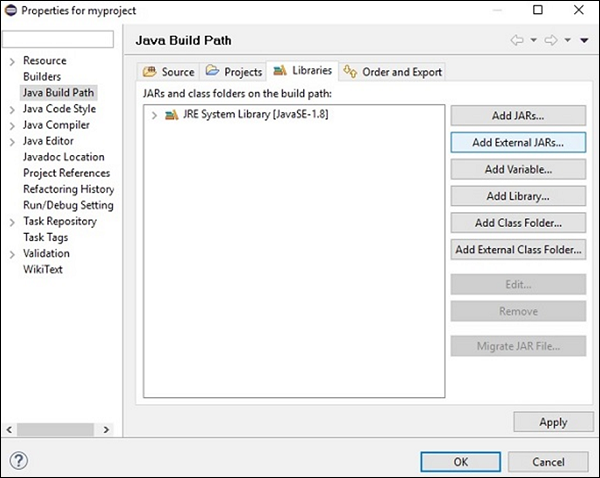
步骤 7 - 选择保存文件opencv-310.jar的路径。
步骤 8 - 单击上面屏幕截图中的“打开”按钮后,这些文件将添加到您的库中。
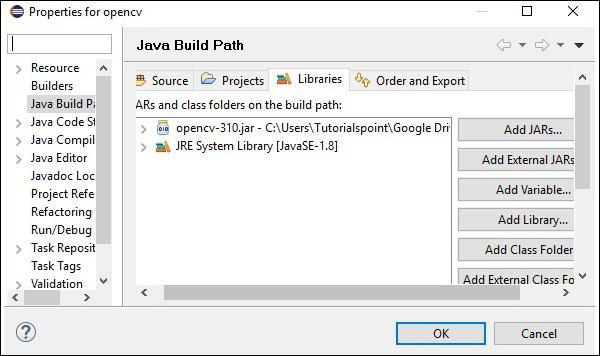
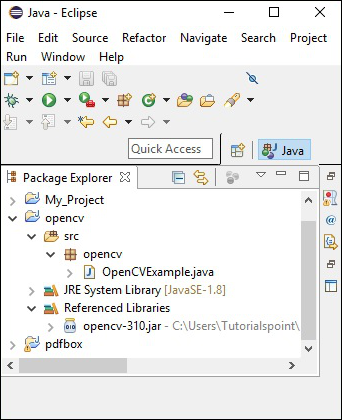
步骤 9 - 单击“确定”后,您将成功将所需的 JAR 文件添加到当前项目,并且可以通过展开引用的库来验证这些添加的库。
设置本机库的路径
除了 JAR 文件之外,您还需要设置 OpenCV 的本机库(DLL 文件)的路径。
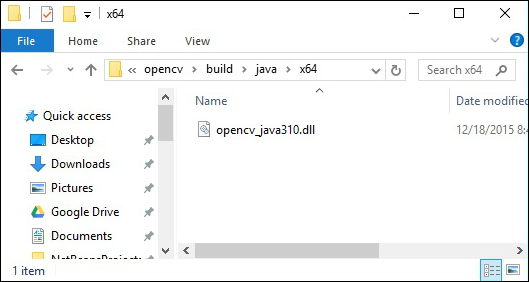
DLL 文件的位置- 打开OpenCV的安装文件夹并转到子文件夹build → java。在这里您将找到两个文件夹x64(64位)和x86(32位),其中包含OpenCV的dll文件。

打开适合您操作系统的相应文件夹,然后您可以看到dll文件,如下图所示。
现在,也按照下面给出的步骤设置该文件的路径 -
步骤 1 - 再次打开 JavaBuildPath 窗口。在这里您可以观察添加的 JAR 文件和JRE 系统库。
步骤 2 - 展开时,您将获得系统库和本机库位置,如以下屏幕截图中突出显示的那样。
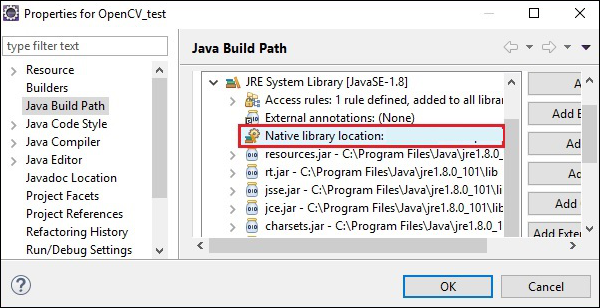
步骤 3 - 双击本机库位置。在这里,您可以看到本机库文件夹配置窗口,如下所示。

在这里,单击“外部文件夹...”按钮,然后选择dll文件在系统中的位置。
OpenCV - 存储图像
为了捕捉图像,我们使用相机和扫描仪等设备。这些设备记录图像的数值(例如:像素值)。OpenCV是一个处理数字图像的库,因此我们需要存储这些图像进行处理。
OpenCV库的Mat类用于存储图像的值。它表示一个n维数组,用于存储灰度或彩色图像、体素体积、向量场、点云、张量、直方图等图像数据。
该类由两个数据部分组成:标头和指针
标头- 包含矩阵的大小、存储方法和地址(大小恒定)等信息。
指针- 存储图像的像素值(不断变化)。
垫子课
OpenCV Java 库在包org.opencv.core中提供了具有相同名称 ( Mat )的此类。
构造函数
OpenCV Java库的Mat类有各种构造函数,您可以使用它们构造Mat对象。
| 序列号 | 构造函数和描述 |
|---|---|
| 1 |
垫() 在大多数情况下,这是不带参数的默认构造函数。我们使用它来构造函数创建一个空矩阵并将其传递给其他 OpenCV 方法。 |
| 2 |
Mat(int 行, int 列, int 类型) 此构造函数接受三个整数类型参数,表示二维数组中的行数和列数以及数组的类型(用于存储数据)。 |
| 3 |
Mat(int 行, int 列, int 类型, 标量) 包括前一个构造函数的参数,这个构造函数还接受一个 Scalar 类的对象作为参数。 |
| 4 |
Mat(尺寸大小,int类型) 该构造函数接受两个参数,一个表示矩阵大小的对象和一个表示用于存储数据的数组类型的整数。 |
| 5 |
Mat(尺寸大小,int类型,标量s) 包括前一个构造函数的参数,这个构造函数还接受一个 Scalar 类的对象作为参数。 |
| 6 | 垫(长地址) |
| 7 |
Mat(Mat m, 范围 rowRange) 该构造函数接受另一个矩阵的对象和 Range 类的对象,该对象表示创建新矩阵所需的行范围。 |
| 8 |
Mat(Mat m, 范围 rowRange, 范围 colRange) 包括前一个构造函数的参数,该构造函数还接受该类的一个对象。Range 表示列范围。 |
| 9 |
Mat(Mat m, 矩形 roi) 该构造函数接受两个对象,一个代表另一个矩阵,另一个代表感兴趣的区域。 |
注意-
数组类型。使用 CV_8UC1, ..., CV_64FC4 创建 1-4 通道矩阵,或使用 CV_8UC(n), ..., CV_64FC(n) 创建多通道(最多 CV_CN_MAX 个通道)矩阵。
矩阵的类型由属于org.opencv.core包的CvType类的各个字段表示。
方法和说明
以下是 Mat 类提供的一些方法。
| 序列号 | 方法和说明 |
|---|---|
| 1 |
垫列(int x) 此方法接受表示列索引的整数参数,并检索并返回该列。 |
| 2 |
垫子行(int y) 此方法接受表示行索引的整数参数,并检索并返回该行。 |
| 3 |
int 列() 此方法返回矩阵中的列数。 |
| 4 |
int 行() 此方法返回矩阵中的行数。 |
| 5 |
Mat setTo(Mat 值) 此方法接受Mat类型的对象并将数组元素设置为指定值。 |
| 6 |
Mat setTo(标量 s) 此方法接受标量类型的对象并将数组元素设置为指定值。 |
创建和显示矩阵
在本节中,我们将讨论第一个 OpenCV 示例。我们将了解如何创建和显示一个简单的 OpenCV 矩阵。
下面给出了在 OpenCV 中创建和显示矩阵所需遵循的步骤。
第1步:加载OpenCV原生库
使用 OpenCV 库编写 Java 代码时,您需要做的第一步是使用 loadLibrary ()加载 OpenCV 的本机库。加载 OpenCV 本机库,如下所示。
//Loading the core library
System.loadLibrary(Core.NATIVE_LIBRARY_NAME);
第 2 步:实例化 Mat 类
使用本章前面提到的任何函数实例化 Mat 类。
//Creating a matrix
Mat matrix = new Mat(5, 5, CvType.CV_8UC1, new Scalar(0));
步骤 3:使用方法填充矩阵
您可以通过将索引值传递给方法row()/col() 来检索矩阵的特定行/列。
并且,您可以使用setTo()方法的任何变体为这些值设置值。
//Retrieving the row with index 0
Mat row0 = matrix.row(0);

//setting values of all elements in the row with index 0
row0.setTo(new Scalar(1));

//Retrieving the row with index 3
Mat col3 = matrix.col(3);

//setting values of all elements in the row with index 3
col3.setTo(new Scalar(3));
例子
您可以使用以下程序代码使用 OpenCV 库在 Java 中创建和显示一个简单的矩阵。
import org.opencv.core.Core;
import org.opencv.core.Mat;
import org.opencv.core.CvType;
import org.opencv.core.Scalar;

class DisplayingMatrix {
   public static void main(String[] args) {
      //Loading the core library
      System.loadLibrary(Core.NATIVE_LIBRARY_NAME);

      //Creating a matrix
      Mat matrix = new Mat(5, 5, CvType.CV_8UC1, new Scalar(0));

      //Retrieving the row with index 0
      Mat row0 = matrix.row(0);

      //setting values of all elements in the row with index 0
      row0.setTo(new Scalar(1));

      //Retrieving the row with index 3
      Mat col3 = matrix.col(3);

      //setting values of all elements in the row with index 3
      col3.setTo(new Scalar(3));

      //Printing the matrix
      System.out.println("OpenCV Mat data:\n" + matrix.dump());
   }
}
执行上述程序时,您将得到以下输出 -
OpenCV Mat data:
[  1,   1,   1,   3,   1;
   0,   0,   0,   3,   0;
   0,   0,   0,   3,   0;
   0,   0,   0,   3,   0;
   0,   0,   0,   3,   0]
使用 JavaSE API 加载图像
java.awt.image.BufferedImage包的BufferedImage类用于存储图像,而import javax.imageio包的ImageIO类提供了读取和写入图像的方法。
例子
您可以使用以下程序代码使用 JavaSE 库加载和保存图像。
import java.awt.image.BufferedImage;
import java.io.File;
import java.io.IOException;
import javax.imageio.ImageIO;

public class LoadingImage_JSE_library {
   public static void main( String[] args ) throws IOException {
      //Input File
      File input = new File("C:/EXAMPLES/OpenCV/sample.jpg");

      //Reading the image
      BufferedImage image = ImageIO.read(input);

      //Saving the image with a different name
      File ouptut = new File("C:/OpenCV/sample.jpg");
      ImageIO.write(image, "jpg", ouptut);

      System.out.println("image Saved");
   }
}
执行上述程序时,您将得到以下输出 -
image Saved
如果打开指定的路径,您可以观察保存的图像,如下所示 -

OpenCV - 读取图像
org.opencv.imgcodecs包的 Imgcodecs 类提供了读取和写入图像的方法。使用 OpenCV,您可以读取图像并将其存储在矩阵中(如果需要,可以对矩阵执行转换)。稍后,您可以将处理后的矩阵写入文件。
Imgcodecs类的 read() 方法用于使用OpenCV 读取图像。以下是该方法的语法。
imread(filename)
它接受一个参数(filename),一个 String 类型的变量,表示要读取的文件的路径。
下面给出了使用 OpenCV 库在 Java 中读取图像的步骤。
第1步:加载OpenCV原生库
使用load()方法加载 OpenCV 原生库,如下所示。
//Loading the core library
System.loadLibrary(Core.NATIVE_LIBRARY_NAME);
第2步:实例化Imgcodecs类
实例化Imgcodecs类。
//Instantiating the Imgcodecs class
Imgcodecs imageCodecs = new Imgcodecs();
第三步:读取图像
使用方法imread()读取图像。此方法接受表示图像路径的字符串参数,并返回读取为Mat对象的图像。
//Reading the Image from the file
Mat matrix = imageCodecs.imread(Path of the image);
例子
以下程序代码显示了如何使用 OpenCV 库读取图像。
import org.opencv.core.Core;
import org.opencv.core.Mat;
import org.opencv.imgcodecs.Imgcodecs;

public class ReadingImages {
   public static void main(String args[]) {
      //Loading the OpenCV core library
      System.loadLibrary( Core.NATIVE_LIBRARY_NAME );

      //Instantiating the Imagecodecs class
      Imgcodecs imageCodecs = new Imgcodecs();

      //Reading the Image from the file
      String file ="C:/EXAMPLES/OpenCV/sample.jpg";
      Mat matrix = imageCodecs.imread(file);

      System.out.println("Image Loaded");
   }
}
执行上述程序时,OpenCV 加载指定的图像并显示以下输出 -
Image Loaded
OpenCV - 写入图像
Imgcodecs类的 write() 方法用于使用OpenCV 写入图像。要写入图像,请重复上一示例中的前三个步骤。
要写入图像,您需要调用Imgcodecs类的imwrite()方法。
以下是该方法的语法。
imwrite(filename, mat)
该方法接受以下参数 -
filename -表示保存文件的路径的字符串变量。
mat -表示要写入的图像的Mat对象。
例子
以下程序是使用 OpenCV 库使用 Java 程序编写图像的示例。
import org.opencv.core.Core;
import org.opencv.core.Mat;
import org.opencv.imgcodecs.Imgcodecs;

public class WritingImages {
   public static void main(String args[]) {
      //Loading the OpenCV core library
      System.loadLibrary(Core.NATIVE_LIBRARY_NAME);

      //Instantiating the imagecodecs class
      Imgcodecs imageCodecs = new Imgcodecs();

      //Reading the Image from the file and storing it in to a Matrix object
      String file ="C:/EXAMPLES/OpenCV/sample.jpg";
      Mat matrix = imageCodecs.imread(file);

      System.out.println("Image Loaded ..........");
      String file2 = "C:/EXAMPLES/OpenCV/sample_resaved.jpg";

      //Writing the image
      imageCodecs.imwrite(file2, matrix);
      System.out.println("Image Saved ............");
   }
}
执行上述程序时,您将得到以下输出 -
Image Loaded ..........
Image Saved ...........
如果打开指定路径,可以观察保存的图像,如下所示 -

OpenCV-图形用户界面
在前面的章节中,我们讨论了如何使用 OpenCV Java 库读取和保存图像。除此之外,我们还可以使用 AWT/Swings 和 JavaFX 等 GUI 库在单独的窗口中显示加载的图像。
将 Mat 转换为缓冲图像
要读取图像,我们使用方法imread()。该方法以Matrix的形式返回读取的图像。但是,要将此图像与 GUI 库(AWT/Swings 和 JavaFX)一起使用,应将其转换为包java.awt.image.BufferedImage的BufferedImage类的对象。
以下是将OpenCV 的Mat对象转换为BufferedImage对象的步骤。
第 1 步:将 Mat 编码为 MatOfByte
首先,您需要将矩阵转换为字节矩阵。您可以使用Imgcodecs类的方法imencode()来完成此操作。以下是该方法的语法。
imencode(ext, image, matOfByte);
该方法接受以下参数 -
Ext - 指定图像格式(.jpg、.png 等)的字符串参数
image - 图像的 Mat 对象
matOfByte - MatOfByte 类的空对象
使用此方法对图像进行编码,如下所示。
//Reading the image
Mat image = Imgcodecs.imread(file);

//instantiating an empty MatOfByte class
MatOfByte matOfByte = new MatOfByte();

//Converting the Mat object to MatOfByte
Imgcodecs.imencode(".jpg", image, matOfByte);
步骤 2:将 MatOfByte 对象转换为字节数组
使用toArray()方法将MatOfByte对象转换为字节数组。
byte[] byteArray = matOfByte.toArray();
第三步:准备InputStream对象
通过将上一步中创建的字节数组传递给ByteArrayInputStream类的构造函数来准备 InputStream 对象。
//Preparing the InputStream object
InputStream in = new ByteArrayInputStream(byteArray);
第四步:准备InputStream对象
将上一步中创建的输入流对象传递给ImageIO类的read()方法。这将返回一个 BufferedImage 对象。
//Preparing the BufferedImage
BufferedImage bufImage = ImageIO.read(in);
使用 AWT/Swings 显示图像
要使用 AWT/Swings 框架显示图像,首先,使用imread()方法读取图像,并按照上述步骤将其转换为BufferedImage 。
然后,实例化JFrame类并将创建的缓冲图像添加到 JFrame 的 ContentPane 中,如下所示 -
//Instantiate JFrame
JFrame frame = new JFrame();

//Set Content to the JFrame
frame.getContentPane().add(new JLabel(new ImageIcon(bufImage)));
frame.pack();
frame.setVisible(true);
例子
以下程序代码展示了如何使用 OpenCV 库读取图像并通过 swing 窗口显示它。
import java.awt.image.BufferedImage;

import java.io.ByteArrayInputStream;
import java.io.InputStream;

import javax.imageio.ImageIO;
import javax.swing.ImageIcon;
import javax.swing.JFrame;
import javax.swing.JLabel;

import org.opencv.core.Core;
import org.opencv.core.Mat;
import org.opencv.core.MatOfByte;
import org.opencv.imgcodecs.Imgcodecs;

public class DisplayingImagesUsingSwings {
   public static void main(String args[]) throws Exception {
      //Loading the OpenCV core library
      System.loadLibrary( Core.NATIVE_LIBRARY_NAME );

      //Reading the Image from the file and storing it in to a Matrix object
      String file = "C:/EXAMPLES/OpenCV/sample.jpg";
      Mat image = Imgcodecs.imread(file);

      //Encoding the image
      MatOfByte matOfByte = new MatOfByte();
      Imgcodecs.imencode(".jpg", image, matOfByte);

      //Storing the encoded Mat in a byte array
      byte[] byteArray = matOfByte.toArray();

      //Preparing the Buffered Image
      InputStream in = new ByteArrayInputStream(byteArray);
      BufferedImage bufImage = ImageIO.read(in);

      //Instantiate JFrame
      JFrame frame = new JFrame();

      //Set Content to the JFrame
      frame.getContentPane().add(new JLabel(new ImageIcon(bufImage)));
      frame.pack();
      frame.setVisible(true);

      System.out.println("Image Loaded");
   }
}
执行上述程序时,您将得到以下输出 -
Image Loaded
除此之外,您还可以看到一个显示加载图像的窗口,如下所示 -
使用 JavaFX 显示图像
要使用 JavaFX 显示图像,首先,使用imread()方法读取图像并将其转换为BufferedImage。然后,将BufferedImage转换为WritableImage,如下所示。
WritableImage writableImage = SwingFXUtils.toFXImage(bufImage, null);
将此WritableImage对象传递给ImageView类的构造函数。
ImageView imageView = new ImageView(writableImage);
例子
以下程序代码展示了如何使用 OpenCV 库读取图像并通过 JavaFX 窗口显示它。
import java.awt.image.BufferedImage;

import java.io.ByteArrayInputStream;
import java.io.IOException;
import java.io.InputStream;

import javafx.application.Application;
import javafx.embed.swing.SwingFXUtils;
import javafx.scene.Group;
import javafx.scene.Scene;
import javafx.scene.image.ImageView;
import javafx.scene.image.WritableImage;
import javafx.stage.Stage;

import javax.imageio.ImageIO;

import org.opencv.core.Core;
import org.opencv.core.Mat;
import org.opencv.core.MatOfByte;
import org.opencv.imgcodecs.Imgcodecs;

public class DisplayingImagesJavaFX extends Application {
   @Override
   public void start(Stage stage) throws IOException {
      WritableImage writableImage = loadImage();

      //Setting the image view
      ImageView imageView = new ImageView(writableImage);

      //Setting the position of the image
      imageView.setX(50);
      imageView.setY(25);

      //setting the fit height and width of the image view
      imageView.setFitHeight(400);
      imageView.setFitWidth(500);

      //Setting the preserve ratio of the image view
      imageView.setPreserveRatio(true);

      //Creating a Group object
      Group root = new Group(imageView);

      //Creating a scene object
      Scene scene = new Scene(root, 600, 400);

      //Setting title to the Stage
      stage.setTitle("Loading an image");

      //Adding scene to the stage
      stage.setScene(scene);

      //Displaying the contents of the stage
      stage.show();
   }
   public WritableImage loadImage() throws IOException {
      //Loading the OpenCV core library
      System.loadLibrary( Core.NATIVE_LIBRARY_NAME );

      //Reading the Image from the file and storing it in to a Matrix object
      String file ="C:/EXAMPLES/OpenCV/sample.jpg";
      Mat image = Imgcodecs.imread(file);

      //Encoding the image
      MatOfByte matOfByte = new MatOfByte();
      Imgcodecs.imencode(".jpg", image, matOfByte);

      //Storing the encoded Mat in a byte array
      byte[] byteArray = matOfByte.toArray();

      //Displaying the image
      InputStream in = new ByteArrayInputStream(byteArray);
      BufferedImage bufImage = ImageIO.read(in);

      System.out.println("Image Loaded");
      WritableImage writableImage = SwingFXUtils.toFXImage(bufImage, null);
      return writableImage;
   }
   public static void main(String args[]) {
      launch(args);
   }
}
执行上述程序时,您将得到以下输出 -
Image Loaded
除此之外,您还可以看到一个显示加载图像的窗口,如下所示 -
OpenCV - IMREAD_XXX 标志
OpenCV 支持各种类型的图像,如彩色、二值、灰度等。使用imread()方法和Imgcodecs类的预定义字段,您可以将给定图像读取为另一种类型。
imread()方法的flags参数(IMREAD_XXX)
在前面的章节中,我们已经了解了Imgcodecs类的imread()方法的语法。它接受一个字符串参数,表示要读取的图像的位置。
imread(filename)
imread ()方法有另一种语法。
imread(filename, int flags)
此语法接受两个参数 -
filename - 它接受一个参数(filename),一个 String 类型的变量,表示要读取的文件的路径。
flags - 表示预定义标志值的整数值。对于每个值,这会将给定图像读取为特定类型(灰度颜色等)
下表列出了Imgproc类中提供的作为此参数值的各个字段。
| 序列号 | 字段和描述 |
|---|---|
| 1 |
IMREAD_COLOR 如果该标志设置为此值,则加载的图像将转换为 3 通道 BGR(蓝绿红)彩色图像。 |
| 2 |
IMREAD_GRAYSCALE 如果该标志设置为此值,则加载的图像将转换为单通道灰度图像。 |
| 3 |
IMREAD_LOAD_GDAL 如果该标志设置为此值,则可以使用gdal驱动程序加载图像。 |
| 4 |
IMREAD_ANYCOLOR 如果该标志设置为此值,则将以任何可能的颜色格式读取图像。 |
| 5 |
IMREAD_REDUCED_COLOR_2 IMREAD_REDUCED_COLOR_4 IMREAD_REDUCED_COLOR_8 如果该标志设置为该值,则图像被读取为三通道BGR,并且图像的尺寸被减小到相对于所使用的场的 图像原始尺寸的1/2、1/ 4或1/8 。 |
| 6 |
IMREAD_REDUCED_GRAYSCALE_2 IMREAD_REDUCED_GRAYSCALE_4 IMREAD_REDUCED_GRAYSCALE_8 如果该标志设置为该值,则图像被读取为单通道灰度图像,并且图像的尺寸相对于所使用的场缩小至图像原始尺寸的1/2、1/ 4或1/8。 |
| 7 |
IMREAD_未更改 如果该标志设置为此值,则加载的图像将按原样返回。 |
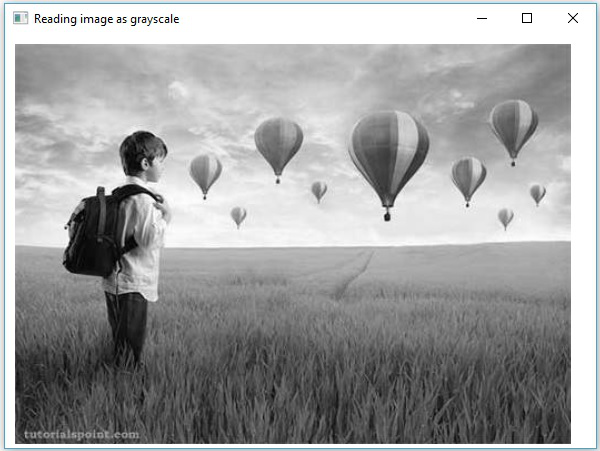
OpenCV - 将图像读取为灰度
以下程序演示了如何将彩色图像读取为灰度并使用 JavaFX 窗口显示它。在这里,我们通过传递标志IMREAD_GRAYSCALE以及保存彩色图像路径的字符串来读取图像。
import java.awt.image.BufferedImage;

import org.opencv.core.Core;
import org.opencv.core.Mat;
import org.opencv.imgcodecs.Imgcodecs;

import javafx.application.Application;
import javafx.embed.swing.SwingFXUtils;
import javafx.scene.Group;
import javafx.scene.Scene;
import javafx.scene.image.ImageView;
import javafx.scene.image.WritableImage;
import javafx.stage.Stage;

public class ReadingAsGrayscale extends Application {
   @Override
   public void start(Stage stage) throws Exception {
      WritableImage writableImage = loadAndConvert();

      // Setting the image view
      ImageView imageView = new ImageView(writableImage);

      // Setting the position of the image
      imageView.setX(10);
      imageView.setY(10);

      // setting the fit height and width of the image view
      imageView.setFitHeight(400);
      imageView.setFitWidth(600);

      // Setting the preserve ratio of the image view
      imageView.setPreserveRatio(true);

      // Creating a Group object
      Group root = new Group(imageView);

      // Creating a scene object
      Scene scene = new Scene(root, 600, 400);

      // Setting title to the Stage
      stage.setTitle("Reading image as grayscale");

      // Adding scene to the stage
      stage.setScene(scene);

      // Displaying the contents of the stage
      stage.show();
   }
   public WritableImage loadAndConvert() throws Exception {
      // Loading the OpenCV core library
      System.loadLibrary( Core.NATIVE_LIBRARY_NAME );

      // Instantiating the imagecodecs class
      Imgcodecs imageCodecs = new Imgcodecs();

      String input = "C:/EXAMPLES/OpenCV/sample.jpg";

      // Reading the image
      Mat src = imageCodecs.imread(input, Imgcodecs.IMREAD_GRAYSCALE);

      byte[] data1 = new byte[src.rows() * src.cols() * (int)(src.elemSize())];
      src.get(0, 0, data1);

      // Creating the buffered image
      BufferedImage bufImage = new BufferedImage(src.cols(),src.rows(),
         BufferedImage.TYPE_BYTE_GRAY);

      // Setting the data elements to the image
      bufImage.getRaster().setDataElements(0, 0, src.cols(), src.rows(), data1);

      // Creating a WritableImage
      WritableImage writableImage = SwingFXUtils.toFXImage(bufImage, null);
      System.out.println("Image Read");
      return writableImage;
   }
   public static void main(String args[]) throws Exception {
      launch(args);
   }
}
输入图像
假设以下是上述程序中指定的输入图像sample.jpg 。

输出图像
执行程序时,您将得到以下输出。
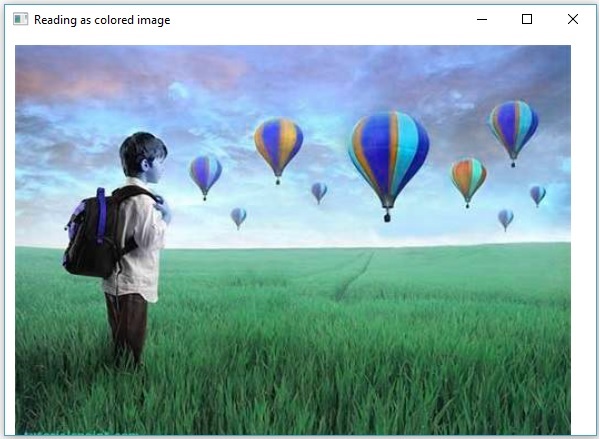
OpenCV - 将图像读取为 BGR
以下程序演示了如何读取彩色图像作为 BGR 类型图像并使用 JavaFX 窗口显示它。在这里,我们通过将标志IMREAD_COLOR以及保存彩色图像路径的字符串传递给方法imread()来读取图像。
import java.awt.image.BufferedImage;

import org.opencv.core.Core;
import org.opencv.core.Mat;
import org.opencv.imgcodecs.Imgcodecs;

import javafx.application.Application;
import javafx.embed.swing.SwingFXUtils;
import javafx.scene.Group;
import javafx.scene.Scene;
import javafx.scene.image.ImageView;
import javafx.scene.image.WritableImage;
import javafx.stage.Stage;

public class ReadingAsColored extends Application {
   @Override
   public void start(Stage stage) throws Exception {
      WritableImage writableImage = loadAndConvert();

      // Setting the image view
      ImageView imageView = new ImageView(writableImage);

      // Setting the position of the image
      imageView.setX(10);
      imageView.setY(10);

      // setting the fit height and width of the image view
      imageView.setFitHeight(400);
      imageView.setFitWidth(600);

      // Setting the preserve ratio of the image view
      imageView.setPreserveRatio(true);

      // Creating a Group object
      Group root = new Group(imageView);

      // Creating a scene object
      Scene scene = new Scene(root, 600, 400);

      // Setting title to the Stage
      stage.setTitle("Reading as colored image");

      // Adding scene to the stage
      stage.setScene(scene);

      // Displaying the contents of the stage
      stage.show();
   }
   public WritableImage loadAndConvert() throws Exception {
      // Loading the OpenCV core library
      System.loadLibrary( Core.NATIVE_LIBRARY_NAME );

      String input = "C:/EXAMPLES/OpenCV/sample.jpg";

      Mat dst = new Mat();

      // Reading the image
      Mat src = Imgcodecs.imread(input, Imgcodecs.IMREAD_COLOR);

      byte[] data1 = new byte[src.rows() * src.cols() * (int)(src.elemSize())];
      src.get(0, 0, data1);

      // Creating the buffered image
      BufferedImage bufImage = new BufferedImage(src.cols(),src.rows(),
         BufferedImage.TYPE_3BYTE_BGR);

      // Setting the data elements to the image
      bufImage.getRaster().setDataElements(0, 0, src.cols(), src.rows(), data1);

      // Creating a WritableImage
      WritableImage writableImage = SwingFXUtils.toFXImage(bufImage, null);

      System.out.println("Image read");
      return writableImage;
   }
   public static void main(String args[]) throws Exception {
      launch(args);
   }
}
输入图像
假设以下是上述程序中指定的输入图像sample.jpg 。
输出图像
执行程序时,您将得到以下输出。
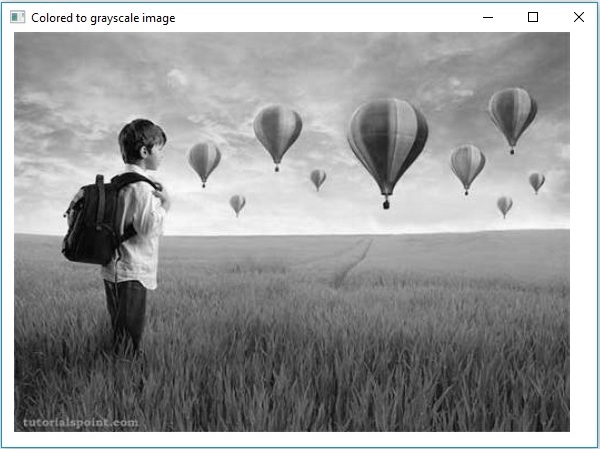
OpenCV - 彩色图像转灰度
在前面的章节中,我们讨论了如何将输入图像读取为不同类型(二进制、灰度、BGR 等)。在本章中,我们将学习如何将一种类型的图像转换为另一种类型的图像。
org.opencv.imgproc包中名为Imgproc的类提供了将图像从一种颜色转换为另一种颜色的方法。
将彩色图像转换为灰度图像
名为cvtColor()的方法用于将彩色图像转换为灰度图像。以下是该方法的语法。
cvtColor(Mat src, Mat dst, int code)
该方法接受以下参数 -
src - 表示源的矩阵。
dst - 表示目的地的矩阵。
code - 表示转换类型的整数代码,例如 RGB 到灰度。
您可以通过将代码Imgproc.COLOR_RGB2GRAY以及源矩阵和目标矩阵作为参数传递给cvtColor()方法,将彩色图像转换为灰度图像。
例子
以下程序演示了如何将彩色图像读取为灰度图像并使用 JavaFX 窗口显示它。
import java.awt.image.BufferedImage;

import org.opencv.core.Core;
import org.opencv.core.Mat;
import org.opencv.imgcodecs.Imgcodecs;
import org.opencv.imgproc.Imgproc;

import javafx.application.Application;
import javafx.embed.swing.SwingFXUtils;
import javafx.scene.Group;
import javafx.scene.Scene;
import javafx.scene.image.ImageView;
import javafx.scene.image.WritableImage;

import javafx.stage.Stage;

public class ColorToGrayscale extends Application {
   @Override
   public void start(Stage stage) throws Exception {
      WritableImage writableImage = loadAndConvert();

      // Setting the image view
      ImageView imageView = new ImageView(writableImage);

      // Setting the position of the image
      imageView.setX(10);
      imageView.setY(10);

      // setting the fit height and width of the image view
      imageView.setFitHeight(400);
      imageView.setFitWidth(600);

      // Setting the preserve ratio of the image view
      imageView.setPreserveRatio(true);

      // Creating a Group object
      Group root = new Group(imageView);

      // Creating a scene object
      Scene scene = new Scene(root, 600, 400);

      // Setting title to the Stage
      stage.setTitle("Colored to grayscale image");

      // Adding scene to the stage
      stage.setScene(scene);

      // Displaying the contents of the stage
      stage.show();
   }
   public WritableImage loadAndConvert() throws Exception {
      //Loading the OpenCV core library
      System.loadLibrary( Core.NATIVE_LIBRARY_NAME );

      String input = "C:/EXAMPLES/OpenCV/sample.jpg";

      //Reading the image
      Mat src = Imgcodecs.imread(input);

      //Creating the empty destination matrix
      Mat dst = new Mat();

      //Converting the image to gray sacle and saving it in the dst matrix
      Imgproc.cvtColor(src, dst, Imgproc.COLOR_RGB2GRAY);

      //Extracting data from the transformed image (dst)
      byte[] data1 = new byte[dst.rows() * dst.cols() * (int)(dst.elemSize())];
      dst.get(0, 0, data1);

      //Creating Buffered image using the data
      BufferedImage bufImage = new BufferedImage(dst.cols(),dst.rows(),
         BufferedImage.TYPE_BYTE_GRAY);

      //Setting the data elements to the image
      bufImage.getRaster().setDataElements(0, 0, dst.cols(), dst.rows(), data1);

      //Creating a WritableImage
      WritableImage writableImage = SwingFXUtils.toFXImage(bufImage, null);
      System.out.println("Converted to Grayscale");
      return writableImage;
   }
   public static void main(String args[]) throws Exception {
      launch(args);
   }
}
输入图像
假设以下是上述程序中指定的输入图像sample.jpg 。
输出图像
执行程序时,您将得到以下输出。
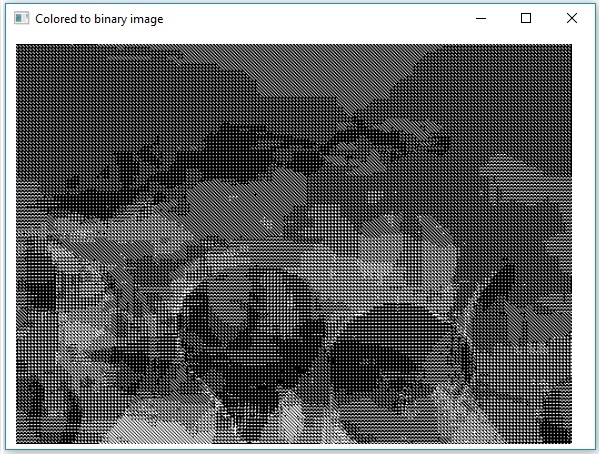
OpenCV - 彩色图像到二进制
一种称为threshold()的方法用于将灰度图像转换为二值图像。以下是该方法的语法。
threshold(Mat src, Mat dst, double thresh, double maxval, int type)
该方法接受以下参数 -
mat -表示输入图像的Mat对象。
dst -表示输出图像的Mat对象。
thresh - 表示阈值的整数。
maxval - 表示与 THRESH_BINARY 和 THRESH_BINARY_INV 阈值类型一起使用的最大值的整数。
type - 表示转换类型的整数代码,例如 RGB 到灰度。
您可以通过将代码Imgproc.THRESH_BINARY以及值传递给其余参数来将灰度图像转换为二进制图像。
例子
以下程序演示了如何将彩色图像读取为二进制图像并使用 JavaFX 窗口显示它。
import java.awt.image.BufferedImage;
import org.opencv.core.Core;
import org.opencv.core.Mat;
import org.opencv.imgcodecs.Imgcodecs;
import org.opencv.imgproc.Imgproc;
import javafx.application.Application;
import javafx.embed.swing.SwingFXUtils;
import javafx.scene.Group;
import javafx.scene.Scene;
import javafx.scene.image.ImageView;
import javafx.scene.image.WritableImage;
import javafx.stage.Stage;
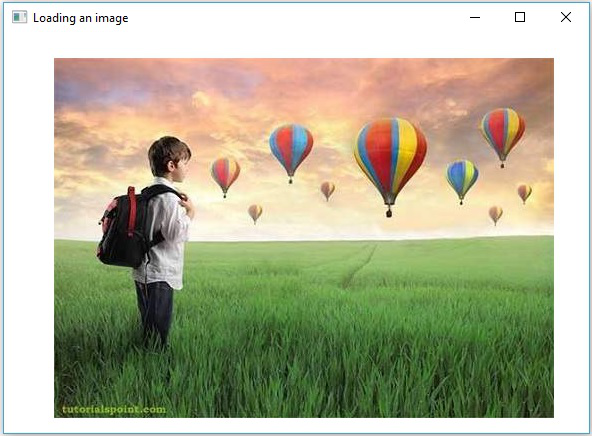
public class ColorToBinary extends Application {
@Override
public void start(Stage stage) throws Exception {
WritableImage writableImage = loadAndConvert();
// Setting the image view
ImageView imageView = new ImageView(writableImage);
// Setting the position of the image
imageView.setX(10);
imageView.setY(10);
// setting the fit height and width of the image view
imageView.setFitHeight(400);
imageView.setFitWidth(600);
// Setting the preserve ratio of the image view
imageView.setPreserveRatio(true);
// Creating a Group object
Group root = new Group(imageView);
// Creating a scene object
Scene scene = new Scene(root, 600, 400);
// Setting title to the Stage
stage.setTitle("Loading an image");
// Adding scene to the stage
stage.setScene(scene);
// Displaying the contents of the stage
stage.show();
}
public WritableImage loadAndConvert() throws Exception {
// Loading the OpenCV core library
System.loadLibrary( Core.NATIVE_LIBRARY_NAME );
// Instantiating the Imgcodecs class
Imgcodecs imageCodecs = new Imgcodecs();
// File input = new File("C:/EXAMPLES/OpenCV/sample.jpg");
String input = "C:/EXAMPLES/OpenCV/sample.jpg";
// Reading the image
Mat src = imageCodecs.imread(input);
// Creating the destination matrix
Mat dst = new Mat();
// Converting to binary image...
Imgproc.threshold(src, dst, 200, 500, Imgproc.THRESH_BINARY);
// Extracting data from the transformed image (dst)
byte[] data1 = new byte[dst.rows() * dst.cols() * (int)(dst.elemSize())];
dst.get(0, 0, data1);
// Creating Buffered image using the data
BufferedImage bufImage = new BufferedImage(dst.cols(),dst.rows(),
BufferedImage.TYPE_BYTE_GRAY);
// Setting the data elements to the image
bufImage.getRaster().setDataElements(0, 0, dst.cols(), dst.rows(), data1);
// Creating a Writable image
WritableImage writableImage = SwingFXUtils.toFXImage(bufImage, null);
System.out.println("Converted to binary");
return writableImage;
}
public static void main(String args[]) throws Exception {
launch(args);
}
}
输入图像
假设以下是上述程序中指定的输入图像sample.jpg 。
输出图像
执行程序时,您将得到以下输出。
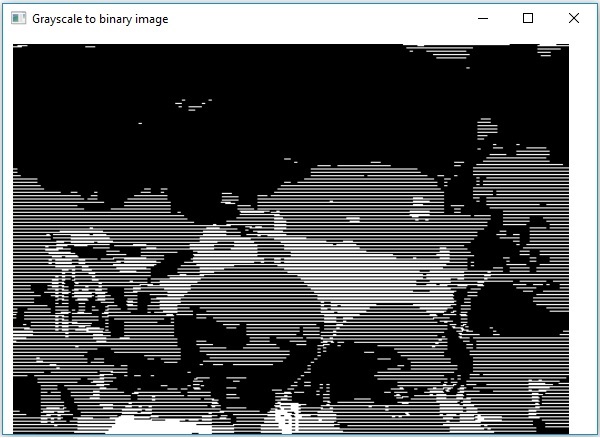
OpenCV - 灰度到二进制
您可以使用上一章中提到的相同方法将灰度图像转换为二值图像。只需将灰度图像的路径作为该程序的输入传递即可。
例子
以下程序演示了如何将灰度图像读取为二进制图像并使用 JavaFX 窗口显示它。
import java.awt.image.BufferedImage;

import org.opencv.core.Core;
import org.opencv.core.Mat;
import org.opencv.imgcodecs.Imgcodecs;
import org.opencv.imgproc.Imgproc;

import javafx.application.Application;
import javafx.embed.swing.SwingFXUtils;
import javafx.scene.Group;
import javafx.scene.Scene;
import javafx.scene.image.ImageView;
import javafx.scene.image.WritableImage;
import javafx.stage.Stage;

public class GrayScaleToBinary extends Application {
   @Override
   public void start(Stage stage) throws Exception {
      WritableImage writableImage = loadAndConvert();

      // Setting the image view
      ImageView imageView = new ImageView(writableImage);

      // Setting the position of the image
      imageView.setX(10);
      imageView.setY(10);

      // Setting the fit height and width of the image view
      imageView.setFitHeight(400);
      imageView.setFitWidth(600);

      // Setting the preserve ratio of the image view
      imageView.setPreserveRatio(true);

      // Creating a Group object
      Group root = new Group(imageView);

      // Creating a scene object
      Scene scene = new Scene(root, 600, 400);

      // Setting title to the Stage
      stage.setTitle("Grayscale to binary image");

      // Adding scene to the stage
      stage.setScene(scene);

      // Displaying the contents of the stage
      stage.show();
   }
   public WritableImage loadAndConvert() throws Exception {
      // Loading the OpenCV core library
      System.loadLibrary( Core.NATIVE_LIBRARY_NAME );

      // Instantiating the imagecodecs class
      Imgcodecs imageCodecs = new Imgcodecs();

      String input = "E:/OpenCV/chap7/grayscale.jpg";

      // Reading the image
      Mat src = imageCodecs.imread(input);

      // Creating the destination matrix
      Mat dst = new Mat();

      // Converting to binary image...
      Imgproc.threshold(src, dst, 200, 500, Imgproc.THRESH_BINARY);

      // Extracting data from the transformed image (dst)
      byte[] data1 = new byte[dst.rows() * dst.cols() * (int)(dst.elemSize())];
      dst.get(0, 0, data1);

      // Creating Buffered image using the data
      BufferedImage bufImage = new BufferedImage(dst.cols(),dst.rows(),
         BufferedImage.TYPE_BYTE_BINARY);

      // Setting the data elements to the image
      bufImage.getRaster().setDataElements(0, 0, dst.cols(), dst.rows(), data1);

      // Creating a Writable image
      WritableImage writableImage = SwingFXUtils.toFXImage(bufImage, null);

      System.out.println("Converted to binary");
      return writableImage;
   }
   public static void main(String args[]) throws Exception {
      launch(args);
   }
}
输入图像
假设以下是上述程序中指定的输入图像sample.jpg 。
输出图像
执行程序时,您将得到以下输出。
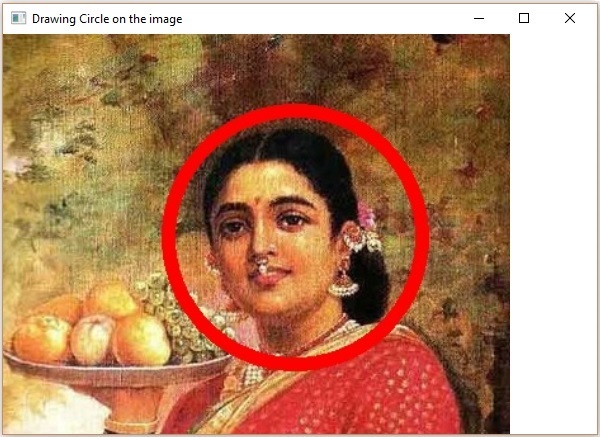
OpenCV - 画一个圆
您可以使用org.opencv.imgproc包的相应方法在图像上绘制各种形状,如圆形、矩形、直线、椭圆形、折线、凸形、折线、折线。
您可以使用imgproc类的Circle()方法在图像上绘制圆形。以下是该方法的语法 -
circle(img, center, radius, color, thickness)
该方法接受以下参数 -
mat - 一个Mat对象,表示要在其上绘制圆的图像。
point -代表圆心的Point对象。
radius -表示圆半径的整数类型变量。
scalar -表示圆的颜色的标量对象。(BGR)
厚度-表示圆的厚度的整数;默认情况下,厚度值为 1。
例子
以下程序演示了如何在图像上绘制圆圈并使用 JavaFX 窗口显示它。
import java.awt.image.BufferedImage;

import java.io.ByteArrayInputStream;
import java.io.InputStream;
import javax.imageio.ImageIO;

import javafx.application.Application;
import javafx.embed.swing.SwingFXUtils;
import javafx.scene.Group;
import javafx.scene.Scene;
import javafx.scene.image.ImageView;
import javafx.scene.image.WritableImage;
import javafx.stage.Stage;

import org.opencv.core.Core;
import org.opencv.core.Mat;
import org.opencv.core.MatOfByte;
import org.opencv.core.Point;
import org.opencv.core.Scalar;
import org.opencv.imgcodecs.Imgcodecs;
import org.opencv.imgproc.Imgproc;

public class DrawingCircle extends Application {
   Mat matrix = null;

   @Override
   public void start(Stage stage) throws Exception {
      // Capturing the snapshot from the camera
      DrawingCircle obj = new DrawingCircle();
      WritableImage writableImage = obj.LoadImage();

      // Setting the image view
      ImageView imageView = new ImageView(writableImage);

      // setting the fit height and width of the image view
      imageView.setFitHeight(600);
      imageView.setFitWidth(600);

      // Setting the preserve ratio of the image view
      imageView.setPreserveRatio(true);

      // Creating a Group object
      Group root = new Group(imageView);

      // Creating a scene object
      Scene scene = new Scene(root, 600, 400);

      // Setting title to the Stage
      stage.setTitle("Drawing Circle on the image");

      // Adding scene to the stage
      stage.setScene(scene);

      // Displaying the contents of the stage
      stage.show();
   }
   public WritableImage LoadImage() throws Exception {
      // Loading the OpenCV core library
      System.loadLibrary( Core.NATIVE_LIBRARY_NAME );

      // Reading the Image from the file and storing it in to a Matrix object
      String file ="E:/OpenCV/chap8/input.jpg";
      Mat matrix = Imgcodecs.imread(file);

      //Drawing a Circle
      Imgproc.circle (
         matrix,                 //Matrix obj of the image
         new Point(230, 160),    //Center of the circle
         100,                    //Radius
         new Scalar(0, 0, 255),  //Scalar object for color
         10                      //Thickness of the circle
      );

      // Encoding the image
      MatOfByte matOfByte = new MatOfByte();
      Imgcodecs.imencode(".jpg", matrix, matOfByte);

      // Storing the encoded Mat in a byte array
      byte[] byteArray = matOfByte.toArray();

      // Displaying the image
      InputStream in = new ByteArrayInputStream(byteArray);
      BufferedImage bufImage = ImageIO.read(in);
      this.matrix = matrix;

      // Creating the Writable Image
      WritableImage writableImage = SwingFXUtils.toFXImage(bufImage, null);

      return writableImage;
   }
   public static void main(String args[]) {
      launch(args);
   }
}
执行上述程序时,您将得到以下输出 -
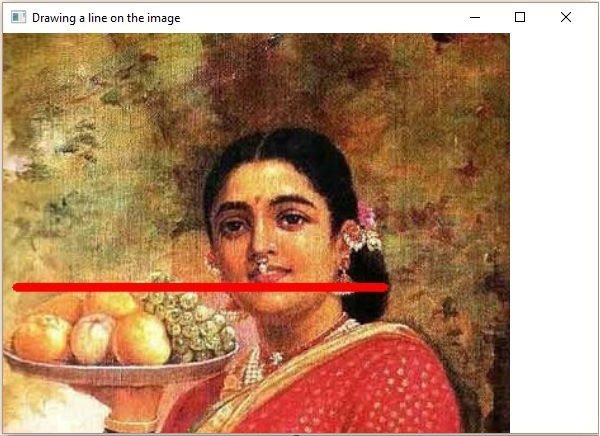
OpenCV - 画一条线
您可以使用imgproc类的line()方法在图像上绘制一条线。以下是该方法的语法。
line(img, pt1, pt2, color, thickness)
该方法接受以下参数 -
mat - 一个Mat对象,表示要在其上绘制线条的图像。
pt1 和 pt2 - 两个Point对象,表示要在其之间绘制线的点。
scalar -表示圆的颜色的标量对象。(BGR)
厚度- 表示线条粗细的整数;默认情况下,厚度值为 1。
例子
以下程序演示了如何在图像上绘制一条线并使用 JavaFX 窗口显示它。
import java.awt.image.BufferedImage;

import java.io.ByteArrayInputStream;
import java.io.InputStream;
import javax.imageio.ImageIO;

import javafx.application.Application;
import javafx.embed.swing.SwingFXUtils;
import javafx.scene.Group;
import javafx.scene.Scene;
import javafx.scene.image.ImageView;
import javafx.scene.image.WritableImage;
import javafx.stage.Stage;

import org.opencv.core.Core;
import org.opencv.core.Mat;
import org.opencv.core.MatOfByte;
import org.opencv.core.Point;
import org.opencv.core.Scalar;
import org.opencv.imgcodecs.Imgcodecs;
import org.opencv.imgproc.Imgproc;

public class DrawingLine extends Application {
   Mat matrix = null;

   @Override
   public void start(Stage stage) throws Exception {

      // Capturing the snapshot from the camera
      DrawingLine obj = new DrawingLine();
      WritableImage writableImage = obj.LoadImage();

      // Setting the image view
      ImageView imageView = new ImageView(writableImage);

      // setting the fit height and width of the image view
      imageView.setFitHeight(600);
      imageView.setFitWidth(600);

      // Setting the preserve ratio of the image view
      imageView.setPreserveRatio(true);

      // Creating a Group object
      Group root = new Group(imageView);

      // Creating a scene object
      Scene scene = new Scene(root, 600, 400);

      // Setting title to the Stage
      stage.setTitle("Drawing a line on the image");

      // Adding scene to the stage
      stage.setScene(scene);

      // Displaying the contents of the stage
      stage.show();
   }
   public WritableImage LoadImage() throws Exception {
      // Loading the OpenCV core library
      System.loadLibrary( Core.NATIVE_LIBRARY_NAME );

      // Reading the Image from the file and storing it in to a Matrix object
      String file ="E:/OpenCV/chap8/input.jpg";
      Mat matrix = Imgcodecs.imread(file);

      // Drawing a line
      Imgproc.line (
         matrix,                    //Matrix obj of the image
         new Point(10, 200),        //p1
         new Point(300, 200),       //p2
         new Scalar(0, 0, 255),     //Scalar object for color
         5                          //Thickness of the line
      );
      // Encoding the image
      MatOfByte matOfByte = new MatOfByte();
      Imgcodecs.imencode(".jpg", matrix, matOfByte);

      // Storing the encoded Mat in a byte array
      byte[] byteArray = matOfByte.toArray();

      // Displaying the image
      InputStream in = new ByteArrayInputStream(byteArray);
      BufferedImage bufImage = ImageIO.read(in);

      this.matrix = matrix;

      // Creating the Writable Image
      WritableImage writableImage = SwingFXUtils.toFXImage(bufImage, null);
      return writableImage;
   }
   public static void main(String args[]) {
      launch(args);
   }
}
执行上述程序时,您将得到以下输出 -
OpenCV - 绘制矩形
您可以使用imgproc类的矩形方法在图像上绘制矩形。以下是该方法的语法 -
rectangle(img, pt1, pt2, color, thickness)
该方法接受以下参数 -
mat - Mat对象代表