- OpenCV 教程
- OpenCV - 主页
- OpenCV - 概述
- OpenCV - 环境
- OpenCV - 存储图像
- OpenCV - 读取图像
- OpenCV - 写入图像
- OpenCV-图形用户界面
- 绘图功能
- OpenCV - 画一个圆
- OpenCV - 画一条线
- OpenCV - 绘制矩形
- OpenCV - 绘制椭圆
- OpenCV - 绘制折线
- OpenCV - 绘制凸折线
- OpenCV - 绘制箭头线
- OpenCV - 添加文本
- 过滤
- OpenCV - 双边滤波器
- OpenCV - 盒式过滤器
- OpenCV - SQRBox 滤波器
- OpenCV - Filter2D
- OpenCV - 膨胀
- OpenCV - 侵蚀
- OpenCV - 形态运算
- OpenCV - 图像Pyramid
- 摄像头和人脸检测
- OpenCV - 使用相机
- OpenCV - 图片中的人脸检测
- 使用相机进行人脸检测
- OpenCV 有用资源
- OpenCV - 快速指南
- OpenCV - 有用的资源
- OpenCV - 讨论
OpenCV - 使用相机
在本章中,我们将学习如何使用 OpenCV 使用系统相机捕获帧。org.opencv.videoio包的 VideoCapture 类包含使用相机捕获视频的类和方法。让我们一步一步学习如何捕获帧 -
第1步:加载OpenCV原生库
使用 OpenCV 库编写 Java 代码时,您需要做的第一步是使用 loadLibrary ()加载 OpenCV 的本机库。加载 OpenCV 本机库,如下所示。
// Loading the core library
System.loadLibrary(Core.NATIVE_LIBRARY_NAME);
步骤2:实例化视频捕捉类
使用本教程前面提到的任何函数实例化 Mat 类。
// Instantiating the VideoCapture class (camera:: 0)
VideoCapture capture = new VideoCapture(0);
第三步:读取帧
您可以使用VideoCapture类的read()方法从相机读取帧。此方法接受Mat类的对象来存储读取的帧。
// Reading the next video frame from the camera
Mat matrix = new Mat();
capture.read(matrix);
例子
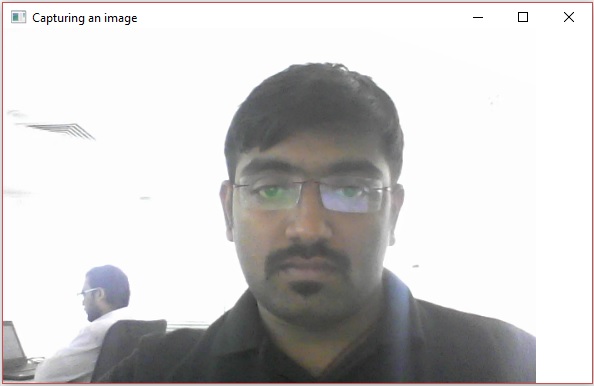
以下程序演示了如何使用相机捕获帧并使用 JavaFX 窗口显示它。它还保存捕获的帧。
import java.awt.image.BufferedImage;
import java.awt.image.DataBufferByte;
import java.awt.image.WritableRaster;

import java.io.FileNotFoundException;
import java.io.IOException;

import javafx.application.Application;
import javafx.embed.swing.SwingFXUtils;
import javafx.scene.Group;
import javafx.scene.Scene;
import javafx.scene.image.ImageView;
import javafx.scene.image.WritableImage;
import javafx.stage.Stage;

import org.opencv.core.Core;
import org.opencv.core.Mat;
import org.opencv.imgcodecs.Imgcodecs;
import org.opencv.videoio.VideoCapture;

public class CameraSnapshotJavaFX extends Application {
   Mat matrix = null;

   @Override
   public void start(Stage stage) throws FileNotFoundException, IOException {
      // Capturing the snapshot from the camera
      CameraSnapshotJavaFX obj = new CameraSnapshotJavaFX();
      WritableImage writableImage = obj.capureSnapShot();

      // Saving the image
      obj.saveImage();

      // Setting the image view
      ImageView imageView = new ImageView(writableImage);

      // setting the fit height and width of the image view
      imageView.setFitHeight(400);
      imageView.setFitWidth(600);

      // Setting the preserve ratio of the image view
      imageView.setPreserveRatio(true);

      // Creating a Group object
      Group root = new Group(imageView);

      // Creating a scene object
      Scene scene = new Scene(root, 600, 400);

      // Setting title to the Stage
      stage.setTitle("Capturing an image");

      // Adding scene to the stage
      stage.setScene(scene);

      // Displaying the contents of the stage
      stage.show();
   }
   public WritableImage capureSnapShot() {
      WritableImage WritableImage = null;

      // Loading the OpenCV core library
      System.loadLibrary( Core.NATIVE_LIBRARY_NAME );

      // Instantiating the VideoCapture class (camera:: 0)
      VideoCapture capture = new VideoCapture(0);

      // Reading the next video frame from the camera
      Mat matrix = new Mat();
      capture.read(matrix);

      // If camera is opened
      if( capture.isOpened()) {
         // If there is next video frame
         if (capture.read(matrix)) {
            // Creating BuffredImage from the matrix
            BufferedImage image = new BufferedImage(matrix.width(),
               matrix.height(), BufferedImage.TYPE_3BYTE_BGR);

            WritableRaster raster = image.getRaster();
            DataBufferByte dataBuffer = (DataBufferByte) raster.getDataBuffer();
            byte[] data = dataBuffer.getData();
            matrix.get(0, 0, data);
            this.matrix = matrix;

            // Creating the Writable Image
            WritableImage = SwingFXUtils.toFXImage(image, null);
         }
      }
      return WritableImage;
   }
   public void saveImage() {
      // Saving the Image
      String file = "E:/OpenCV/chap22/sanpshot.jpg";

      // Instantiating the imgcodecs class
      Imgcodecs imageCodecs = new Imgcodecs();

      // Saving it again
      imageCodecs.imwrite(file, matrix);
   }
   public static void main(String args[]) {
      launch(args);
   }
}
输出
执行程序时,您将得到以下输出。

如果打开指定的路径,您可以观察到保存为jpg文件的同一帧。